Table of Contents
Permanent Placement #
There are two ways to access the placement screen as will be described below but both must be accessed from the Position record.
- Go to the Position tab in the main menu.
- Search for the job for which you want to make a placement.
- Click on the Job Title
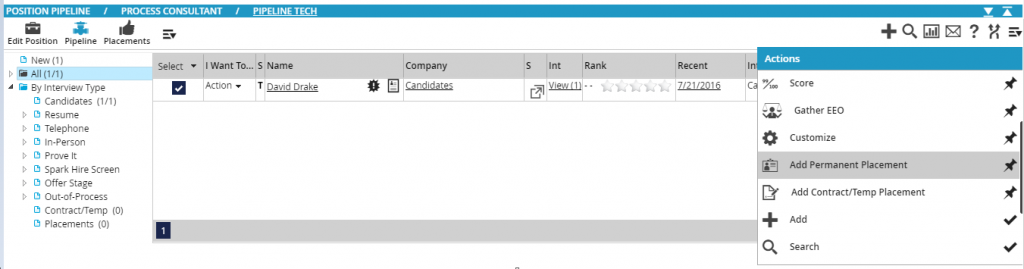
- Click on the ‘Placements’ icon in the navigation menu.
- Click on the actions dropdown and select ‘Add Permanent Placement’.

- Go to the Position tab in the main menu.
- Search for the job for which you want to make a placement.
- Click on the Job Title
- Click on the Pipeline icon in the navigation menu.
- Place a checkmark next to the candidate’s name in the Pipeline.
- Click on the actions dropdown and select ‘Add Permanent Placement’.
 Placement Screen #
- Candidate Name: Click the dropdown to the right of this field to display a list of all candidates in the pipeline to select as being placed or you can search for a candidate by typing in [Last Name], [First Name] and click ‘List’
- Start Date: By clicking in this field a calendar will be brought up where you can select the candidate’s starting date and time. The default is the current date
- Placement Date: By clicking in this field a calendar will be brought up to select the date and time the candidate was placed. The default is the current date
- Starting Salary: This field will allow you to enter the candidate’s starting salary
- Fee Percentage: This field will allow you to put in the fee percentage
- Placement Fee: This field will allow you to put in the placement fee
- Mark As Filled: This field will allow the number of openings to decrease on the position record. When this number reaches zero it will close out the job by marking the status as ‘Filled’
- Placement Type: This field can be used to specify a placement in PCRecruiter using placement codes
- Placed By: The default is to have the current user that is logged in but by clicking the dropdown to the right of the field you can select another user to be credited for the placement
- Guarantee: This field is used to put details about the guarantee
- Feedback
- Notes
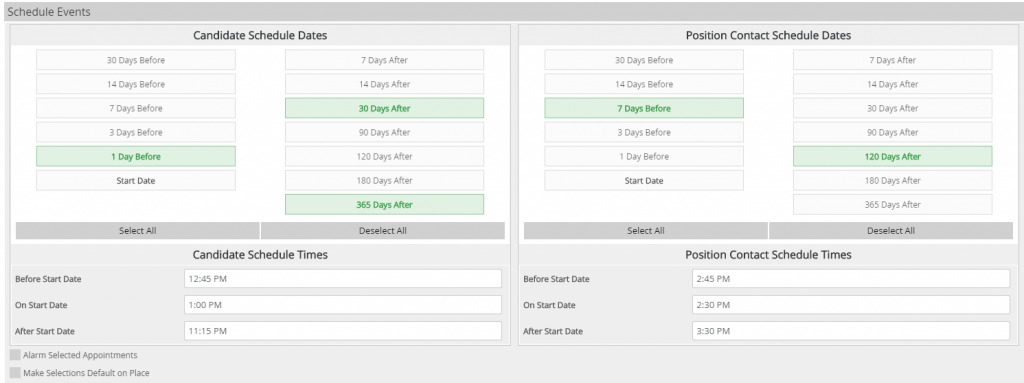
Scroll down to view the Schedule Events:
- The Candidate Schedule Dates portion of this window will mark items on your calendar to reach out to the candidate. Options range from 30 days prior to the start date of the candidate up until one year after the start date. Three clock dropdowns will give the choice as to when these items will be placed on your schedule. The first is for items placed before the start date. The second is designed for the start date while the third is meant for items only after the start date.
- The Position Contact Schedule Dates portion of this window will mark items on your calendar to reach out to the contact on the position. Options range from 30 days prior to the start date of the candidate up until one year after the start date. Three clock dropdowns will give the choice as to when these items will be placed on your schedule. The first is for items placed before the start date. The second is designed for the start date while the third is meant for items only after the start date.
When the necessary fields have been filled in, click the Place button in the lower right corner of the window. This will trigger the following changes:
- If you chose to mark the position as filled it will decrease the Number of Openings field on the job by one. If this number drops to zero it will change the status of the position to Filled.
- The placed candidate’s Name record will move from their previous Company to the one associated with their new Position.
- The status of the candidate will change to Placed and they will inherit the Job Title of the Position.
- The Work History of the candidate will now populate with information from this placement such as the company name, start date and salary.
With the proper security settings a user can also customize their placement layouts. Click here to learn how.