Creating an Advanced Sequence Template #
Users with the Sequencing Security set to Add/Update or Full Permission can create a Sequence template. Templates are the starting point for any Advanced Sequence and can be copied and altered to create new templates.
- Click the Advanced Sequencing icon to open the Advanced Sequencing dashboard.
- Click Templates to list all existing templates. Here you can:
- Right-click on an existing template and select Copy Template.
- Click Create New at the top right to create a new Sequence template.
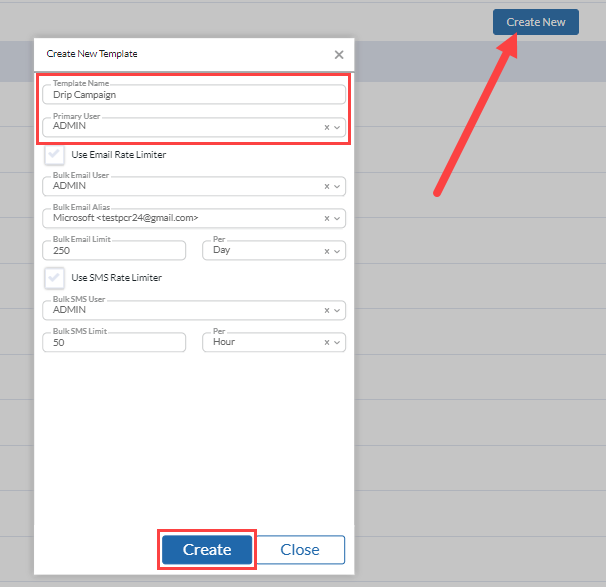
- Add details for the Advanced Sequence template: (Only the Template Name and Primary User are required)
- Template Name: This is where you name the Advanced Sequence (e.g. ‘Biz Dev Campaign’).
- Primary User: This is where you specify who the template is for. All Templates require a primary user before they can be activated.
- Use Email Rate Limiter: If your Advanced Sequence will include Automatic Email Steps, click this checkbox to specify the user, alias, limit, and timeframe options. For example, you can have the email sent from a specific user’s email alias at the maximum rate of 50 messages per hour.
- Use SMS Rate Limiter: If your Advanced Sequence will include Automatic SMS Steps, click this checkbox to specify the user, alias, limit, and timeframe. For example, you can have an SMS message sent from a specific user at the maximum rate of 30 per hour.
- Click Create. The new template will now be listed in the Templates area. You can right-click on the template name to edit the properties above or delete the template.
Defining Steps, Conditions, and Branches #
The first Step is to plan out your Advanced Sequence. Typically it is easier to map out your process prior to constructing the Sequence, this allows you to visually understand what will occur and allow you to anticipate multiple scenarios. Sequencing Template Examples can also help you if you need a starting point or just want a suggested workflow.
The three basic components of a Sequence are Branches, Steps, and Conditions.
- Branches: These are the highest level of your Sequence. A Sequence can have a single or multiple Branches, depending on the complexity of your workflow.
- Steps: Within each Branch, the Steps are used to define the action to happen, such as a call, automated or manual email, automated or manual SMS, LinkedIn actions, adding to or removing from a rollup, linking to a pipeline, scheduling, or custom other action.
- Conditions: Used to define the possible results of a Step and where the name will be routed to within your Sequence based on the outcome of the Step. Conditions are also used to either remove the name from the Sequence (and the associated rollup) or to end the Sequence.
Add Steps #
Each Sequence is constructed using various types of steps based on your chosen workflow. Once the Template has been created follow the instructions below to map out all the steps of your process. You will want to start with adding all of the steps of your process first followed by adding in conditions and more branches(If needed).
- Navigate to the Sequence Branch editor(Opens right after creating the template.)
- Click Add Step. A menu will pop up with the following types of Step to choose from.
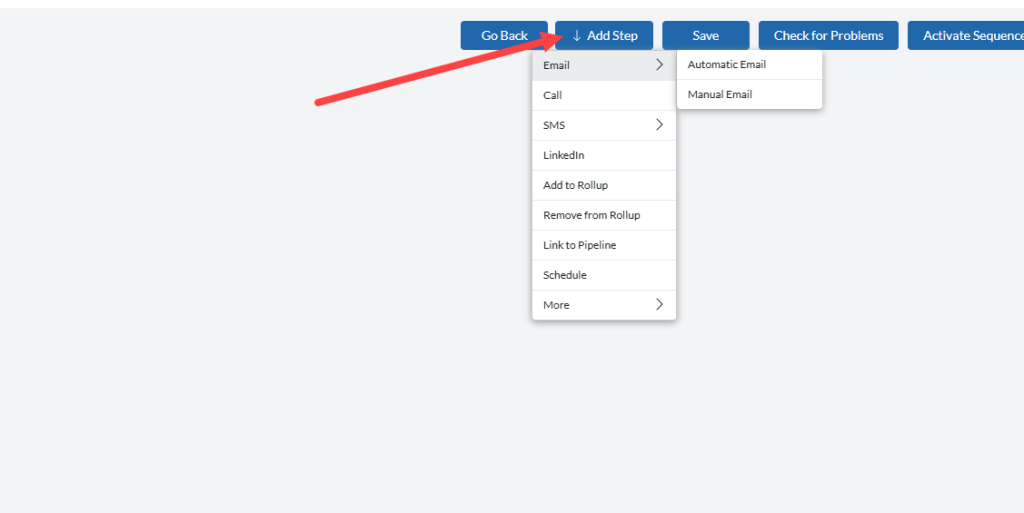
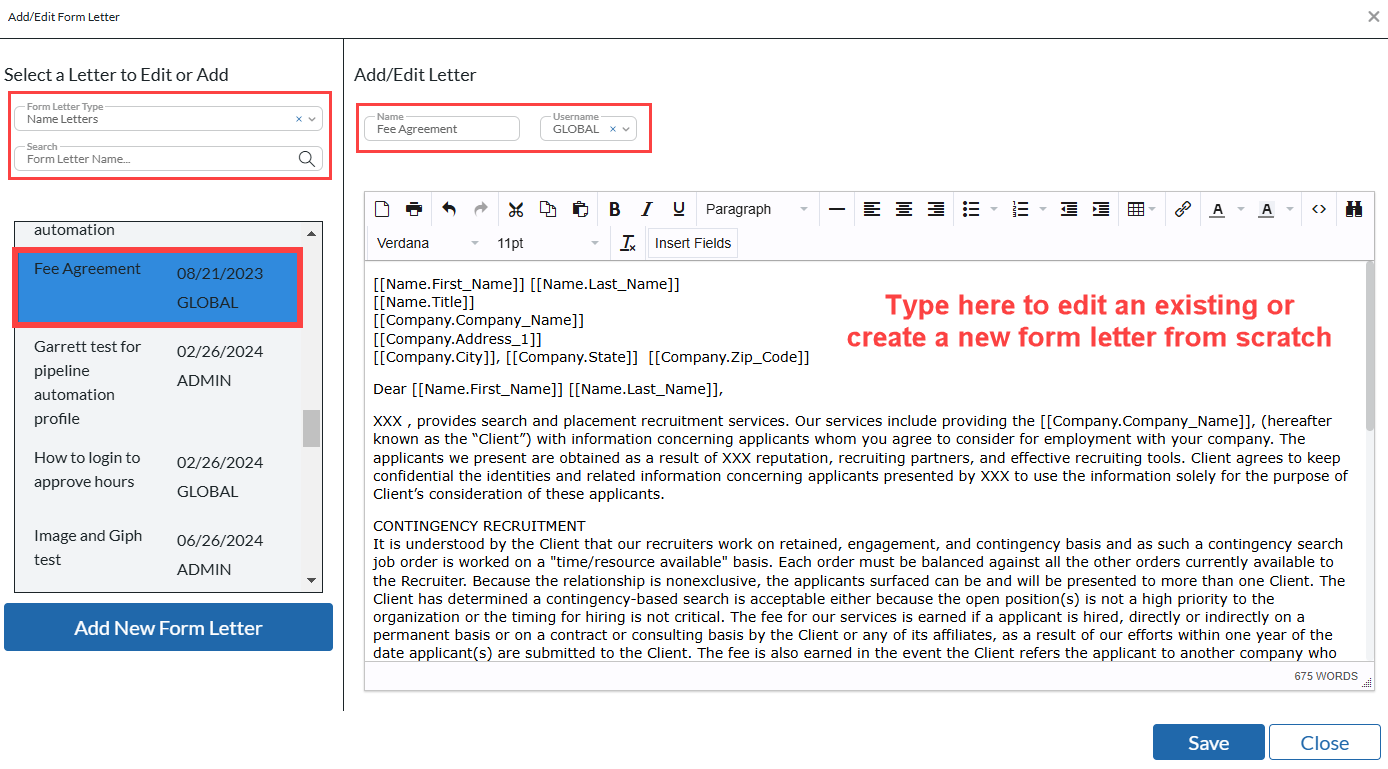
- Email (Automatic or Manual): Provides the ability to select a Form Letter to send out automatically or to manually compose an email a task. The manual email can be blank or have a Form Letter associated with it, which can be edited prior to sending.
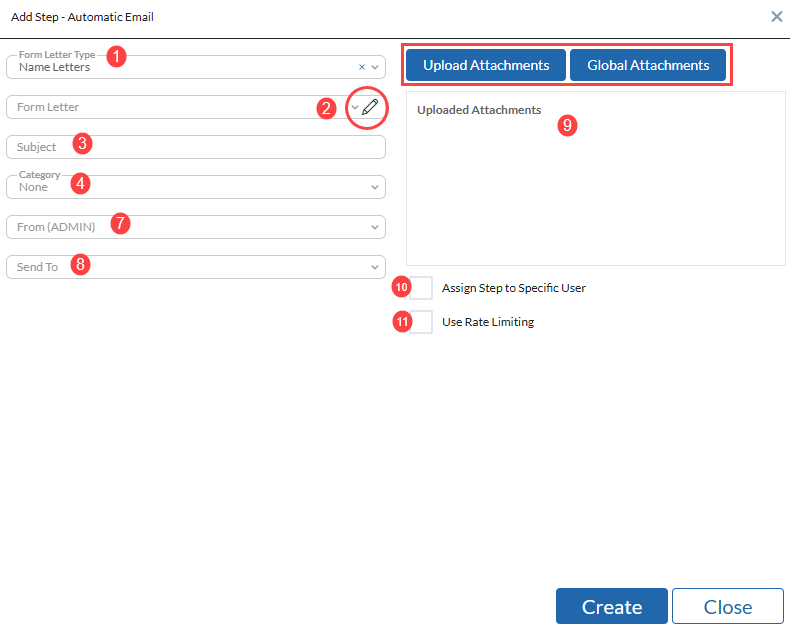
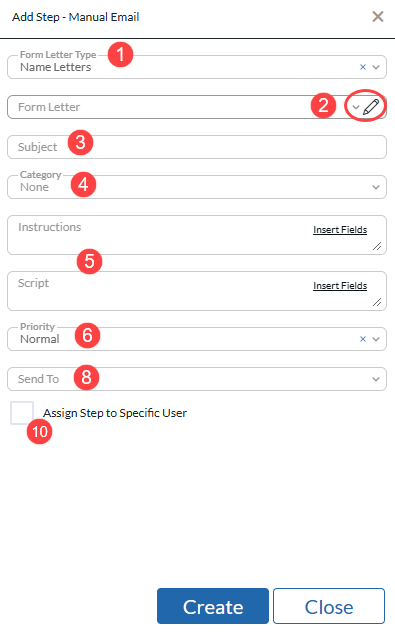
- Select the either Name or Position Form letter. (Position letters require the branch to be linked to a Position, otherwise the insert fields will be blank.)
- Use the dropdown to search for the Form Letter in your database or click the pencil icon to create a new or edit an existing letter. (Form Letter Editor Screenshot Below)
- Enter the Subject line, if left blank this will be the name of the selected Form Letter.
- Select your email category. Users can opt-out of specific categories when using the opt-out link.
- Add instructions and a script if desired (Manual only).
- Set Task priority level. This is a filter option found on the Task screen which can help users to prioritize which tasks should be completed first. (Manual Only)
- Select the email alias you want the email to send from. This will display the template username’s email alias. (Automatic only)
- Select which field from the Name record you want the email to be sent to.
- Add any attachments you want sent with this letter. (Automatic only)
- Steps can be assigned to a specific user, select the checkbox and choose the username you want this step assigned to. (This will affect the email alias for automatic steps)
- If an Email rate limiter was assigned to the Template the user rate limiter box should be checked. (Will not show if no rate limiter is set)
- Call: Creates a Call task which will display a click to dial button if the phone number exists on the Name Record.
- Select the phone field from the name record.
- Add instructions and a script. (Optional)
- Set priority level.
- Assign to a specific user. (Optional)

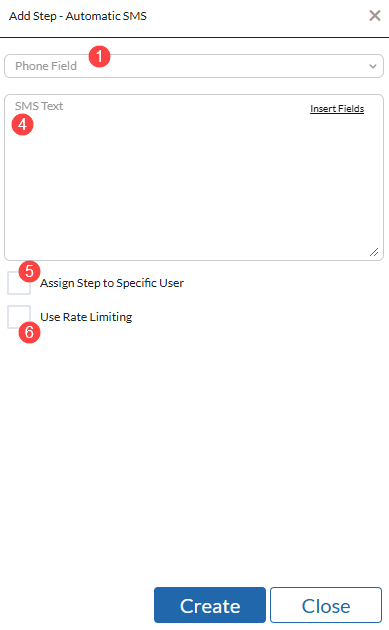
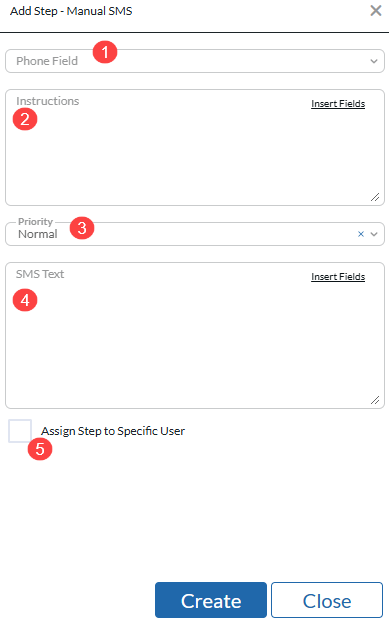
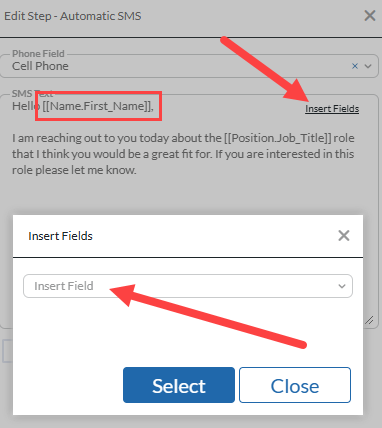
- SMS (Automatic or Manual): The Automatic option provides the ability to send an automated text message. A manual SMS prompts the user to complete an SMS task. A manual SMS message can be modified before sending. (This requires you to have the RingCentral Integration.)
- Select the phone field from the name record.
- Add instructions if desired. (Manual only)
- Set priority level. (Manual Only)
- Add the SMS text for the step. (Required)
- Assign to a specific user. (Optional)
- If an SMS rate limiter was assigned to the Template the user rate limiter box should be checked. (Will not show if no rate limiter is set)
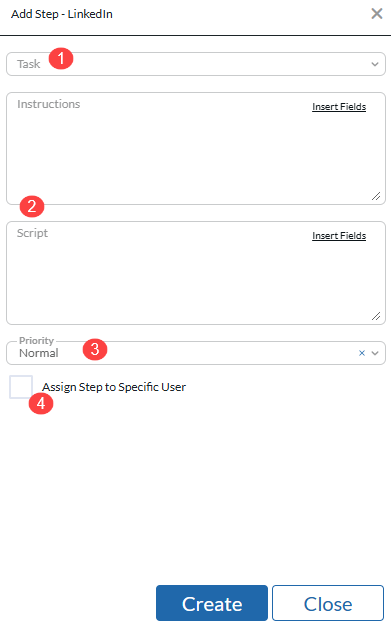
- LinkedIn: Provides a prompt to complete a task on LinkedIn: View Profile, Interact with Post, Send A Connect Request or Send an InMail. The task will contain a button that automatically jumps you to the LinkedIn page for that record; if the LinkedIn URL is not in PCR then the button will automatically run a search for the LinkedIn page. NOTE: This Step requires the user to manually perform the selected action on Linkedin, as PCRecruiter cannot perform LinkedIn actions on the user’s behalf.
- Pick the task that should be completed on LinkedIn.
- Add instructions and a script, the script is a great place to put the text for an Inmail. (Optional)
- Set priority level.
- Assign to a specific user. (Optional)
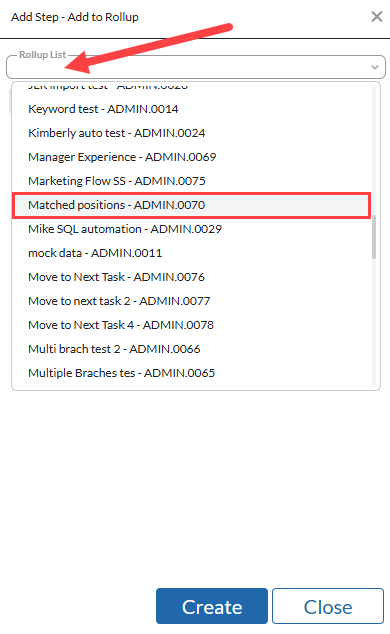
- Add to Rollup: Can be used to add a Name record to an additional Rollup List. This is an automatic step so selecting the Rollup is the only option.
- Remove from Rollup: Can be used to Remove a Name Record from a Rollup List. This is an automatic step so selecting the Rollup is the only option. (This can remove the record from the same Rollup List that the Sequence is associated with but this will lock the candidate out of this Sequence in the future.)
- Link to Pipeline: Click the Link icon to choose a Position Pipeline that the Name Records will be linked to upon entering the Task. When this task is automatically executed, the Name will appear in the Inbox of the selected Position’s Pipeline.

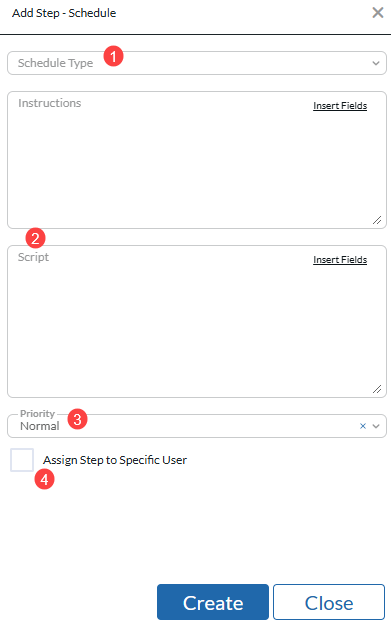
- Schedule: Provides the ability to schedule a meeting that shows on the user’s PCRecruiter Schedule, or to schedule an interview for a Position. The interview option allows you to move the candidate through the Pipeline but will not add them to the inbox.
- Select Schedule type: Meeting or Interview.
- Add instructions or a script. (Optional)
- Set priority level.
- Assign to a specific user. (Optional)
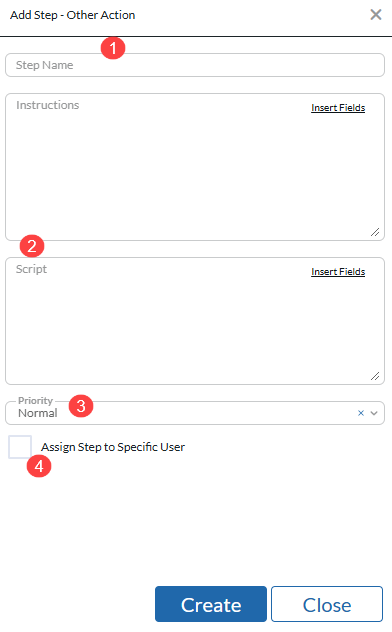
- Other Action: Provides the ability to create a custom Step outside of PCRecruiter’s pre-built options. This area also includes Instructions and Script fields to give further detail the task.
- Name the step based on the task that should be completed. (Example: Review Email Response)
- Add instructions or a script. (Optional)
- Set priority level.
- Assign to a specific user. (Optional)
- Once the Add Step is chosen and detailed, click Create.
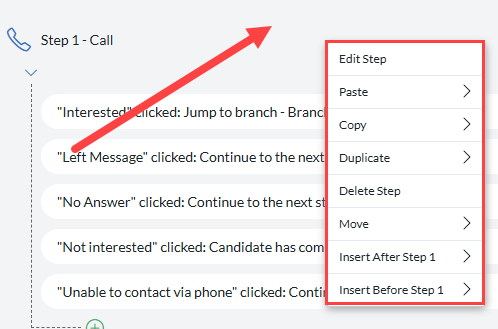
- Repeat the process for each Step in the Branch. You will notice that for some Steps the Conditions may automatically display, but it is best to edit the Conditions after all Steps are defined. Once a Step is in the workflow, you can right-click on the Step’s name to edit, delete, or move the Step. You can also insert a step before or after the chosen step, this is helpful if you forget to add a step earlier in the process.
- Helpful Hint: Steps can be copied by right clicking the step, selecting Copy Step, then right clicking again and selecting paste step above or below. You can also duplicate steps, which will insert a copy of the step directly after the one you duplicated. This can help to speed up the process of constructing the Sequence.
- When creating scripts, instructions, or SMS messages insert fields are available to automatically information from records within the database such as first name or job title.
- Once all Steps are defined, click Save.
It is always recommended to start with a single branch and add additional later if needed. If you have decided if you need multiple Branches, the next part of the setup process is to add a new blank branch or duplicate and add/edit/delete the Steps for the other Branche(s). Additional details on branches can be found below.
Set Conditions #
Now that the Steps are defined, you can define the Conditions that control how a contact progresses through the Sequence based on an outcome of each Step.
- Many Steps provide Conditions based on the Step name. These can be changed, deleted, or moved up/down by right-clicking on the Condition. The order of the conditions here is how they will be displayed on the Task screen.
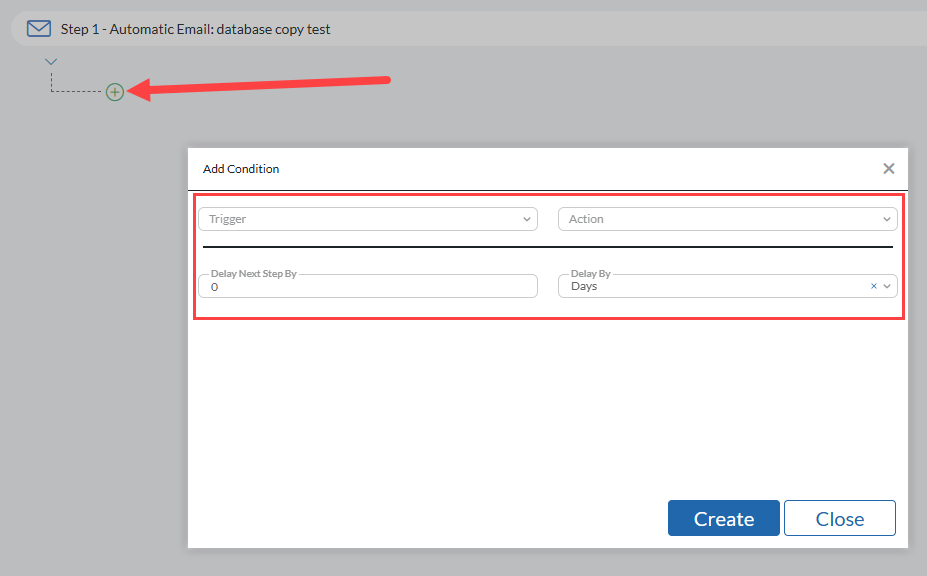
- Click the + icon below the Step to add a new Condition.
- Select the Trigger and the Action to determine where the record will go next. You can also set a delay before the next step occurs. Once the trigger condition has been met the record will remain in the step until the timeframe is met.
- Conditions for each step are different, below are some examples of Triggers based on the step type.
- Automatic Email Steps: Based on recipient interactions.
- Email Sent: Cannot be used with any other conditions.
- Email Opened: Once email is opened, this condition cannot be used with any other interactive condition. (Please note that email providers will sometimes prescan an email as a security measure, this can trigger this condition before the recipient opens the email.)
- Link Clicked: Select a link from your email, this condition can be chosen multiple times for each link in the email.
- Replied to: Triggers upon email response. Will only occur if candidate is in this step when the reply is received.
- Opt-out/Unsubscribed: Based on opt-out status in database or opt-out link being clicked from email.
- No Condition met in X timeframe: After the email is sent the candidate will remain in this step until the time has been met or another condition is met (Such as replied to).
- Automatic SMS: Based on recipient interactions
- Message Sent: Cannot be used with other conditions
- When replied to with: This can be set as any reply or with specific text responses, such as “STOP”. Multiple responses can be set but the SMS must match the exact wording to trigger.
- Call/LinkedIn/Schedule/Other Action: Manual steps
- Manual task button: Custom named condition
- No Conditions Met in X Timeframe: Set the days/hours/minutes you want the record to remain in this step before moving forward. The record will remain on the task list until a manual condition is selected or this timeframe is met.
- Manual Email/SMS: Manual Sends.
- Manual task button: Custom named condition. No other options.
- Add/remove from Rollop/Link to Pipeline: No trigger options, the only condition available is “When Step is complete”
- In addition to the triggers all the conditions have the option for the following actions. These options are the same for all conditions.
- Move to next step: Moves to the next step in the Sequence.
- Jump to Branch: Jumps to another branch in the Sequence and starts at the first step of that branch. (If current Branch is selected record will ‘loop’ back to the first step of the branch).
- Jump to Step: Jumps to later step in the Sequence, such as going from from step 2-4. (You cannot go backwards in the Sequence)
- Remove from Sequence: Removes record from the Sequence and from the Rollup list. (If the record is readded to the Rollup they can return to the step they were in when they left, depending on how they were removed, click HERE for details.)
- Sequence is Complete: Removes record from the Sequence but keeps them on the Rollup list. They are now locked out of and cannot be readded to this Sequence.
- Once all conditions are specified. Click Save.
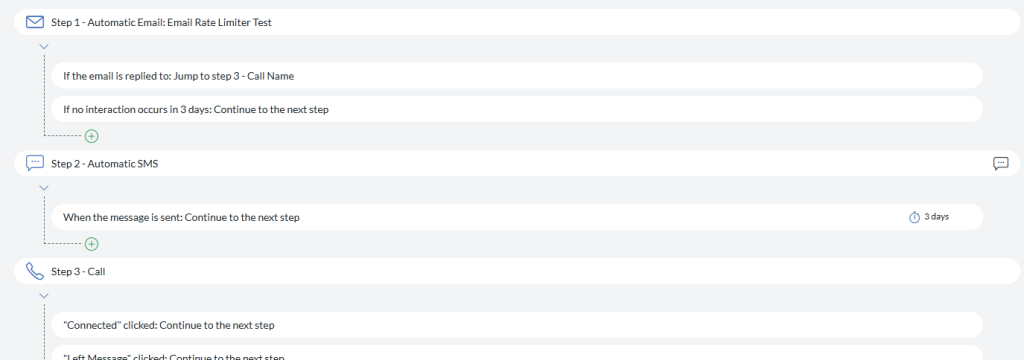
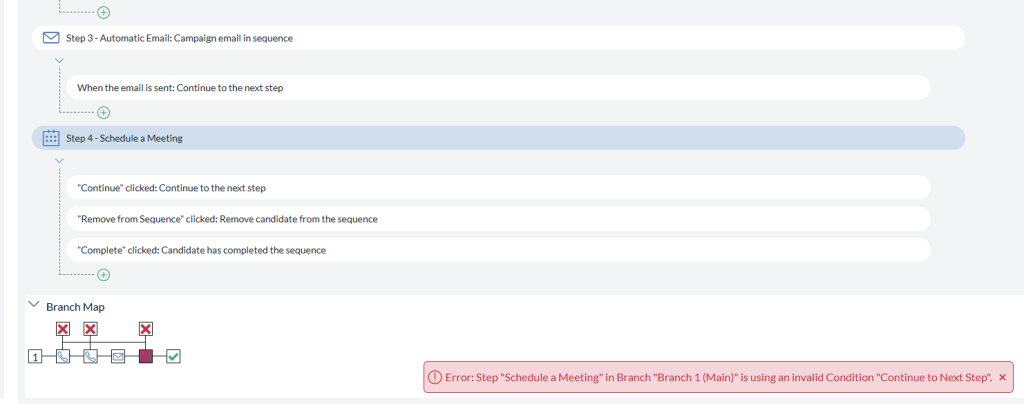
In the example below, the first action that will happen once the Sequence is activated is that an automatic email will be sent. If the person replies, the contact will jump to Step 3, which is to make a call. If the contact does not reply within 3 days, they will be sent an SMS message as defined in Step 2. Once the message is sent there is a 3 day delay before reaching the call step (Step 3).
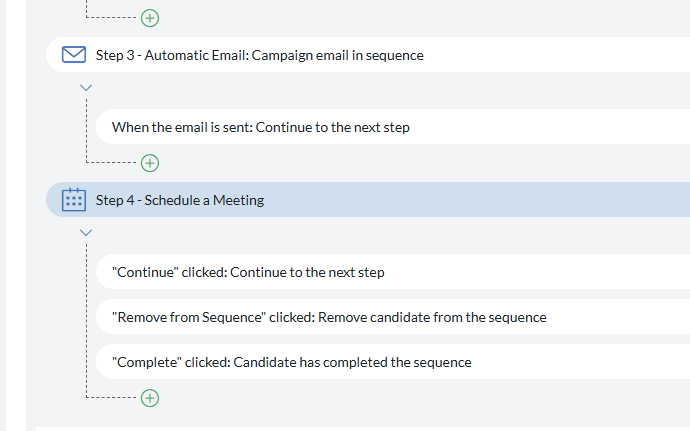
All Sequences must have an endpoint Condition. Records must have a way to leave the Sequence end the branch. In the example below, there are 3 conditions for step 4, which is the last step of the Sequence. The “Remove from Sequence” and “Sequence is Complete” conditions are both valid because they navigate the record outside of the Sequence. The “Continue” condition is not valid because there are no more steps in the Sequence so the record has nowhere to go.
IMPORTANT INFO REGARDING EMAIL ‘OPEN’ OR ‘REPLY’ CONDITIONS:
- Triggers based on email Reply require your incoming email account to be synced with PCRecruiter via IMAP/PCRMail. If PCRecruiter is not able to read the emails coming to your account, it will not be able to associate any replies with a Campaign or Sequence-generated email. Similarly, PCRecruiter will be unable to track email Bounce messages without access to your incoming mail.
- ‘Open’ tracking for emails, in PCRecruiter and all email marketing tools, is based on logging when a tracking image inserted into the email has been loaded. Only recipients who load the images will trigger an ‘Open’. If the recipient’s email reading software, such as Outlook, is configured not to load images by default, then their opening of the email will not be tracked. Conversely, Apple’s Mail Privacy Protection feature will sometimes pre-load the email on a proxy server before passing it on to the recipient’s iPhone / iPad / Mac email app, which means Apple’s server will trigger an ‘Open’ event if the recipient never opens the mail at all. For these reasons, email marketing professionals advise to rely on Clicks and Replies for taking action, and to use Open tracking as a general informational tool with a dose of skepticism.
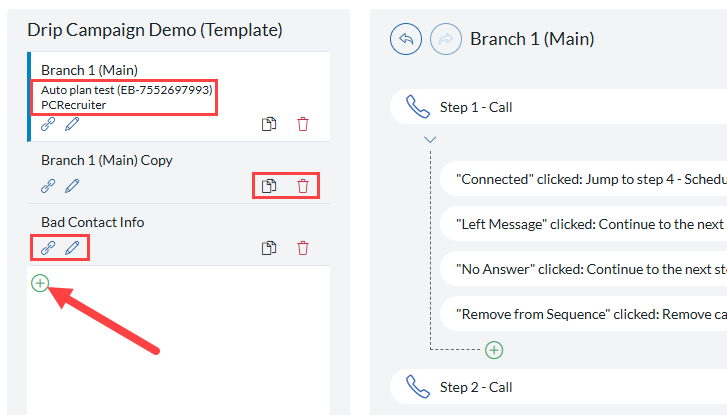
Define Branches #
If you needs to have the flexibility for multiple workflows you may need to use multiple branches within a single Sequence. You’ll want to create those branches prior to setting your conditions. As noted above, a Sequence can have a single or multiple Branches. When first starting out with Sequencing it is a good idea to stick to one branch. Additional Branches can be added in the future as needed.
To create Branches:
- Navigate to the Advanced Sequencing branch editor.
- All Sequences have at least one Branch, and will start with Branch 1 (Main). You can leave this Branch name as-is or click on the pencil icon to edit.
- Click the + icon below the list of existing Branches to add another Branch. You can click the Edit option to rename this Branch.
- If your additional branch(es) are similar to your first branch you can copy a previous branch by clicking the copy icon, this will duplicate all steps and conditions in the newly created branch.
- Unneeded branches can be deleted by clicking the trash icon found here.
- Branches can also be linked to positions. The linked position will determine what Position information is pulled from Position Insert Fields within form letters, SMS messages, and instructions/scripts. Click the Link icon and select the desired Position you wish to link this Branch to.
- Each Branch can be linked to its own Position, allowing you to use a single Sequence while recruiting for multiple jobs. The Linked position title will display below the Branch name.
- The Link to Pipeline steps and Link Branch to Position settings are separate and do not automatically interact. Make sure to configure both of these with the correct positions.
- Click Save.
Check for Problems #
Before activating a Sequence, use the Check for Problems option at the top right. This will alert you to any issues with your Template. For more explanations and examples of errors click HERE.
Below is an example of the previous invalid conditions example. Below you can see the step with the issue is highlighted and indicated as red on the branch map. The error “Step ‘Schedule a Meeting’ in Branch 1(Main)’ is using an invalid Condition “Continue to Next Step” is being shown because there are no more steps in the Sequence, therefore, the condition must be removed to allow the Sequence to activate.
Save the Template #
Once all Branches, Steps, and Conditions are defined and the Template has been checked for problems, click Save. It is important to save a newly created Template before activating it as a Sequence. If you do not save the template it will revert to its previous settings and you will need to adjust it again before activating.
If you are using a single Sequence Template to activate multiple different Sequences, such as 3 separate Sequences for 3 different jobs, you can activate these Sequences without saving them to maintain your primary template. This is especially useful if you have a standardized process but want to make small specific tweaks to the Sequence for each role but this will not be repeated the same way for future Sequences.
Example: I have a 4 step Sequence Template and I am hiring for 2 jobs from different clients with specific parameters.
- For the first job my template branch and link to pipeline step needs to be linked to that position. I would link the branch and step to that position and click save, since I will not be using another future Sequence to hire for this role again I do not need to save the new settings for this template.
- For the second role I need to add an additional screening step to ensure that they prove their qualifications for this job before moving forward in the process. I would add an additional ‘other action’ step to confirm that this is completed prior to linking them to the Pipeline. This step is becoming a regular part of my process so I will save the template so that I can maintain this process in the future.
Rate Limiter for automatic Email/SMS steps #
Rate limiters for automatic email and SMS communication allows users to protect themselves from being blacklisted, marked as spam, and to follow the laws and regulations of specific entities. By setting a rate limit you will be able to control the number of emails or sms messages that are sent out per hour, day, week, or month. Below is detailed information regarding how these rate limiters function within the software. Please note that while we do provide you with this capability within the software, we are not able to provide you with specific numbers for these settings. For more information check out the guidelines available on your provider’s website. We have included a few links to articles below but we strongly recommend reaching out to your provider directly or doing additional research prior to starting any bulk outreach campaigns.
Email Rate Limiting #
- Email Provider Mass Emailing Reference articles: It is important to note that we cannot guarantee any specific numbers that will allow for a ‘safe’ amount of emails to send within a specific timeframe. Each provider uses number of different criteria so it is always best to contact them regarding safe sending limits.
- Microsoft 365 Online Limits
- Gmail Sending Limits
- It is always best to be conservative when sending out large amounts of emails. We do not recommend using the full listed amount right away, the rate limiter can always be adjusted in the future.
- If you are worried about your email integrity or require large amounts of emails to be sent out you may want to consider a bulk email provider as an option.
- The email rate limiter is set based on a per alias basis. This means that all bulk emails sent out from the system will be considered when utilizing the rate limiter. For example: A rate limiter of 200 emails per day is set for a Sequence which runs from 8am-9am while a second Sequence, under the same username and email alias, is set for 200 emails per day which runs from 3pm-4pm. When the first Sequence begins at 8am the rate limiter will send out 200 emails and then stop sending since it has met the daily limit. When the 3pm Sequence would kick off it will not send any additional emails due to the previous 200 already counting for the day. There are a few other items that should be considered when setting up these rate limiters.
- Rate limiters only apply to bulk emails sent out via Email Campaigns or Sequences, meaning that individual emails do not count in the overall number, however, those emails may still be counted by your email provider as part of your daily sending limit. Make sure to contact them for more specific details.
- When a Sequence has an automatic email as the first step the initial step will be sent out as an email blast. Sequential steps in the Sequence will send out in smaller cadanced amounts over the entirety of the timeframe set. For Example: If I set a rate limit of 12 email per hour and have multiple automatic email steps, the first step will send all 12 at once, while the later steps will send out about 3 emails every 15 minutes, similar to an email drip campaign. This is to ensure that your male server does not get overloaded and assists with preventing your emails from being marked as spam.
- When setting up the rate limiter it is important to ensure that all steps that the limit should apply to have the “Use Rate Limiting” checkbox selected. this ensures that when a username/alias different from the template user is assigned to that Sequence when activating the template will follow the rate limiting criteria.
- It is always recommended to include a way for the recipient to opt-out of further communications.
SMS Rate Limiting #
- Currently the RingCentral integration is the only option for sending SMS messages through our Sequencing feature. Click HERE for their guidelines on Bulk SMS messages.
- SMS rate limiter works on a per number basis, meaning that each user will have their bulk SMS messages counted against all Sequences across the database, but not individual or manual SMS messages.
- It is always recommended to include a way for the recipient to opt-out of further communications.