All names that are brought in from a third party search integration will be saved to the database’s default company. Before performing a third party resume search, confirm that your database has a default company. This is done by clicking Company on the main toolbar then clicking Display Default Company from the action toolbar to the right. If a record is not returned, you must create a fictitious company record (i.e. ‘Candidates’), and set the ‘Default Company’ field to ‘Default Company’.
CareerBuilder #
Configuring Resume Search #
A user with admin-level security must install and configure resume searching before it can be used.
- Click System on PCRecruiter’s main toolbar.
- Select Add-Ons
- Choose Install Feature
- In the Please Enter New Feature Code area enter ‘cb-search”
- Click Next.
- Enter the Username, Password and Customer Account Code provided by CareerBuilder
- Save
Searching and Importing Resumes #
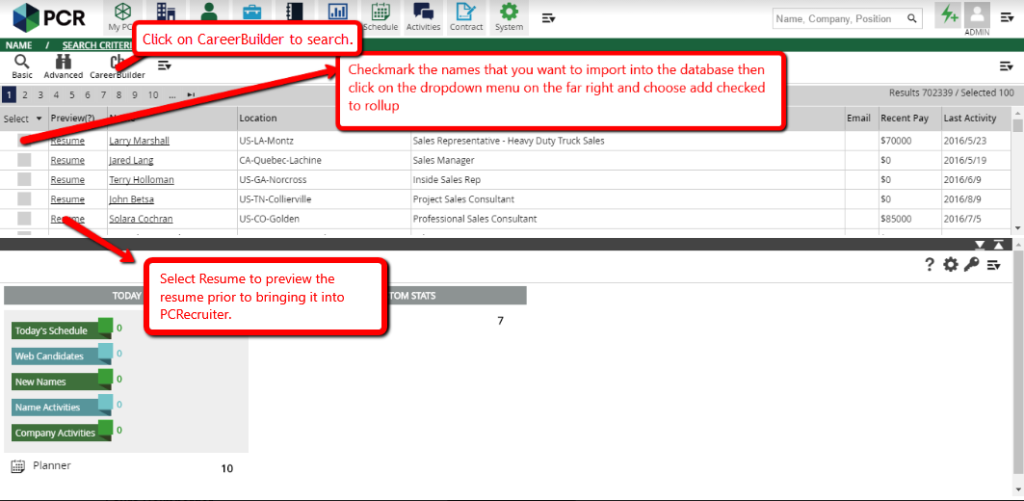
- Click Name on PCRecruiter’s main toolbar.
- Click the CareerBuilder icon from your search toolbar on the left.
- Enter keywords using Boolean search logic (AND, OR, NOT, etc.).
- Open the Filters tab to enter search filters
- Filter by City. Please note that testing performed by MST found that CareerBuilder will only accept the City value when State is specified.
- Filter by State. Separate multiple values with a comma and do not include a space between values (i.e. NY,NJ,PA).
- Filter by Country using the provided dropdown.
- Filter by Zip Code. Please note that testing performed by MST found that CareerBuilder will only accept one full, 5-digit zip code.
- Filter by Radius to find candidates within a specific distance of the Zip Code entered.
- Filter by Last Activity. Use the dropdown to specify the number of days. The date reflects when the job seeker posted or modified their resume on CareerBuilder.
- Click the Advanced Options tab to further filter results. Options include:
- Education
- Job Category
- Minimum Salary
- Maximum Salary
- Minimum Experience
- Languages
- Employment Type
- Military Experience
- Manages Others
- Click Search. All names from CareerBuilder matching the specified criteria are listed.
- Import the resumes and create records by clicking on a candidate’s name to download the candidate from CareerBuilder into PCRecruiter.
Monster #
The Monster Resume Search Integration requires setup by Main Sequence. Please contact support at support@mainsequence.net for assistance
Searching and Importing Resumes #
- Click Name on PCRecruiter’s main toolbar.
- Click Monster Resume Search from the search toolbar on the left
- Use default search options:
- Enter keywords using Boolean search logic (AND, OR, NOT, etc.). Use the Resume, Job Title, and Job Description boxes to indicate where you want to find the keywords specified. Please note that each box you check requires that the terms entered are found in that area. Therefore, you may want to limit to only searching the Resume as MST testing found this area to return the most results.
- Open the Filters tab to filter your search results
- Filter by Occupation using the first dropdown. Once an option is selected, you will be presented sub-categories to further refine your search.
- Filter by Target Work Location
- Filter by Zip Code by entering a value into the provided field. Please note that this search option is to be used only with United States Zip Codes, testing performed by MST found that Monster will only accept one, 5-digit zip code. Use the distance dropdown to expand your search based on miles from the specified zip code.
- Filter by Last Activity using the provided dropdown. Last Activity refers to the date the resume was created or last updated.
- Open the tab for Advanced Options for additional searching methods:
- Filter by Company Name by entering a value in the provided field.
- Filter by School Name by entering a value in the provided field.
- Filter by Education using the provided dropdown.
- Filter by Minimum Salary using the provided dropdown.
- Filter by Maximum Salary using the provided dropdown.
- Filter by Minimum Experience using the provided dropdown.
- Filter by Career Level using the provided dropdown.
- Filter by Language Spoken. The first dropdown allows you to specify the language. The second dropdown allows you to specify the candidate’s fluency of the selected language.
- Filter by Employment Type using the provided dropdown.
- Filter by Manages Others using the provided dropdown.
- Click Search. Monster will return up to 1,000 names matching the specified search criteria.
- Do one of the following to download candidates (please note that Monster does not allow for viewing the resume until it has been downloaded to PCRecruiter:
- To download an individual the candidate(s):
- Click on a candidate name. (You will be alerted that downloading this resume will count against your allotted Monster resume downloads. Click Yes to continue or Cancel to end the process).
- If you clicked ‘Yes’ to download the candidate, Monster releases the candidate. The candidate’s information displays in a PCRecruiter Name record. This record is presented in ‘Add Mode’, which allows you to make changes to the record. You’ll then need to click Save to save the record to your PCRecruiter database. You will be alerted if a duplicate candidate is found.
- To download candidates into a Rollup (maximum of 20 candidates allowed per download):
- Working one page at a time, review the list to identify the candidates to download. Click the checkbox in the Select column to individually select a candidate, or click Select Page to select all candidates on the current page.
- Once candidates are selected, click Rollup. You will then be prompted to select or create the Rollup on which you want to place the Monster candidates.
- To download an individual the candidate(s):
- You may then navigate to the next set of 20 candidates by clicking the Next button. Please note that selections are not retained as you navigate from page to page.
- Once the candidates have been downloaded to PCRecruiter, the created record includes the following as available from the candidate’s Monster profile: First Name , Middle Initial, Last Name, Title, Address, City, State, Zip, Country, Email Address, Home Phone, Available, Degree Type, EEO Source (set to Monster.com) and Resume
Note: When importing resumes from Monster they will be found in the Resume section, not Attachments.