The PCRecruiter Split Desk tool allows users to split data that is being entered into PCRecruiter between multiple users. These splits can take place on Company, Name, Position or Interview records.
Manual Placement Fees #
The most basic (and easiest) way to utilize Split Desk is for splitting Placement Fees manually between multiple users serving different roles; for instance, Sourcers, Recruiters, Account Managers, etc. Using Split Desk in this manner takes out any additional steps and allows users to manually enter percentages on Placement records which in turn calculates their Split based on Placement Fees.
Creating Split Types #
When manually entering Split data into a placement record, we recommend creating custom Split Types to identify the specific user roles (Later on we will discuss using our predefined types). To create custom Split Types an Admin user will need to do the following:
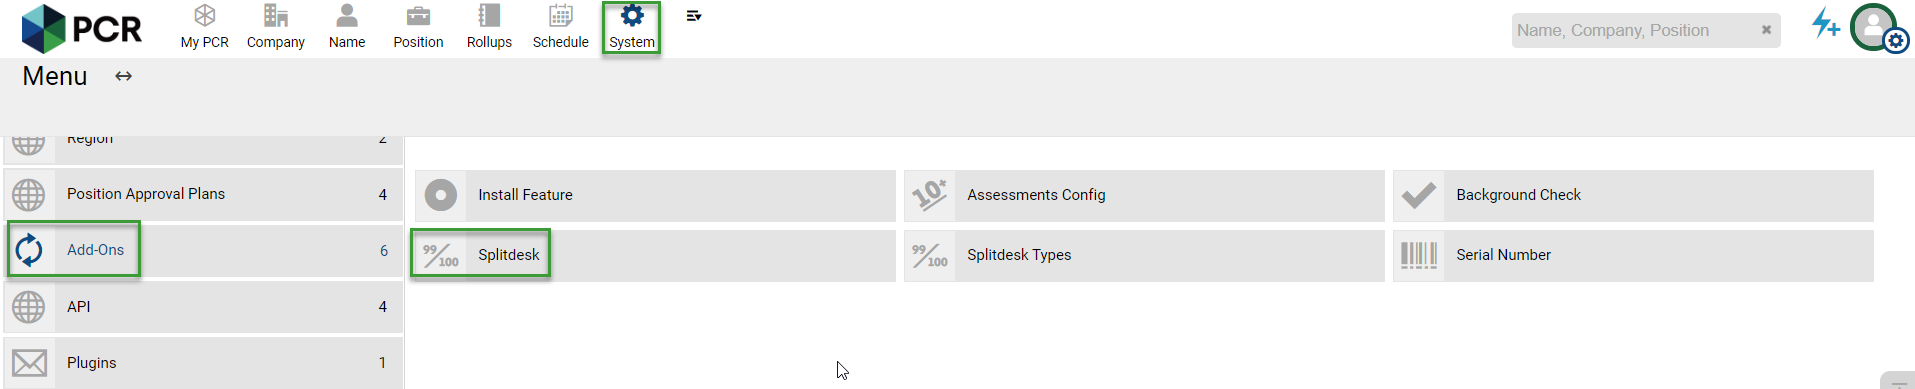
- Select System from the main toolbar
- Select Add-Ons from the menu
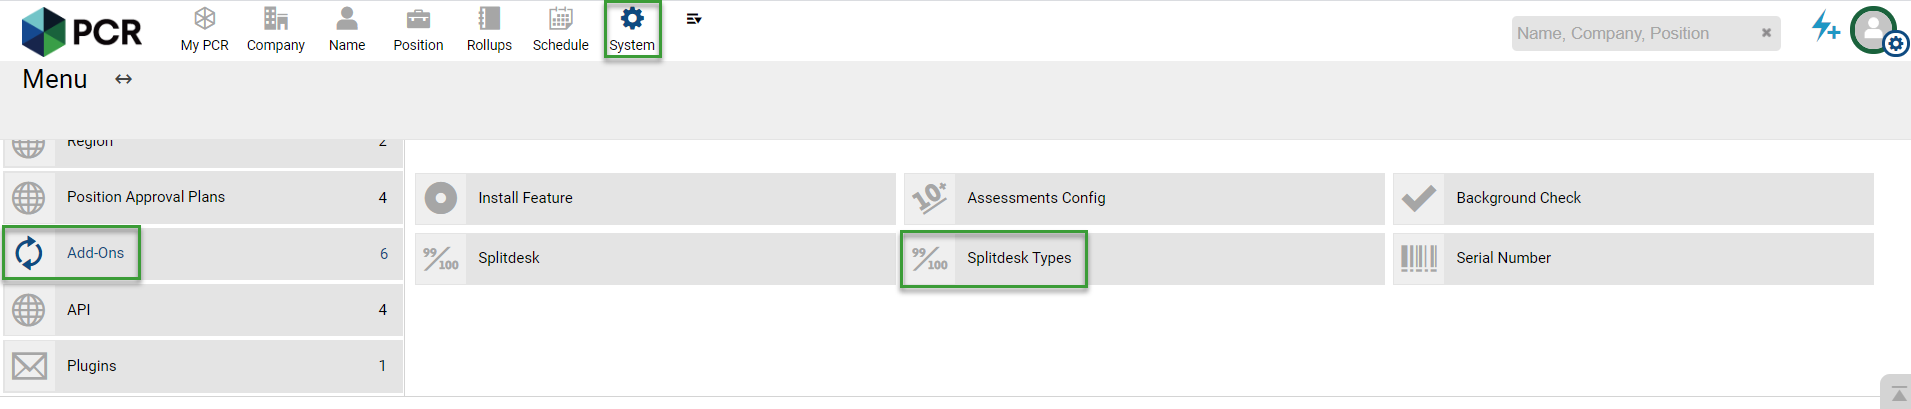
- Choose Splitdesk Types
- Click Add Splitdesk Type
- Enter a label for the Splitdesk Type
- Click Save
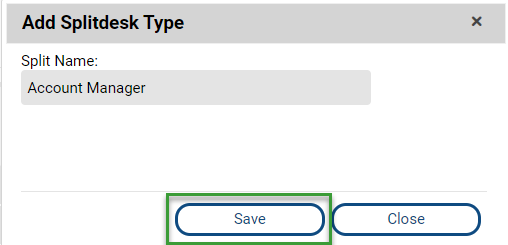
- Repeat steps 4-6 until all your Splitdesk Types have been created.
Permanent Placements #
Split Desk can be applied to a Placement once a Permanent Placement has been made. Let’s take a look:
- Choose the Position you would like to create a Placement for, here we will use our Advertising Executive
- Choose Placements from the navigation menu

- Choose Add Permanent Placement from the action menu

- Enter your placement details making sure to enter a Placement Fee
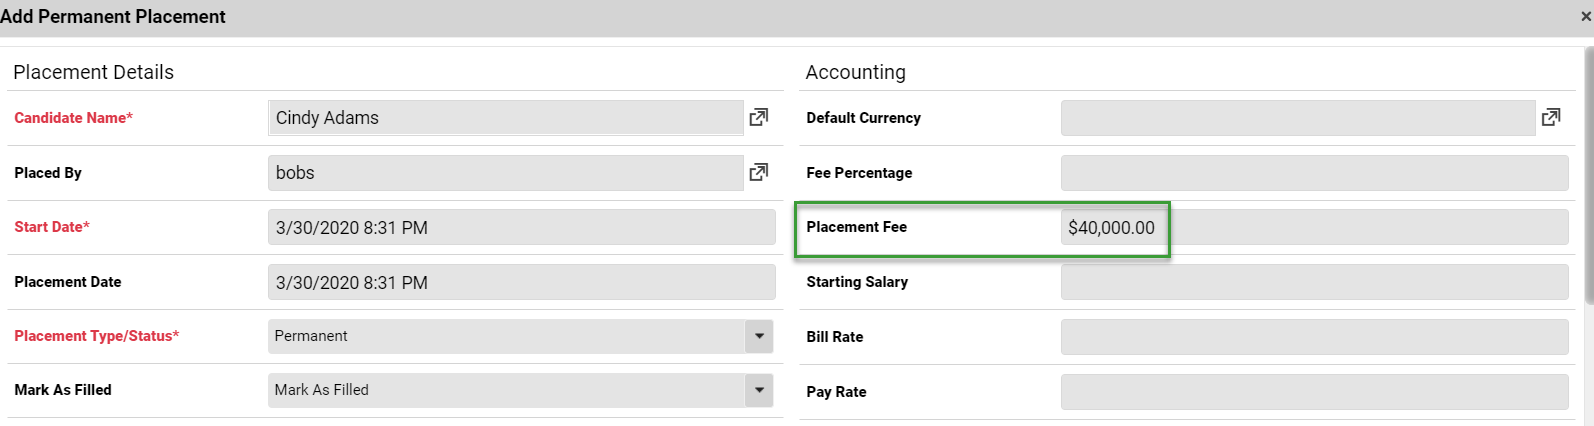
- Click Place when finished
- Once the Placement has been created the Split Desk Distribution section becomes editable

- Use the first dropdown to identify what type of a split you are entering.
- The second dropdown is used to choose which user is associated with this split
- And the Percentage field is used to enter the percentage of the split the user will receive.
- Once you have entered this information click Add. Once you do so, you will see the actual dollar amount that breaks down to below.

- Continue to add until all users receiving a portion of the split have been entered.
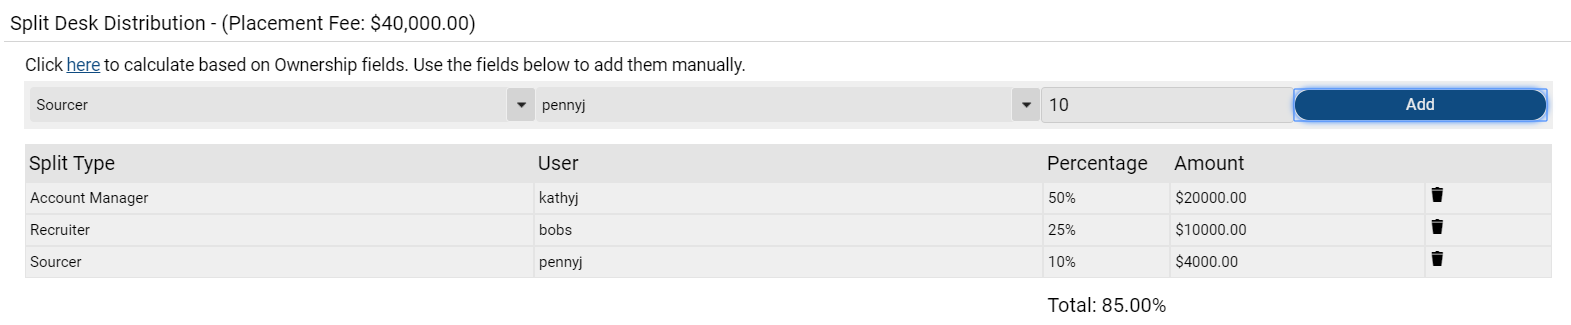
- Once all users are entered click Save on the placement record
Contract/Temp Placements #
Using Split Desk with a Contractor/Temporary Placement is similar to the process outlined above for Permanent Placements but there are some differences:
- Begin by accessing the Position you would like to make a Placement for. Choose Placements from the Navigation toolbar.
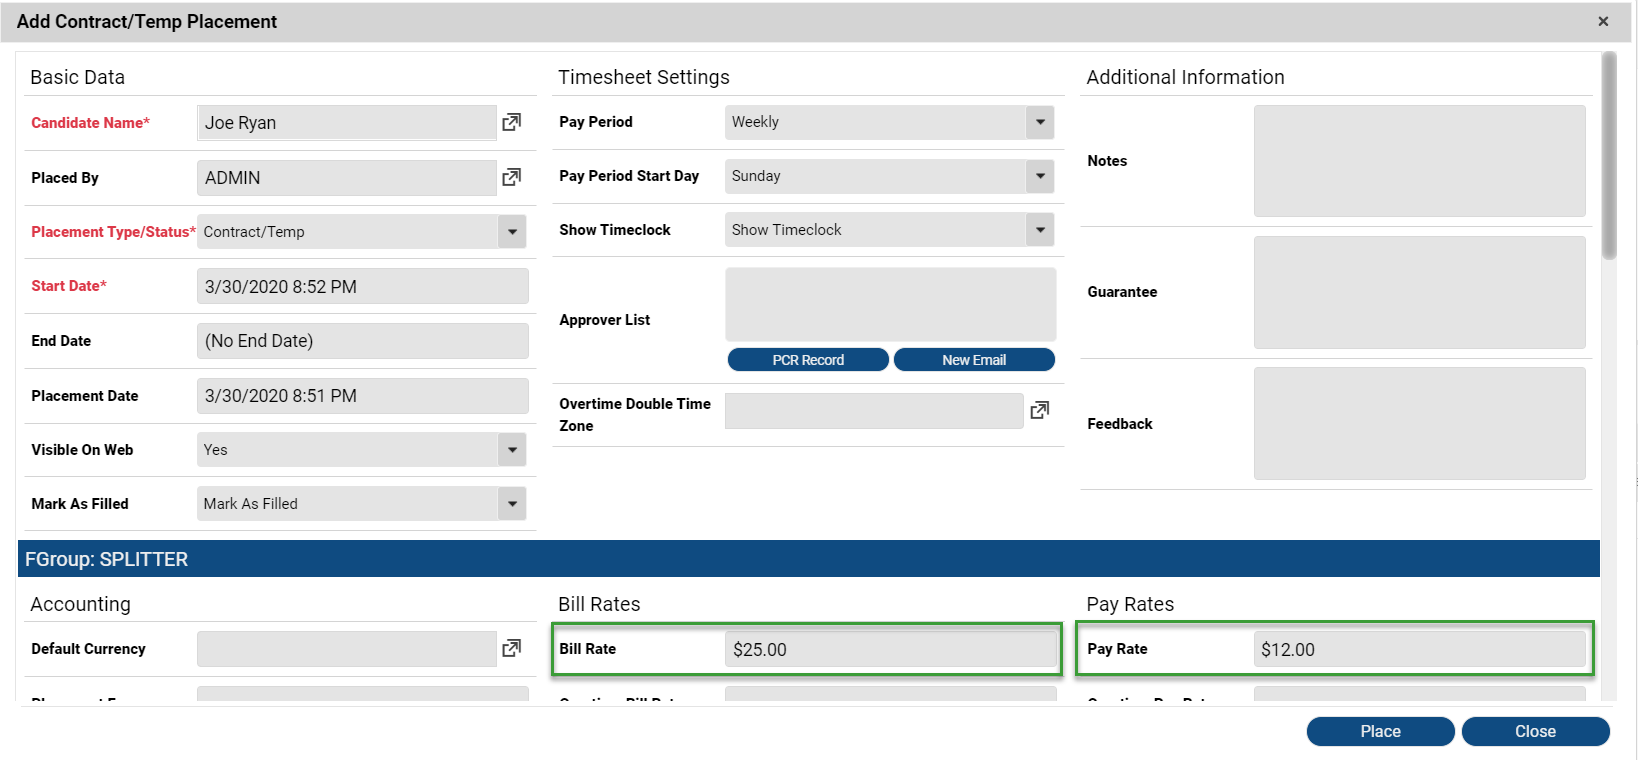
- Choose Add Contract/Temp Placement from the Action Toolbar

- Enter the details of your contract placement being sure to include Bill Rate and Pay Rate
- Before hitting Place scroll down to locate the Contract Estimator – This step is crucial or your Placement will not show in the PCRecruiter Analytics
- Click Open Estimator Calculator

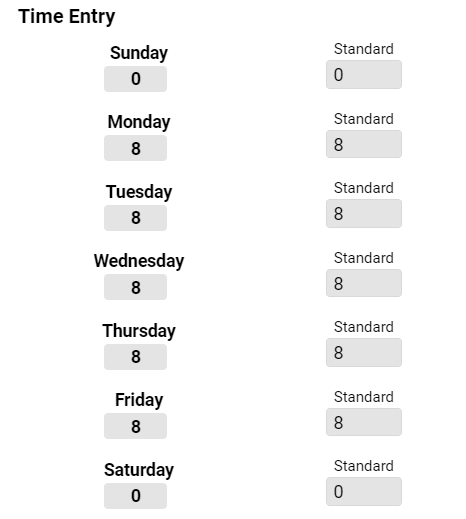
- In the Estimator you will need to enter additional details for your Contract Placement. You can get as detailed as entering Expenses but you MUST enter the hours they will be working. If they will be working a standard 8 hours Monday through Friday you can click the Standard 40 Hour Preset option at the bottom.
- You will see Revenue, Cost and Profit Estimates are generated at the bottom. Click Update Values to add these values to the placement record


- Click Place
- Now the Split Desk Distribution section is editable and can be used as discussed above.

- Click Save when finished
Using Split Desk Ownership #
Now we will take this a step further and utilize Ownership with the PCRecruiter Split Desk. This functionality allows users to be assigned to Name, Company, Position and Interview Records in PCR and auto calculate Split Desk data based on these fields.
Activating Ownership #
First an admin user must activate the Ownership fields in your database.
- Select System from the Main Toolbar
- Select Add-Ons
- Select Splitdesk
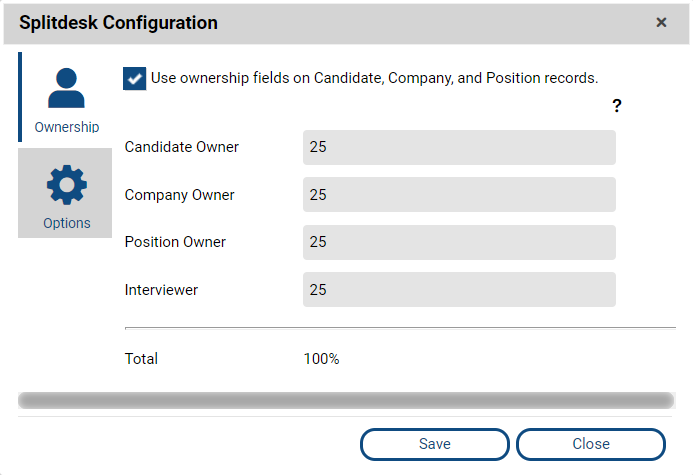
- This will open the Splitdesk Configuration window, check the option to Use ownership fields on Candidate, Company and Position records.
- When you do this, you will see the fields become editable. This screen dictates what percentage of a placement is disbursed to each owner. Here you must enter values that will equal 100%. For instance, each owner can receive 25%; or the Interviewer can receive 50% and the Candidate Owner can receive the other 50% excluding the Company Owner and position Owner. For this example, I am going to assign 25% for each owner.
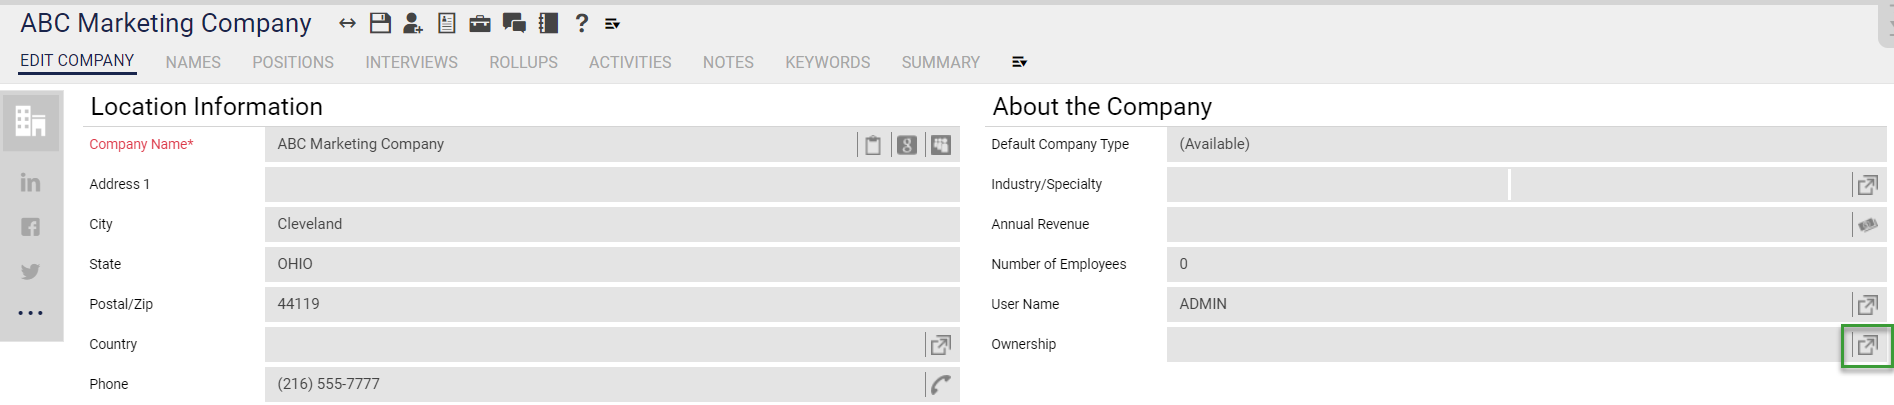
- Now, we will need to add the Ownership field to Company, Name and Position records (It is automatically added to Interview records when Split Desk is Activated). Select any Company Record to start
- Choose Customize from the Action Toolbar
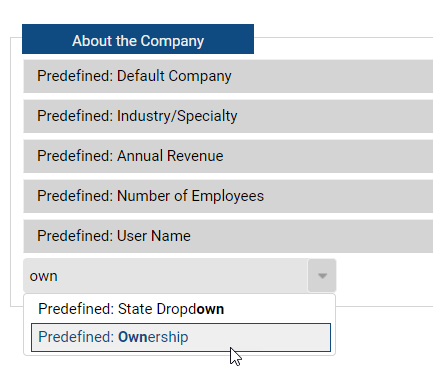
- Click into Click to set Field
- Choose Ownership from the dropdown
- Drag and Drop the field wherever you desire
- Save
- Repeat steps 7-10 from a Name and Position record.
Assigning Ownership #
Now that we have activated the Ownership feature, we can assign Ownership to our records. Remember, you do not need to have Ownership for every type of record, but you can. You can also have multiple Owners for one record as you will see below.
- Let’s start by assigning BobS as 100% Owner of ABC Marketing Company, Click the selector icon for the Ownership field
- In the pop up box we will enter BobS at 100%. This means BobS will receive the full 25% that is being delegated to the Company Owner (Per the Ownership setup screen discussed in the previous step).
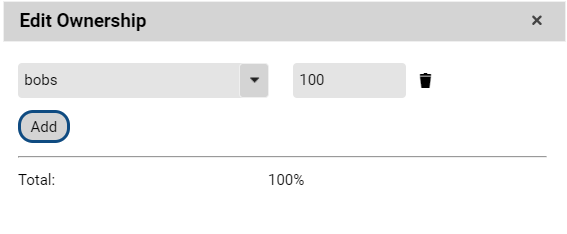
- Click Save
- Close the box and you will see BobS is now in the Ownership field – You do not need to save the actual Company record, the value is already saved.
- Now we will move onto the Candidate we will be placing for the position, Penelope White
- Locate the Ownership field as we did on the Company record and click the selector icon
- Now, let’s say there are 2 users who are splitting ownership of this person. We will add both of them to this screen as we did before – but with the appropriate percentage.

- Remember the percentages entered here are splitting the 25% that is being dispersed to the Candidate owner – so KathyJ and PennyJ would both be getting ½ of the 25%, so 12.5% each.
- Save when finished
- Follow the same process on the Position Record if desired.
Interview records will work slightly different when assigning Ownership, in fact; the person entering the Interview will automatically be given 100% credit for the interview they are adding. Read on for more details.
Linking to a Pipeline #
When a user links a Candidate to a Pipeline that user is automatically given 100% for that action.
- Select the Candidate you would like to link
- Choose Link to Position
- Choose the Position you would like to link to
- The Candidate is Linked and you do not have to do anything further to receive Split Desk credit for linking the record (In this case KathyJ).
Adding an Interview #
- From the Pipeline Choose Action for the record you would like to create an interview for.
- Choose Add

- Enter your interview details as you normally would
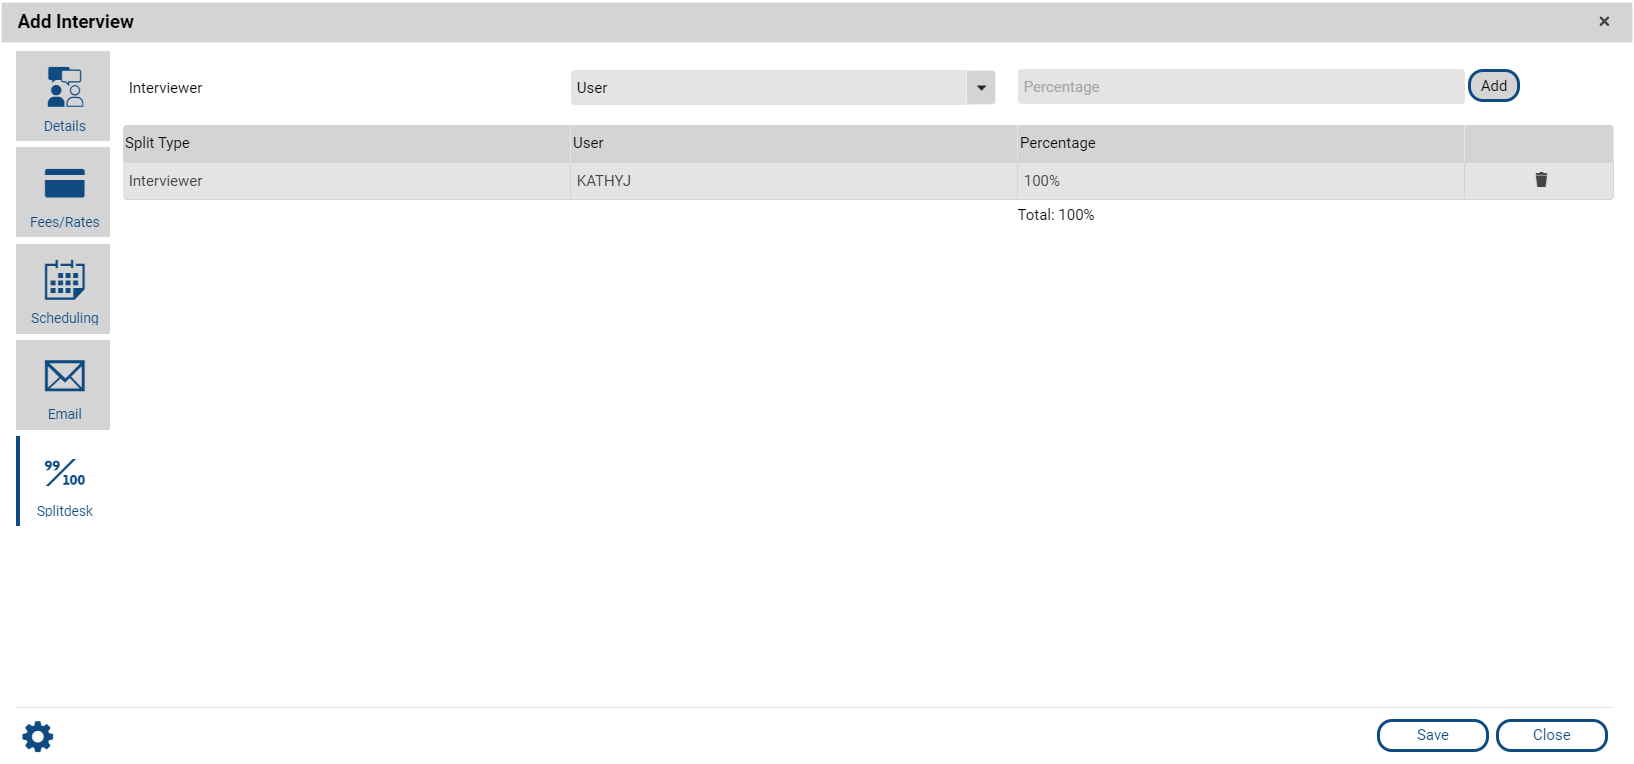
- Select the Splitdesk Charm
- Here you will see the Username in the Written By field is already populated here at 100%
- You can delete this and choose to add multiple users for a particular interview if desired, but this screen must equal 100%
These same rules will apply if you are using Drag and Drop in a pipeline, the person completing the action will automatically be given 100% of the interview.
If the same person is completing all steps of the interview process with a candidate this doesn’t get too complicated – they would receive the full 25% that has been delegated to the interviewer.
However, you could have 2 interviews with different owners, or you could have 1 interview with 2 different owners, either would cause a split of the 25% accordingly.
For this example, Penelope had the following Interviews:
- Linkname = Bobs 100%
- Tel Int = KathyJ 100%
- 1st InPers = PennyJ 100%
Making the Placement #
Now we will create a new Placement for Penelope following the same processes outlined above. But this time, we will be automatically adding our Split Desk data based on the Ownership fields previously discussed.
- Enter a Placement including Placement Fee as usual (Or using the Contract Estimator if placing a Contractor)
- Click Save
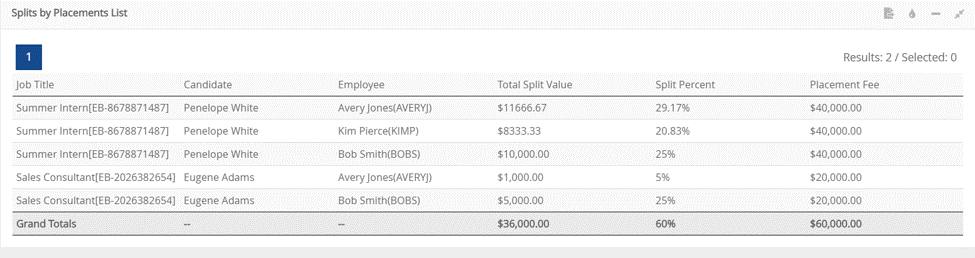
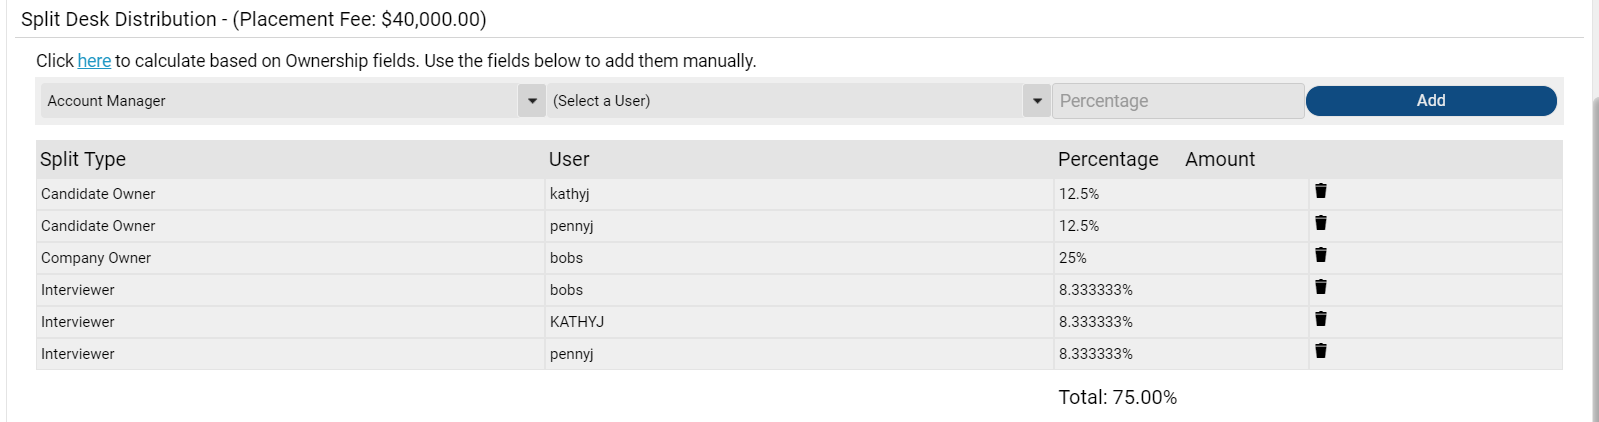
- Now, go to the Split Desk Distribution and click the “here” link, the data is automatically populated as we have entered through our example:
- Click Save when finished.
Calculating Commissions #
Commissions can either be calculated in conjunction with Split Desk Distribution or separately.
Calculating Separate Commissions #
Once a placement has been made a user can opt to utilize the Commissions area instead of the Split Desk Distribution area. This is useful if you (or an administrative person) just want to go through and enter Commissions for each user – no splitting involved, just entering dollar amounts.
- Once the placement has been made scroll to the Commissions
- Click Add

- Choose a Username
- Enter their Commission Amount
- Save – You do not need to do anything else on this screen

- Continue to add until all Commissions have been added.

- Save the Placement when finished.
Calculating Commissions Based on Split Distribution #
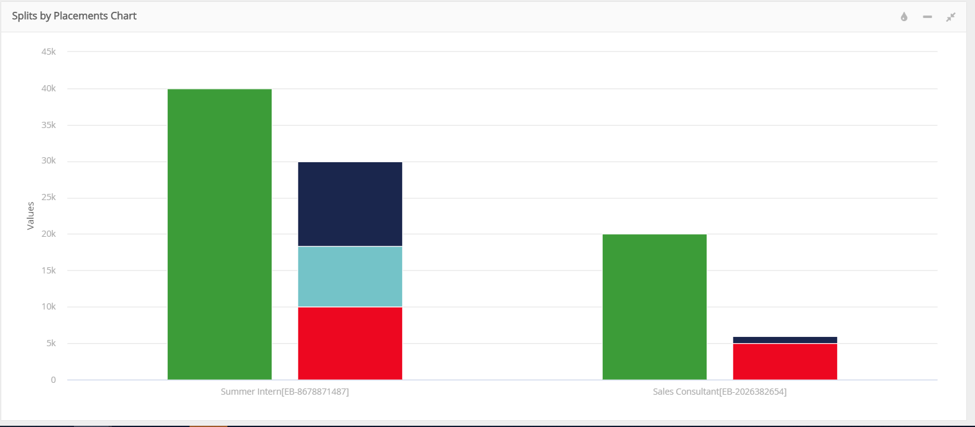
Let’s take a look at our last option which is to enter Commissions Based on Split Distribution. For this we will return to our example with Penelope, her Split Desk Distribution looks like so: 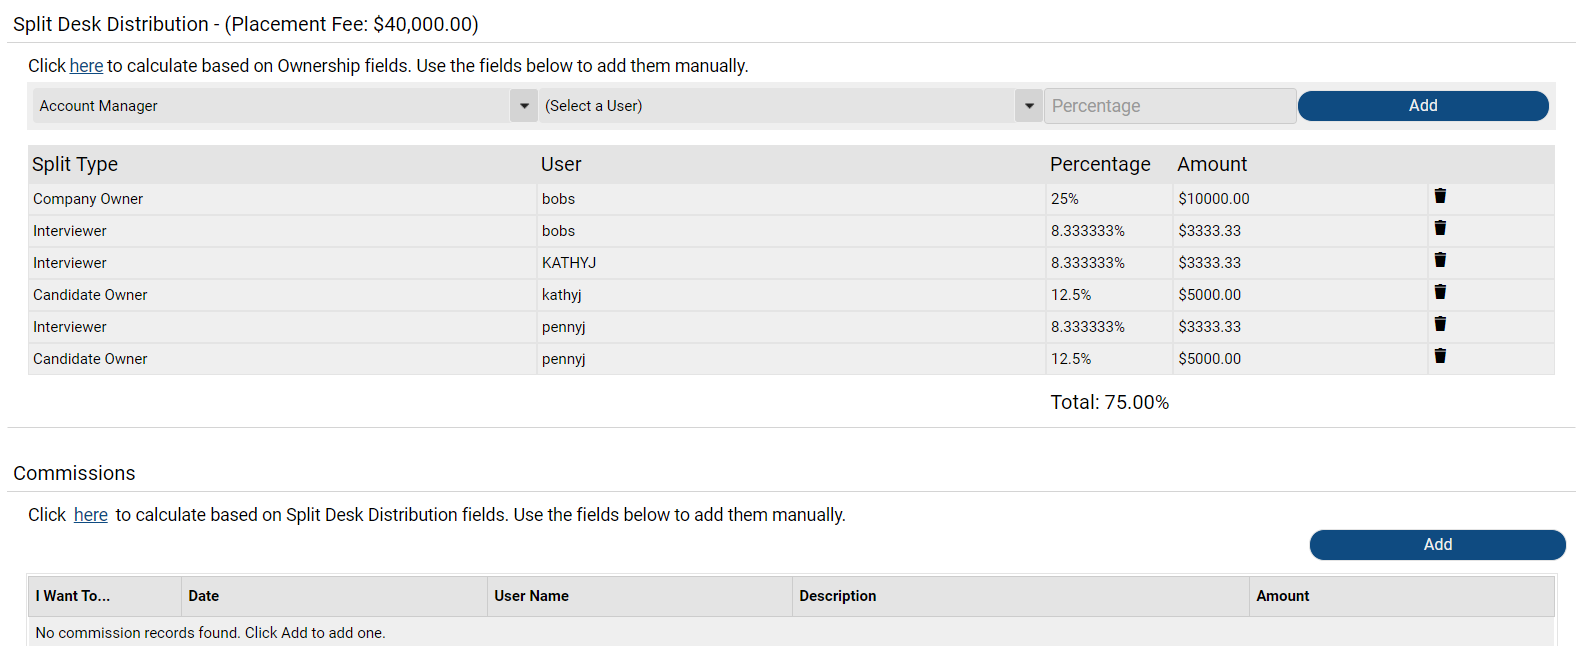
Below the Split Desk Distribution you will see the Commissions area.
You can choose to manually enter Commissions as discussed above, or you can click the “Here” option to automatically pull the data into this section as well. This will allow the data to be shown on the Splits by Commission chart with the Analytics – which shows total brought in from the placement vs. commissions paid. 
The Analytics will look as follows: