Table of Contents
Activating a Sequence #
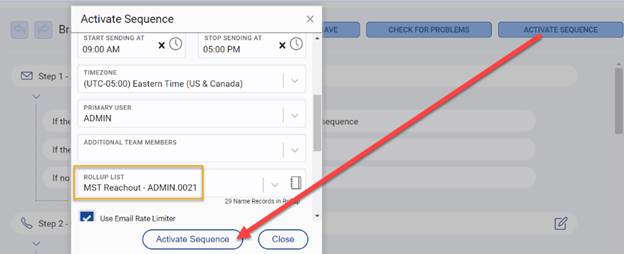
Once you are ready to begin using the Sequence, click the Activate Sequence option at the top right.
- Enter a Sequence Name
- Begin Sequence / End Sequence: Specify when the Sequence should begin. Specifying an End Date is not required but can be used if you want to prevent Tasks from continuing to be completed outside of a specific timeframe.
- Send on Days: This is required, as your Sequence may contain automated emails or SMS messages. This setting will allow you to control the days on which emails and text messages are sent. For example, you can select only workdays to prevent messages from being sent on weekends. This also affects when a name can be triggered to move to the next Step.
- Start Sending At / Stop Sending At: Specify the times during which to send automated emails and text messages (i.e. only during business hours.) This also affects when a name can be triggered to move to the next step.
- Timezone: This setting couples with the start/stop ending times.
- Primary User: Select who to activate the Sequence for as the primary User. If multiple Users will be using the same Sequence, select the additional Users in the Additional Team Members area.
- Rollup List: Select the Rollup List of names that will be used for this Sequence.
- Only one Rollup can be associated with each Sequence. You cannot run one Sequence on multiple Rollups, nor can you use multiple Rollups with one Sequence. If the Rollup is already assigned to an activated Sequence, you will not be able to activate a new Sequence with that list.
- When you remove someone from a Rollup list that is associated with a Sequence it will place their Steps/Tasks into a paused state. If the name is added back to the same Sequence/Rollup they will resume from that position. They will not return to the beginning of the Sequence.
- If you use the “Remove from Sequence” option, the contact will be removed from the Sequence and the Rollup. If they are subsequently re-added to the list, they will return to the Step they were active in when removed.
- Click Activate Sequence.
If your Begin Sequence Date has already passed, your Sequence will instantly begin. If it is scheduled for the future, the Sequence will not start until the designated Date/Time is reached. Once the Date/Time has been reached, any Name records that are currently on the Rollup List will enter the Sequence. If the first Step of the Sequence is an Automatic Task, the Task will run in the background. If the first step is a Manual Task, you will be able to begin working on your tasks from the Tasks screen.