Once your Sequence Template and Rollup List have been created the Sequence is now ready to be activated. Advanced Sequences can be activated by any user who has the Add/Save Sequence permissions enabled. For larger offices it is recommended that an Admin user be in charge of activating and assigning out Advanced Sequences to their users. This allows the Admin to ensure that a standardized process is followed and that one template is able to be used to create Advanced Sequences for multiple users.
Activating a Sequence #
Click the Activate Sequence option at the top right inside of the desired Sequence template.
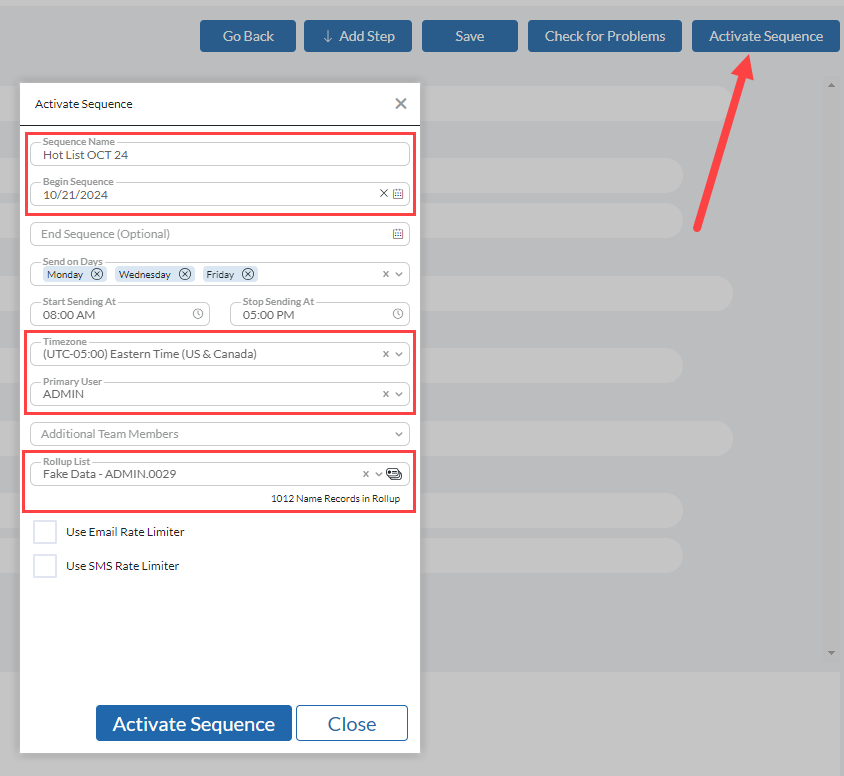
- Enter a Sequence Name (Required-Cannot be the same as a previous Sequence)
- Begin Sequence (Required) / End Sequence (Not required): Specify when the Sequence should begin, this is required to start your Sequence. Specifying an End Date is not required but can be used if you want to prevent Tasks from continuing to be completed outside of a specific timeframe. (Sequences can be manually ended at any time).
- Send on Days (Not Required): This setting will allow you to control the days on which emails and text messages are sent. For example, you can select only workdays to prevent messages from being sent on weekends. This also affects when a name can be triggered to move to the next step as well as when the name record will appear on the task list.
- Start Sending At / Stop Sending At (Not Required): Specify the times during which to send automated emails and text messages (i.e. only during business hours.) This also affects when a name can be triggered to move to the next step as well as when the name record will appear on the task list.
- Timezone (Required): This setting should reflect the primary user’s timezone. This controls activity writing timestamps and ensures that start/stop sending times function correctly.
- Primary User (Required): Select who to activate the Sequence for as the primary User. If this user does not match the Template Username you will be prompted to update the email aliases for all steps with the selected Username.
- Additional Team Members (Not Required): If multiple Users will be using the same Sequence, select the additional Users in the Additional Team Members area. This gives the additional users with the my tasks permission to access the tasks from that Sequence.
- Rollup List (Required): Select the Rollup List of names that will be used for this Sequence.
- Only one Rollup can be associated with each Sequence. You cannot run one Sequence on multiple Rollups, nor can you use multiple Rollups with one active Sequence. If the Rollup is already assigned to an activated Sequence, an error message will appear and you will not be able to activate a new Sequence with that rollup list.
- When you remove someone from a Rollup list that is associated with a Sequence it will place their Steps/Tasks into a paused state. If the name is added back to the same Sequence/Rollup they will resume from that position. They will not return to the beginning of the Sequence.
- If you use the “Remove from Sequence” option, the contact will be removed from the Sequence and the Rollup. If they are subsequently re-added to the list, they will return to the Step they were active in when removed.
- Set your Email or SMS Rate Limiter (Not Required): Limits the number of email or texts that will go out in a specified timeframe. For more information on rate limiting click HERE.
- Click Activate Sequence. You Sequence will now show on the Overview Panel and your Tasks will be available from the Task screen.
If your Begin Sequence Date is the current date or one that has already passed, your Advanced Sequence will instantly begin. If it is scheduled for the future, the Advanced Sequence will be automatically paused when activated. Once activated unpause the Sequence and when the Date/Time you selected has been reached, any Name records that are currently on the Rollup List will enter the Sequence. If the first Step of the Sequence is an Automatic Task, the Task will run in the background. If the first step is a Manual Task, you will see the tasks displayed on your Task screen.
Sequence Tasks #
Task Listing #
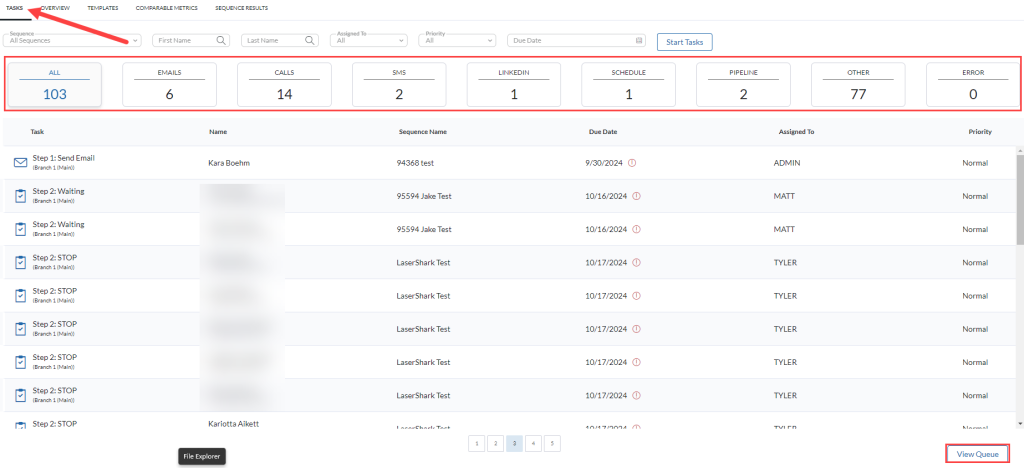
When you enter the Advanced Sequencing dashboard, the first screen that will open is your Tasks. This is where you can view all Tasks which you have access to and any actions you need to take, grouped by type (Email, LinkedIn, etc.). At the top are filters to narrow down the list based on the Sequence name, user it is assigned to, priority, and due date.
When the Tasks screen first loads, you will see ALL Tasks. You can filter by a specific type of Task by clicking the button for the desired step type.
If you do not see any names in your Tasks area, it may be for one of the following reasons:
- If the next Step is in an automated Email or SMS, then there is no manual Task for you to execute. (Check the queue for records that will pop up in the future).
- If you activated a Sequence outside of the Start/Stop Times that were set, there may be no Tasks to complete until the following day. For example, if it is 3 PM and you activate a Sequence that is set it to send from 8 AM to 2 PM, the Tasks will not start showing up until the following morning at 8 AM.
- Filters selected at the top of the Tasks screen may be causing some Tasks to be hidden. Look for a numeric value greater than 0 in the ALL tasks filter.
- Steps which carry a delay may be queued but not ready for the next Task to be completed. You can click View Queue to see any contacts waiting in this state.
- The Sequence or Task may be active but not assigned to your user name.
Completing a Task #
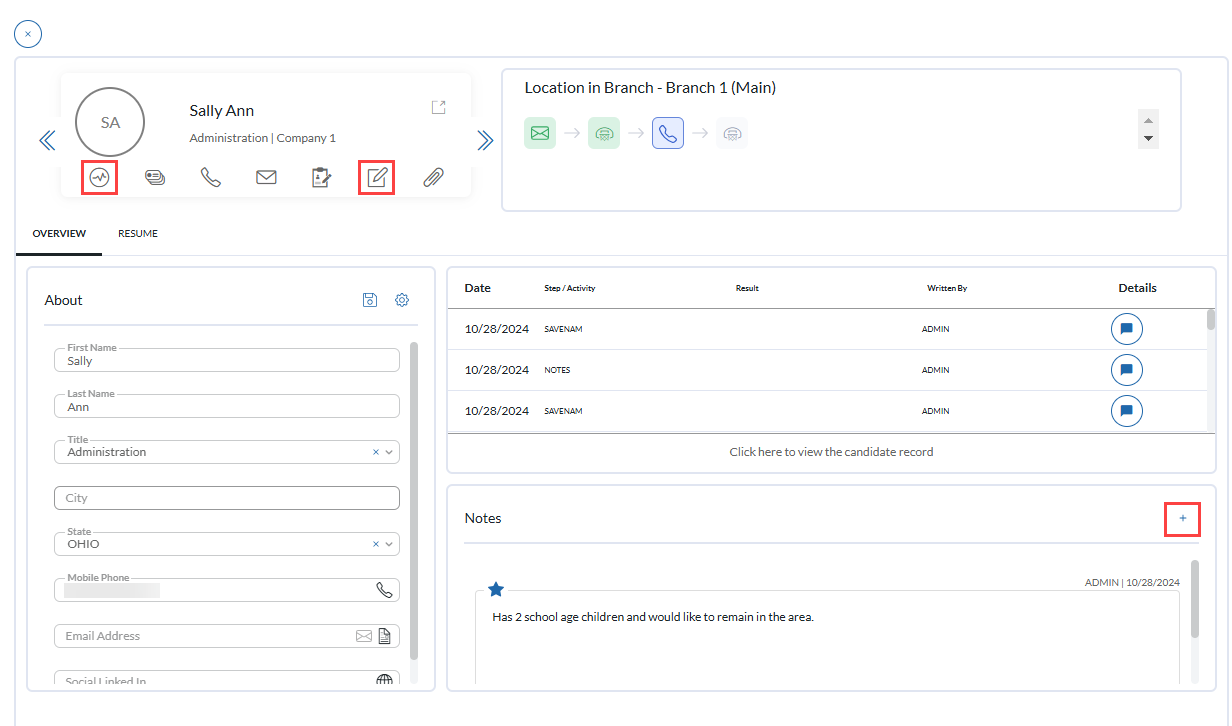
When a Task is displayed, you will have access to important information about the person and the Task. The areas of the Task panel are as follows:
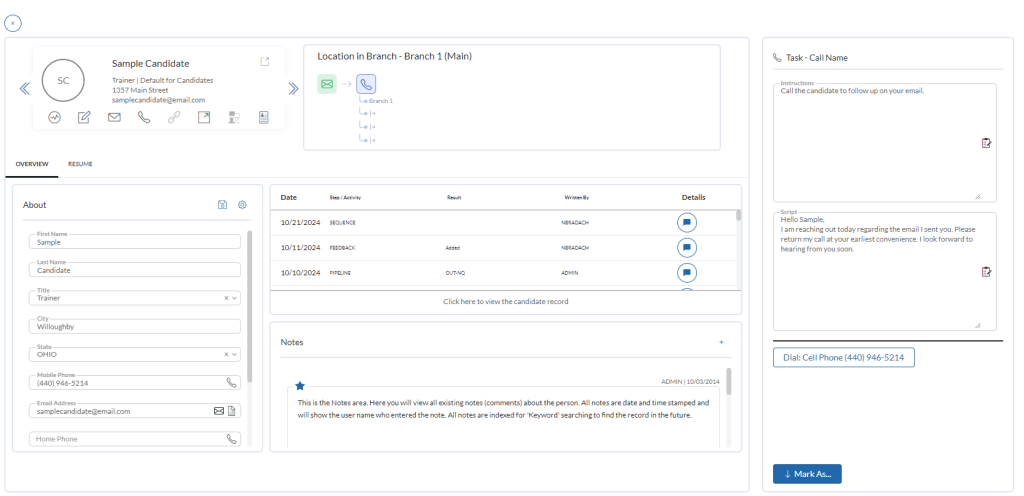
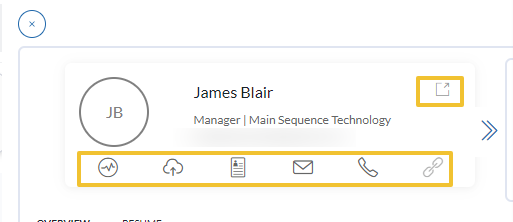
- Card: The card, located in the upper left, provides a summary of info about the person. The shortcut icon to the right of their name that will open their full record. At the bottom of the card are quick links for actions such as writing an activity, adding a note, or making a call. These shortcuts reflect the same setup you have for your record cards from the Pipeline. To adjust these settings please reach out to the support team for assistance.
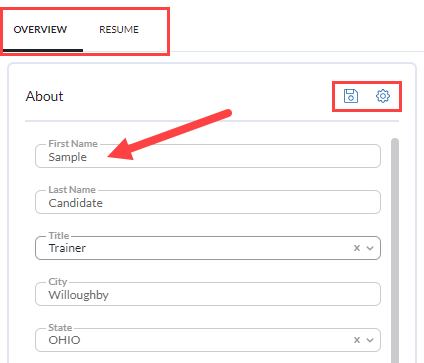
- Overview & Resume: You can edit field data directly in the Overview / About section then click Save to store the changes.
- Use the Configure gear icon to select which fields to show.
- Click on the Resume tab to review the person’s resume.
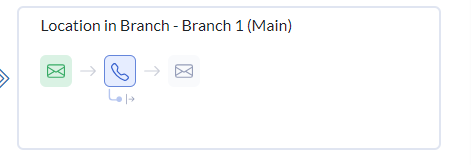
- Location in Branch: This graphic in the top center of the display shows where the person currently stands in your Sequence.
- Activities: The center list shows the person’s recent Activities. Below the activity listing is a link to open their full name record.

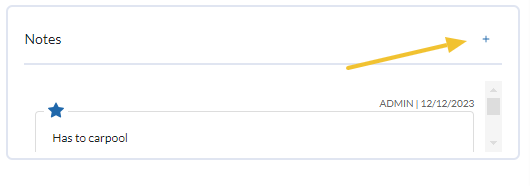
- Notes: Displays existing notes with the ability to add a new note to the name record. This is
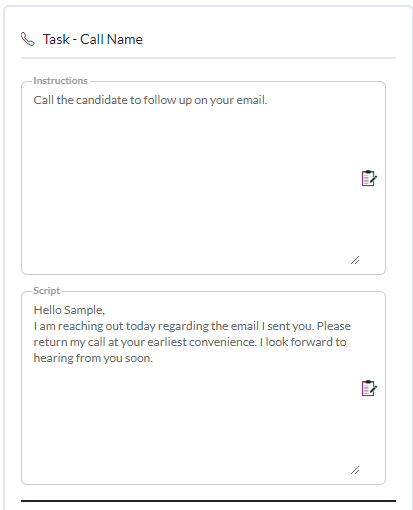
- Task: This box provides any Instructions or Script for the Step, as defined by the Sequence. The clipboard icon on these two boxes will copy the Script’s text for use elsewhere.
- Mark As: This is a menu of the Conditions defined for the Step. Selecting a Condition will determine how this contact proceeds in your Sequence. Once you use ‘Mark As’ to set the Condition, the next record in your Task list will display automatically.

Regarding Contacts with Blank Email Addresses: If you have an Automatic Email Task queued for someone who does not have an Email Address on their record, you will see an error indication on the Tasks list. You can click on that row, populate the Email Address field in the ‘About’ panel on the Task screen, and click the Save icon. If the Email Address field is not available in your Overview ‘About’ area, click the icon to the right of their name to view and edit the full name record or use the gear icon to configure and add the Email to your view. Once the email has been added, return to the Task, click ‘Mark As,’ and then select Retry. If the error cannot be resolved, you can remove the name from the Sequence.
View Queue #
Click the ‘View Queue’ option at the lower right corner of your main Sequence screen to see names that have a pending next Step. The Queue screen will show each contact’s last Task and Outcome, their Next Task, and when the Next Task is scheduled for. You can use the filters at the top of this window to filter this list, and can right-click on a person’s row to jump to their name record.

- The Queue will only show names that have completed at least 1 step in the Sequence. Names that are waiting to complete step one, such as those scheduled for a future send date or controlled by the rate limiter, will not be shown here.
- If the previous step was an automatic Email or SMS step that had multiple conditions the Last Task Outcome and Next Task columns will display a status of “Waiting….” until the previous criteria has been met. For these records the Next Task Scheduled For column will display the date of the “If no conditions met in X timeframe” condition assigned to the step.

- The “Move to Next Task Now” action for automatic Email and SMS steps will follow the “If no conditions met in X timeframe” setting for the next task. Keep this in mind if you need to manually move someone forward in the Sequence.
Sequence Activities #
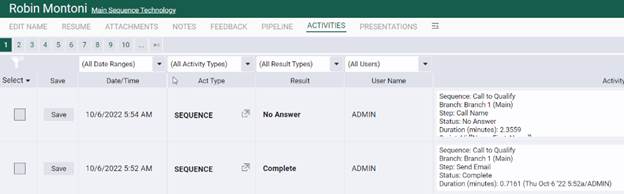
As you move a name through a Sequence, a SEQUENCE activity is written to the contact’s name record. The Activity Text will include the Sequence details.
If you want to add a specific manual Activity to the record, you can use the Add Activity and Add Note shortcuts in the Task pane.
Overview Panel #
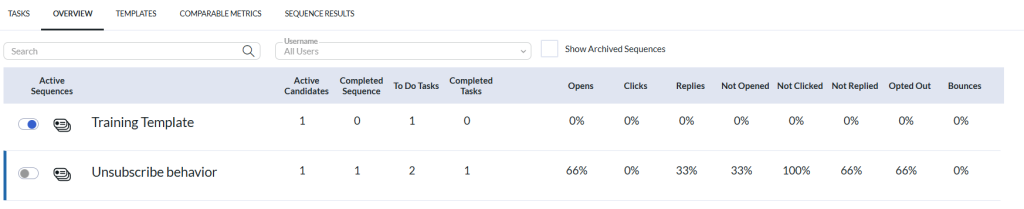
- The Overview area of Sequencing will include:
- A toggle for activating / pausing each Sequence.
- A count of Active Candidates / Names in the Sequence. NOTE: This count will not show any Active contacts until at least one Task has been completed. For example, if your first Task is to send a manual email, at least one contact’s first ‘manual email’ Task must be marked with a Condition before any indication of activity will appear here.
- A count of contacts that have Completed that Sequence.
- A count of To-Do Tasks outstanding for that Sequence.
- A count of completed Tasks in that Sequence.
- If your Sequence includes a email step, you will also see the percentage of opens, clicks, replies, etc.
- For Sequences with the toggle indicating an Active state, right-clicking will show options to ‘Use as Template’ or ‘Pause Sequence’ (this does the same thing as the toggle)
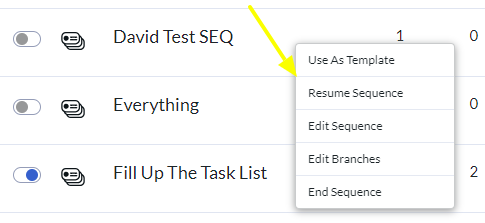
- For Sequences with the toggle indicating a Paused state, right-clicking will show options for the following:
- Use As Template – use the Branches, Steps, and Conditions of this sequence as a sequence template
- Resume Sequence – used after pausing and editing to pick up where the Sequence left off.
- Edit Sequence – used to edit the existing Sequence (i.e., send on days, times, etc.)
- Edit Branches – used to edit the flow of Branches, Steps, and Conditions.
- End Sequence – used to stop the Sequence. THIS ACTION CANNOT BE UNDONE.
- You can right-click on a Completed Sequence and select Archive Sequence to hide it from the Overview screen.
Sequence Results and Comparable Metrics #
Sequence Comparable Metrics and Results can be accessed from within the Advanced Sequencing dashboard or from within the Analytics feature.