Whether you want to monitor user activities or create specialized teams for more effective analysis, this tool provides a comprehensive set of features. To get started with PCRecruiter Analytics, follow these step-by-step instructions to enable user access, configure security levels, and create teams to streamline your data analysis.
Enabling User Access to Analytics #
- After enabling Analytics for your database, follow these steps to grant user access:
- Click on “System” in the main toolbar.
- Select “Users,” then click on “Manage Users.”
- Choose a specific username and click on “Security on the left.
- Navigate to the “Other” section and change the Analytics security from “No Permission” to “Full Permission.” Then, click “Save.”
- Once a user has been granted permission for Analytics, they will notice an unpinned Analytics icon on the main toolbar. Users can go to the full menu and click the push pin to keep the Analytics icon permanently displayed.
- An initial “power user” will be assigned for the initial Analytics setup. However, Analytics has its own user security section to manage and define user capabilities within the tool.
Configuring Analytics Security Levels #
Within Analytics, it’s essential to define the level of access for each user, which determines their filtering capabilities and whether they can access the Administration section to perform any setup tasks. This access control ensures that users can focus on the specific data and actions relevant to their roles and responsibilities.
- Click “Analytics” on the main toolbar.
- Go to “Administration.”
- Click on “User Security,” where you’ll find a list of users. On the right, specify their level of access within Analytics.
- “No User or Team Filters”: Users can only view their own Analytics and won’t access analytics for other users.
- “Filter by Related Teams or Users”: Users can view their own Analytics and those of team members.
- “Filter by Anything”: Users can view metrics for any user or team but don’t have access to the Administration section.
- “Full Admin”: These users have complete filtering capabilities and access to the Administration section for user management and Analytics configuration.
Creating Teams #
Teams can be beneficial for larger clients to organize and analyze data for specific groups of users, such as Recruiting or Business Development teams. To create a team:
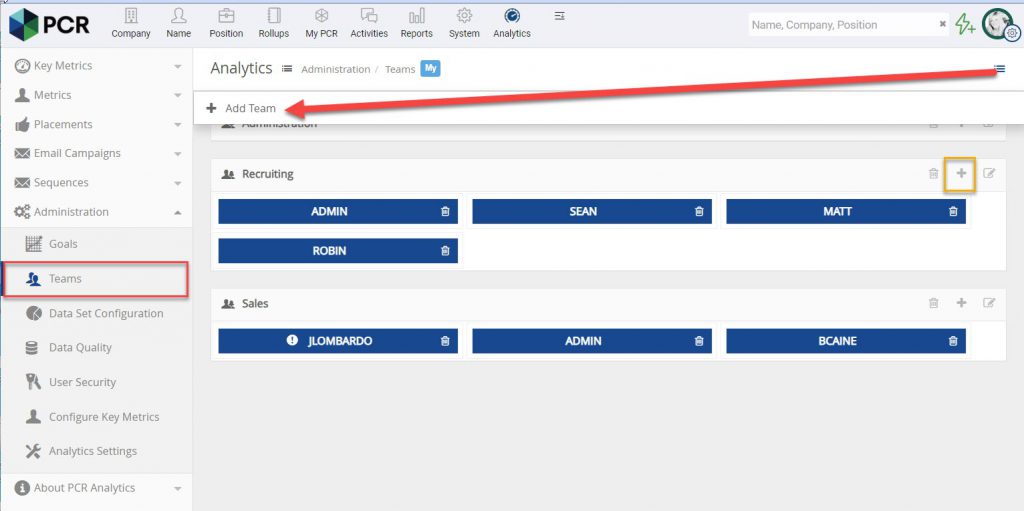
- In the Analytics section, click on “Administration,” then select “Teams.”
- To generate a new Team Name, click the three-lined icon at the top and choose “Add Team.”
- Provide a name for the team, e.g., “Sales,” and then click “Save.”
- You can assign members to the Sales team by clicking the ‘+’ symbol on the Sales header.
- A dropdown of all usernames will appear. You can search by name, select members, move them to the right to be included, and then click “Save.”