Now, let’s dive into the highlight of the recruitment process – placing the chosen candidate. Follow these instructions to add a Permanent Placement record, marking their official entry as an employee of the client company.
Placing a Candidate #
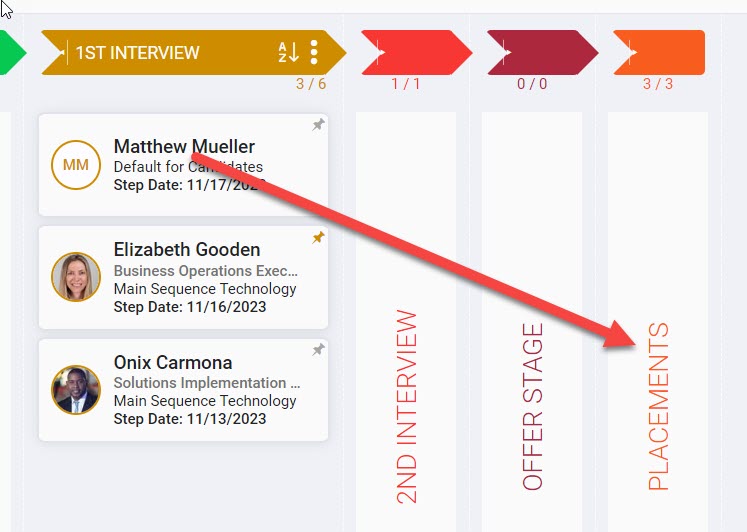
- Open the Position record.
- Click “Pipeline”.
- Location your candidate within the pipeline.
- Follow either of these steps:
- Drag and drop the candidate’s card onto the “Placements” pane of the Pipeline, or
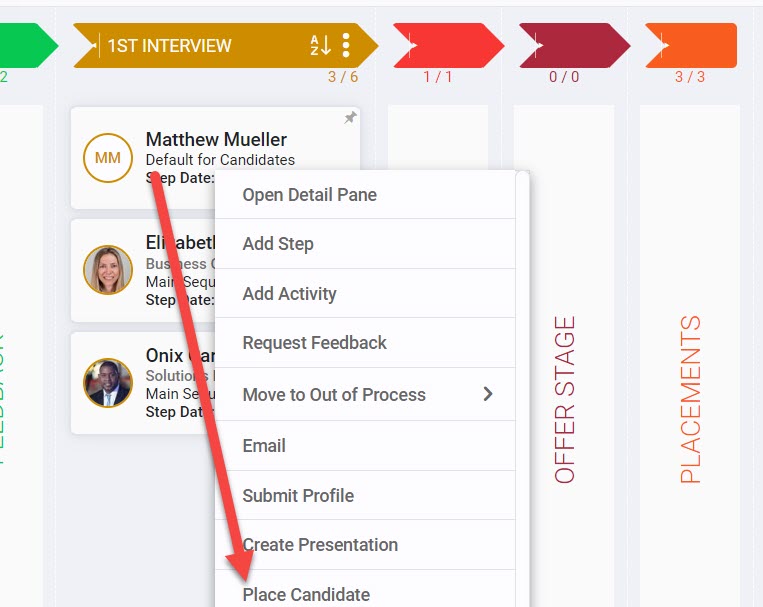
- Right-click on the candidate’s card and select “Place Candidate”.
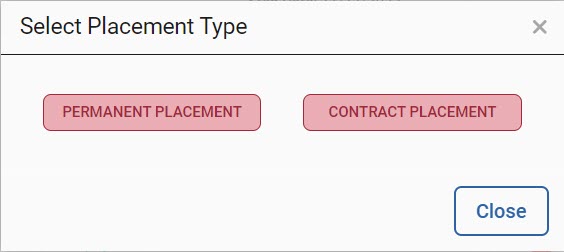
- You will then be prompted to add a Permanent or Contract Placement. Select “Permanent Placement.”
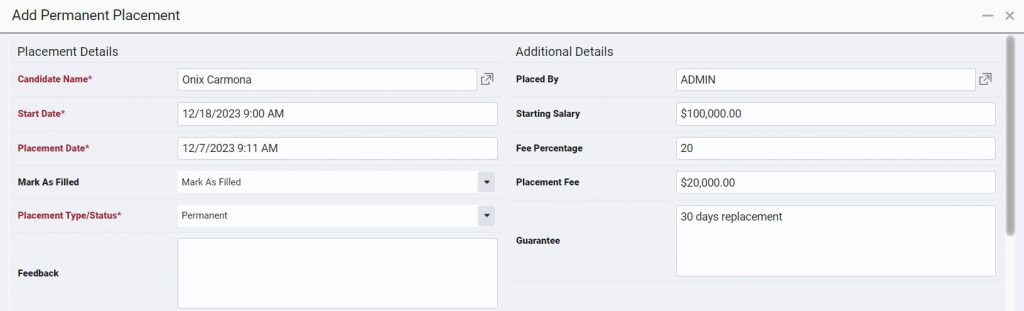
- Enter the placement details. At a minimum, specify the Placement Date, Start Date, Starting Salary, Fee Percentage, and Fee Amount.
- The “Placed By” field defaults to your logged-in username. Administrators can use the dropdown to select another user placement credit.
- The “Mark As Filled” field defaults to “Remove One Opening.” Change it to “Mark as Filled” to not only reduce the number of openings but also update the Position’s Status field to “Filled.”
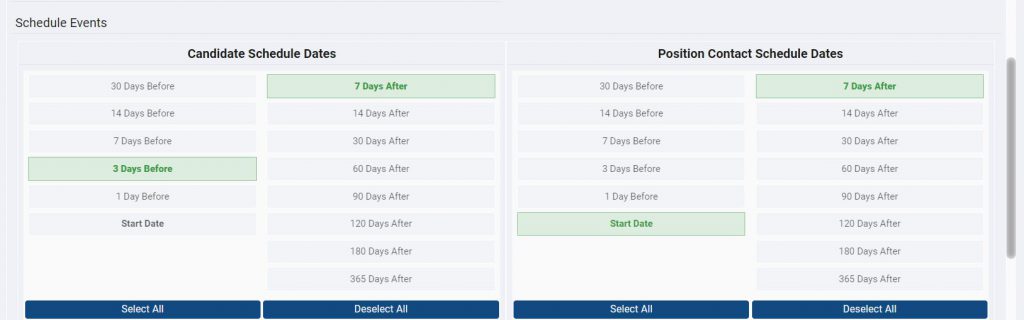
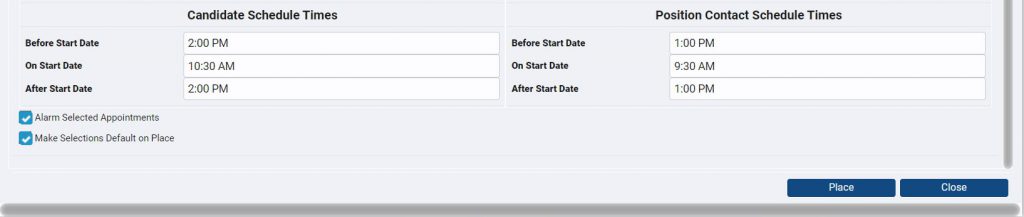
- Use the Scheduled Events section to schedule outreach appointments in your PCR Schedule for the candidate and/or position contact. Choose the timing from 30 days before the candidate’s start date up to one year after. Use the three time dropdowns to specify when these events will be added to your schedule. Below this, use checkboxes to enable alarms or set default selections for future candidate placements.
- Please note that if your database has the Split Desk feature of Analytics, you will need to complete the Split Desk Distribution section to be credited for the placement.
- Click “Place”.
Placing Multiple Candidates #
Efficiently add placements for multiple candidates for the same job with this method:
- Open the Position record.
- Navigate to the Pipeline.
- Select each candidate’s card within the pipeline.
- Drag and drop the cards directly onto the Placements pane or use the “Actions” option at the bottom right, choosing “Add Permanent Placement.”
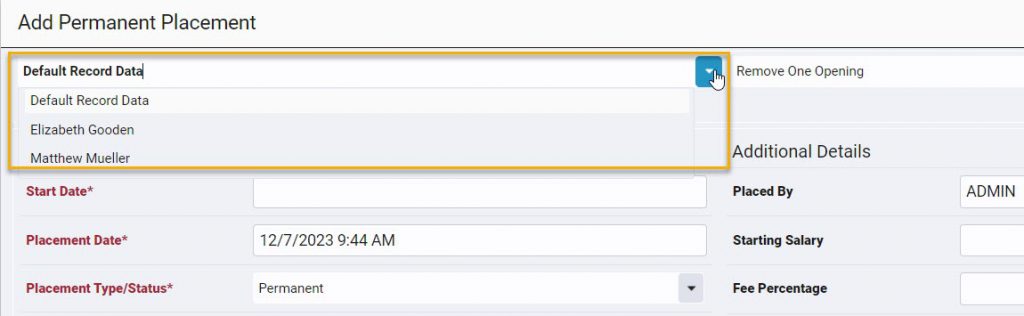
- On the placement screen, find a dropdown at the top left, set to set to “Default Record Data” by default. The placement details will be uniformly applied to all selected candidates. Alternatively, choose a specific candidate’s name from the dropdown, add details, and switch to another selected name.
- Click “Save All Placements”
Automated Placement Actions #
Adding a placement will automatically trigger the following changes:
- Each placement reduces the Number of Openings field on the Position record by one.
- If you chose to Mark the Position as field, the Status field on the position record will change to Filled.
- The placed candidate’s Name record will move from their previous Company to the one associated with their new Position.
- The Status on the candidate’s Name record will change to Placed.
- The candidate will inherit the Job Title of the Position. The Starting Salary also populates to the Current Salary field on the Name record.
- The Work History of the candidate will now populate with information from this placement such as the company name, start date and salary.
If further actions need to occur, learn how to create Automations.
With the proper security settings a user can also customize their placement layouts and create custom Placement fields. Click here to learn how.
Accessing Saved Placements #
Once a placement is saved, you can conveniently access it using the following methods:
- From the Position Record – Pipeline Section
- Right-click on the candidate’s card in the Placements pane within the Pipeline. Select “View Placement.”
- From the Position Record – Placements Section:
- Navigate to the Position record and click on “Placements.” This displays a list of all saved placements for the Position. The date serves as a hyperlink to open the placement record. If the desired placement is not listed, click the “Add Permanent Placement” action icon to add it directly from here. Note that when using this method, you’ll need to use the Candidate Name dropdown to select the chosen candidate.
- From the Candidate’s Name Record:
- Open the candidate’s Name record and click on “Pipeline.” Expand the pipeline details area and click on the “Permanent” step to view the Placement details.
- From Activities – Interviews:
- Navigate to “Activities” on the main toolbar and select “Interviews.” Use the “Filter by Interview Type/Status” option to narrow down your search to Placements. The date serves as a hyperlink to open the Placement record.
Keep in mind that once the Placement screen is displayed, you can edit the fields, but the “Scheduled Events” section is only available during the initial placement addition.