Table of Contents
For a basic export of candidates based on a specific pipeline stage or date for a particular position, the Custom Pipeline Report is suitable. For more advanced features, such as filtering by current pipeline status and grouping to display only the candidate’s latest pipeline record for the specified position, we recommend using the Custom Applicant Tracking Report.
Creating a Custom Pipeline Report #
- Click “Reports” on the main toolbar.
- Click on the “Manage Custom Reports” action icon.
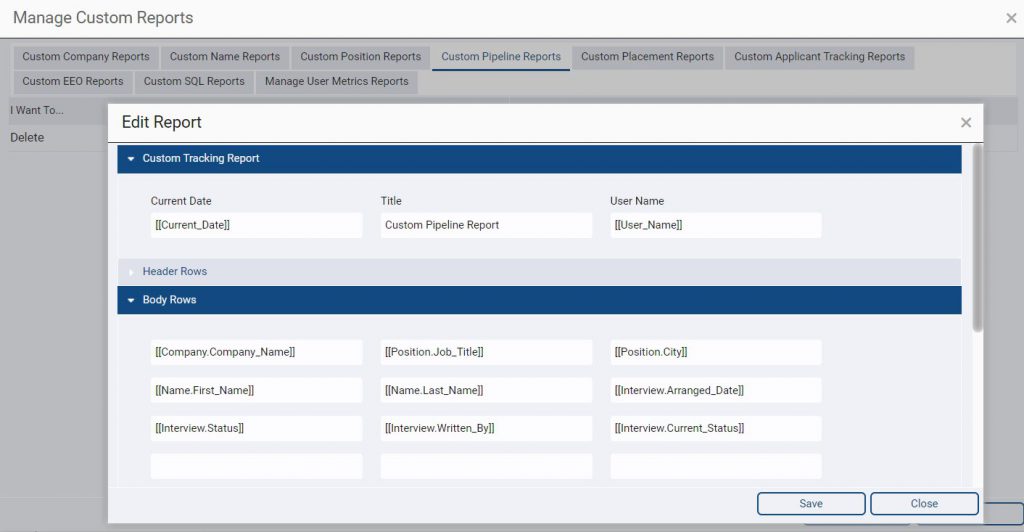
- Click on the “Custom Pipeline Reports” tab.
- Click the “Add” button to create a new report.
- In the “Custom Tracking Report” section, replace the placeholder [[Report Title]] with your desired report name.
- Begin populating the cells in the “Body Rows” section by clicking on the first cell and choosing the desired field.
- Continue selecting fields from left to right and row to row, with the option to choose up to 18 fields. Keep in mind the field prefixes:
- Fields starting with “Name” pertain to the candidate.
- Fields starting with “Company” relate to the company associated with the job.
- Fields starting with “Position” are relevant to the job itself.
- Fields beginning with “Interview” correspond to specific stages in the pipeline.
- Customize Header Rows:
- As you select a field, the field name will populate the Header Row cells. For example, you can change the header from “Company_Name” to “Client.”
- Use Field Groups (Optional)
- In the “Field Groups” section, you can display a list of unique values for the selected field and a count of records with each unique value. For instance, you can choose the [[Name.Details.EEOC_Source]] field to display a breakdown of the record count based on the candidate’s source.
- Include Totals (Optional)
- In the “Totals” area, you can include a count of how many records contain data in the selected field.
- Save your Custom Pipeline Report:
- Once you’ve made all your selections and configured your report to your satisfaction, click “Save.” Your custom report will be accessible in the “Pipeline Reports” section under the Reports menu.
Generating a Custom Pipeline Report #
- Choose “Reports” on the main toolbar.
- Select “Pipeline Reports.”
- Click on the name of the desired report.
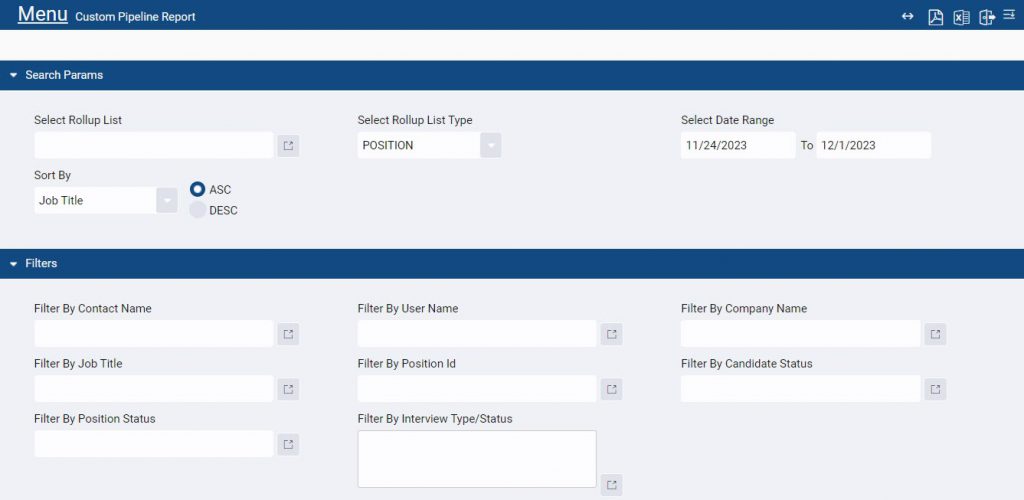
- In the ‘Search Params” area, you have the option to:
- Select a Rollup List of Companies, Names, or Positions.
- Limit by Date Range, based on the Appointment Date of the Pipeline record.
- Choose your sorting preference using the “Order By” dropdown, followed by selecting either ascending or descending order.
- Use the options in the “Filters” section to further refine your results:
- Filter by Contact Name: narrows results based on the Contact Name of the Position record.
- Filter by User Name: narrows results based on the User Name of the Position record.
- Filter by Company Name: narrows results based on the associated Company Name.
- Filter by Position Title: narrows results based on the Title field of the position record(s). Note: Use the Position ID field for specific job limitations.
- Filter by Position ID: narrows results based on the Position ID field for a specific position record.
- Filter by Candidate Status: narrows results based on the Status field of the candidate’s Name record (e.g., C, D, P).
- Filter by Position Status: narrows results based on the Status field of the Position record (e.g., A, F, C).
- Filter by Interview Type/Status: narrows results based on the pipeline stage (e.g., Resume/Submitted). Please note that the Custom Applicant Tracking Report also offers a “Filter by Current Interview Type/Status” option. If you only want rows returned based on the current status, consider using a Custom Applicant Tracking Report.
- Access the action menu and opt for your desired export format (Note: Export options beyond PDF View Mode depend on your Export Reports security setting).