
When PCR Capture is able to detect capturable information, a ‘Click to Add’ (or ‘Click to Update’, if the contact already exists in your database) prompt will appear on the right side of the browser window. This icon can be dragged up and down if you wish to reposition it while reading the page. Click on the icon to begin capturing the currently displayed record.
Review Captured Info #
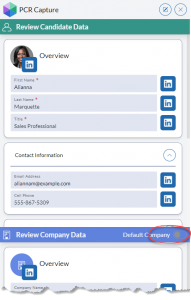
If PCRecruiter is unable to find any existing records in the database that could conceivably be a duplicate of the captured contact, you will be taken directly to the Review Candidate Data screen.
This screen contains an overview of the information about the name and company extracted from the page. You may edit it as you please before clicking Complete Capture at the bottom of the panel.
Default Company Toggle:
‘Default Company’ toggle is OFF: Capture will generate a company record using the data shown and will associate the newly captured name with that company.
‘Default Company’ toggle is ON: The company information will be ignored and the captured name will be added to the database’s Default Company (e.g. Talent Pool, House Account, or Candidates Company.) The ‘Review Company Data’ section will be collapsed.
If you are unsure of your database’s Default Company, log into PCRecruiter and use the ‘Display Default Company’ option. This can be found in the Action menu at the top of your Basic Company Search screen.
Merging Duplicate Records #
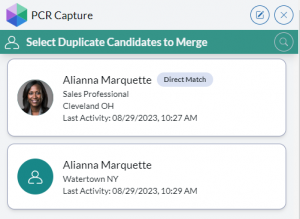
PCR Capture will automatically compare the contact and company data to existing records in the database, displaying “Click to Update” rather than “Click to Add” if possible matches are found.
PCRecruiter will identify up to 20 duplicate records and will allow merging of up to 11 of them into the captured record.
As with any other data merge performed in PCRecruiter, non-admin users must have the Allow Record Merging security permission enabled on their User Record in order to perform this operation. Without this permission users will only be able to update one existing record with new information rather than combining several duplicates.
If the first/last name and email, first/last name and phone, or the social network URL directly matches an existing record, you will see a ‘Direct Match’ indicator by that name. Other potential duplicates may be identified based on combinations of additional standard and custom fields from the record using a weighted algorithm.
If one or more duplicate Name or Company records are found, they will be displayed in a list. If left untouched, these detected duplicates will be ignored and the ‘Add’ process proceeds as normal.
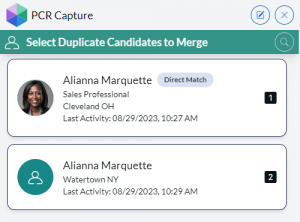
However, clicking on one or more duplicate records will assign it a reference number. After applying numbers to one or more identified duplicates, click Review Records at the bottom right.
On the Review Candidate Data screen, you will see icons next to each field, indicating the source of the data in that field. Fields not collected from the captured record will be auto-populated with data from your selected duplicates if a value is available, and prioritized by the numbered order you’ve selected.
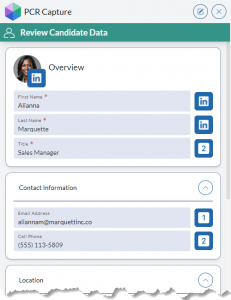
Clicking on the icons will cycle through the options for that field, including the data just captured and the duplicates you numbered on the previous screen. Use these to select which value you wish to retain in the final merged record.
In the example shown to the right, the photo, First Name, and Last Name from the captured LinkedIn record are being imported, while the Email Address on file from record #1 and the Title and Cell Phone values from record #2 are being retained. The resulting single record in PCRecruiter will contain the selected fields from all three records.
Manually Locating Duplicates #
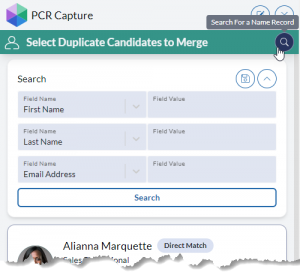
On occasion, the data available on the screen may not be enough to trigger an automatic duplicate detection, but you are aware that there is already a record on file for the person or company shown on the screen. In this case, you can use the magnifying glass icon to manually search for the record(s). If you are on the ‘Review Candidate Data’ screen, click the ‘Back’ button to reach this area.
Within the ‘Search’ panel, the ‘Field Name’ dropdowns allow you to select which field to search, and the ‘Field Value’ to the right of the dropdown is the value you want to search for.
Clicking the Save icon in the upper right corner of the panel will cause PCR Capture to remember your selected ‘Field Name’ dropdown choices for the next time that the Search window is accessed.
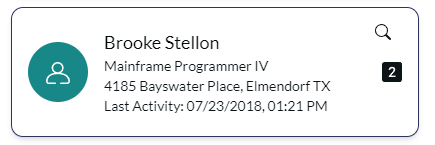
Once one or more search results have appeared, they can be clicked on and numbered as shown with auto-detected duplicates above. A magnifying glass icon will appear above the number icon for any search results to help differentiate them from auto-detected duplicates.
Save & Merge #
After specifying which fields you wish to retain from one or more records, clicking Complete Capture at the lower right will save the record, and/or update and combine existing records into one in PCRecruiter.
If you are merging multiple records, the order of the reference numbers applied to the records will be used to determine priority for any fields which you have not included in your PCR Capture field list. For example, if the Country field is not part of the screen when capturing, the final merged record will retain the Country value from the record you labeled with reference number 1. If that record has no Country, then it will use the value from record 2, and so on.
Saving/Confirming this update via Capture will generate a SAVENAM activity if only one existing record was updated. If multiple records were combined, a MERGEDUPE activity will appear, and the Change Log on the record will indicate any updated fields. A “Record merged” text file will be added to the contact’s Attachments as well, detailing what field data was merged from the other record(s).