Deleting Users #
Deleting a user will deny access to the database with those credentials and remove the user name in User Name dropdowns going forward.
Any records, activities, interviews, rollups, etc. created by that user account will remain in the system.
NOTE: If you wish to disable access to an account during a leave of absence but intend to reactivate it on a future date, do not delete it. Instead, use the “Account is Disabled” checkbox found at the bottom of the User Record in the Security area.
To remove a username:
- Click System in the Main menu.
- Click Users.
- Click Manage Users.
- Click on the user name you wish to remove.
- Click the Delete icon, which is found in the Action menu at the top of the record.
- Confirm the deletion.
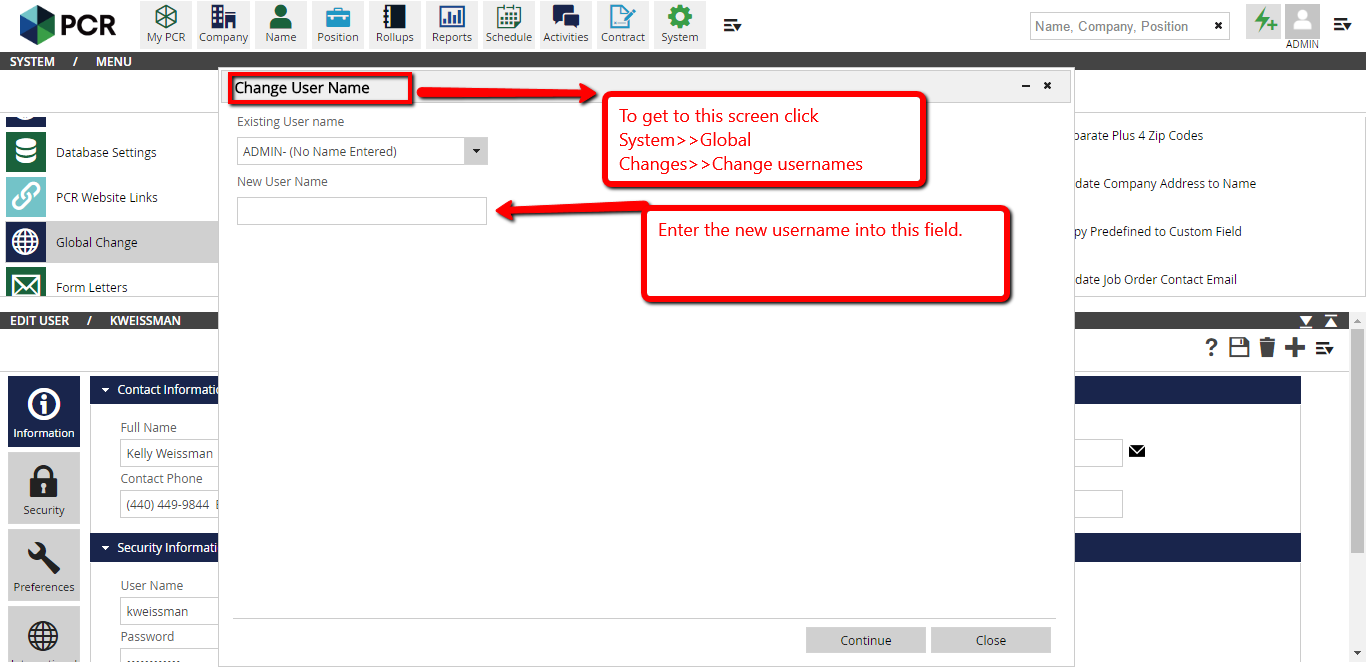
Change Username #
At times, you may wish to change the Username throughout the database. For example, if user JSMITH has changed last names and should be JMASON, you might wish to rename their account and all records associated with their account to a new name.
- Click the System on the Main menu.
- Click Global Change.
- Click Change User Name.
- Select the Existing User Name from the dropdown.
- Enter the New User Name. NOTE: Enter only the new 1-10 character username. Do not enter the full name here.
- Click Save.
Copy Configurations #
By default, configurations are per-user and each account can have independent settings. It it common for an administrator to need to copy the settings from one user to one or more other users for consistency. As with any change affecting multiple records, please use with caution.
Designating Model Users #
You may indicate within the User record whether that user’s account is available as a ‘source’ when copying settings to other users. It is typical for one or two users to be set up as models which other users with similar needs are copied from.
- Click System in the Main menu.
- Click Users.
- Click Manage Users.
- Click on the user name you wish to adjust.
- Within the Information section, expand the Security Information panel (if not already expanded).
- Change the Model User dropdown to ‘Yes’
- Save the record.
Copying Settings from Model Users #
- Click the System icon from the Main menu.
- Click Users
- Click Copy User Settings
- On the left side of the panel, select Source User Name to copy settings from. If the desired username isn’t in the list, see the ‘Designating Model Users’ instructions above.
- Choose which settings to copy (see full breakdown below). The Select All option will check everything except Form letters.
- Choose Save as Default to save your selections, this will save your options for the next time you are copying settings.
- On the right side of the panel, select a Target Database (by default, user settings are copied within the current database).
- Select the User(s) to inherit the settings from the source.
- Click Save to complete the copy.
Settings to Copy #
The following list details the settings that appear within the ‘Copy User Settings’ panel.
User Records #
- Security: Use this option to copy another user’s Security settings to this user. This governs their access to areas and their ability to add, save, delete records, etc.
- Preferences: Use this option to copy another user’s preference settings to this user. This governs the behavior of PCR features for this user.
- Security Policy: Use this option to copy the Security Policy section of another user’s setup, governing items such as password expiration.
- International Settings: This option copies a user’s international settings to a new user (Country Name, Country Code, Default Area Code, etc.)
Name, Company, Position Records #
- Record/Search Layout: Copies the configurations of Name, Company, Position screens and search results. The MyPCR setting will copy any custom queries and other settings from the Model User’s MyPCR screen.
- Record Card: Record Cards are the rectangular badges containing candidate information, their photo, and quick action icons. These are shown in your recently viewed records from the basic search menu as well as several other locations in your database. This option will copy the fields and quick action icons that are displayed
- Activity Defaults: Use this option to copy the Activity Screen defaults (Copy to Company, show/hide fields, Add to Schedule)
Interviews/Placements #
- Interview Settings: Copies the options selected when accessing the Add Interview screen
- Pipeline Configuration: Copies the pipeline column headers, rows displayed, and additional details. (This does not include Interview Types and Statuses, as those are not per-user settings.)
- Placement Layouts: Copy custom screen layouts for Permanent and/or Contract Placements.
Rollup Lists #
- Rollup List Layout: Use this option to copy custom Rollup layout, this will include headers, ‘I Want To’ options, and rows per page.
- Rollup Stage Setup: Copy the Rollup stages used when working a rollup to identify their current stage in your process.
- Copy Rollup Automation Plan Actions: Copy the actions associated with the model user’s Rollup Automation Plans.
Pins and Actions #
- Pinned Navigations and Action Icons: This option will copy the model user’s pinned/unpinned navigation and action menu settings.
Form Letters #
- Copy Form Letters: Copies all Form Letters. NOTE: This should only be used when copying settings between databases to prevent duplication of letters within the database. The ‘Select All’ option will not check this box.