Accessing the Pipeline Setup #
To access the Pipeline Setup, a system administrator will need to do the following:
- Select System from the Main Toolbar
- Choose Database Setup
- Choose Pipeline Setup
Default PCR Pipeline #
Each database will start with a locked ‘PCR Pipeline’ workflow. Please note that you are unable to modify or remove steps within the default ‘PCR Pipeline’ template. We recommend creating a new custom template as soon as the pipeline feature is activated and before adding new positions.
Let’s explore the default PCR Pipeline to understand what’s customizable when creating your own template.
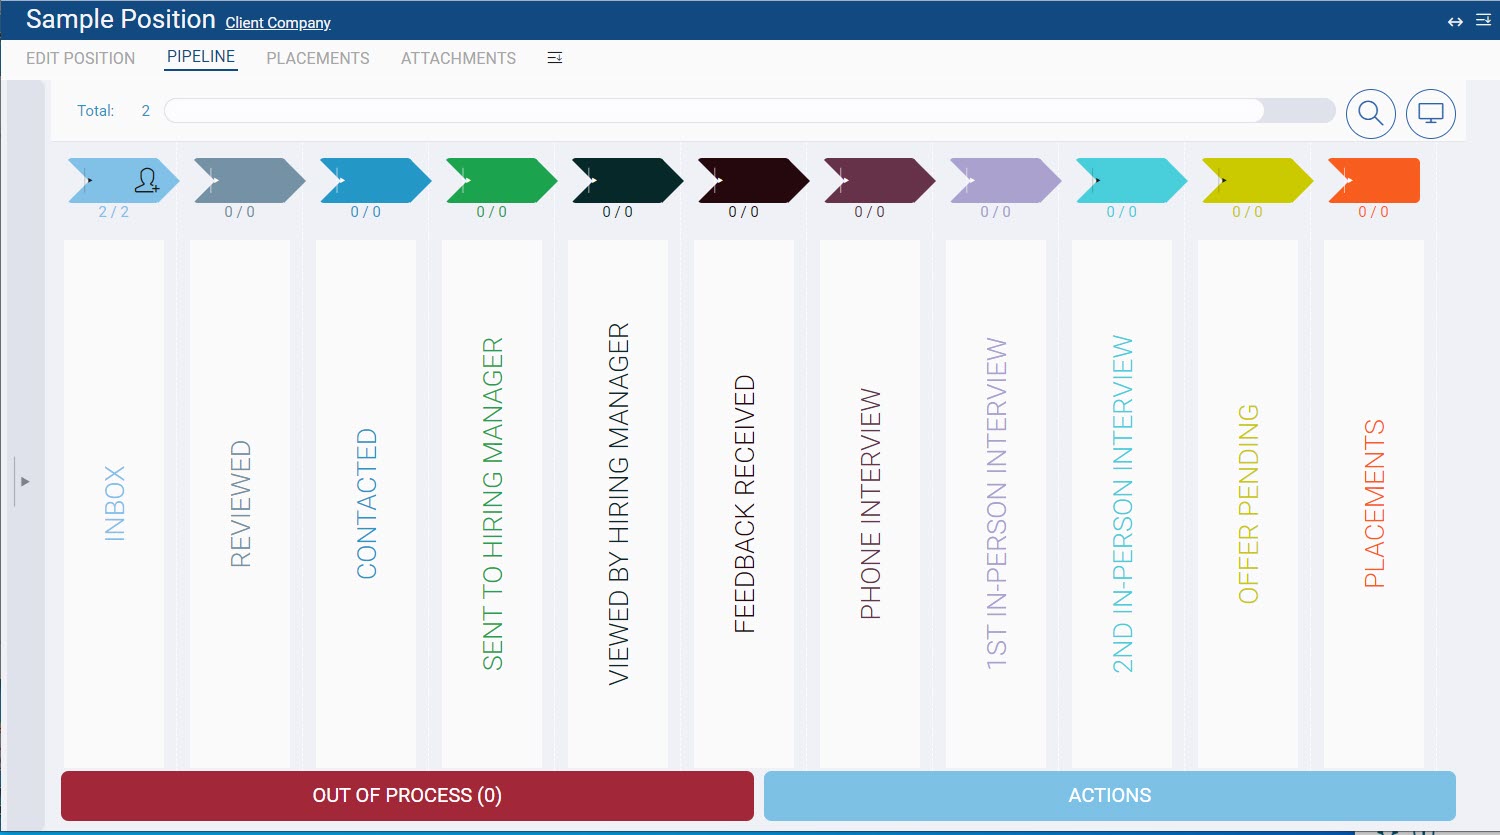
- All pipeline templates start with INBOX. Candidates who are linked or apply online to the position land in the INBOX.
- All pipeline templates end with PLACEMENTS
- When creating a custom Pipeline template, you can define up to 18 “active” steps positioned between INBOX and PLACEMENTS.
- Candidates progress by either dragging them to a step or using ‘Add Step’ for actions such as scheduling or sending emails.
- Activities can happen while a candidate is at a specific step. For example, leaving a message for a candidate while at a submittal step. You can specify which activity types should be just a right-click away.
- The ‘OUT OF PROCESS’ section allows you to categorize candidates who are no longer in consideration. You can define up to 10 “out” disposition reasons.
Creating a Pipeline Template #
PCRecruiter System Administrators have the capability to create customized Pipeline Templates, allowing you to tailor your workflow to match your unique processes and terminology. These templates offer the flexibility to add, rename, or remove steps as needed.
Although some databases use only one template, our system supports the use of multiple templates. For example, your candidate tracking process for permanent hires may differ significantly from that of contract positions. To streamline reporting and searching, it’s recommended to create as few templates as necessary, as you will need to select steps from each template in specific reporting and searching functions within PCR.
Please note that these templates can only be applied to new positions and cannot be retroactively applied to previously created positions.
- Open PCRecruiter and click on the ‘System’ option in the main toolbar.
- Navigate to ‘Database Setup’ and select ‘Pipeline Setup.’
- To create a new template, click ‘+ New Template.’
- Alternatively, you can choose to copy an existing template, including the locked PCR Pipeline template.
- Enter a descriptive ‘Template Name.’
- If this template will be your primary choice for most Position Records, check the ‘Primary Template’ option.
- Save your changes.
Note: If you create multiple templates, you’ll be prompted to select a template when creating a new Position Record. If you’ve created only one custom template, it will be automatically applied.
Pipeline Flow (Active Steps) #
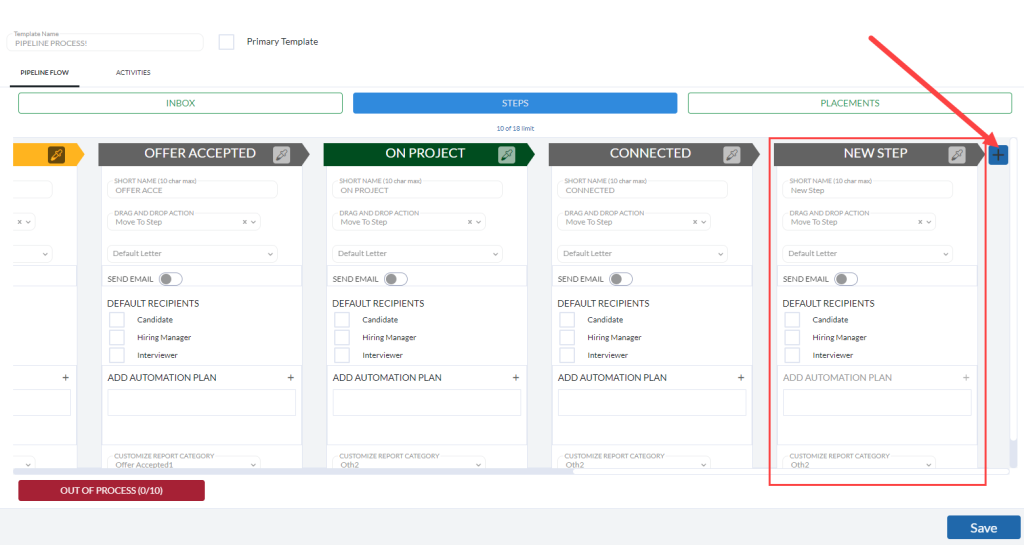
The Pipeline Flow section of the template is where you configure your “active” Pipeline Steps. Here, you can name your steps, pick colors, set action behaviors, and choose email templates to match your workflow.
- Ensure your custom template is selected in ‘Pipeline Setup.’
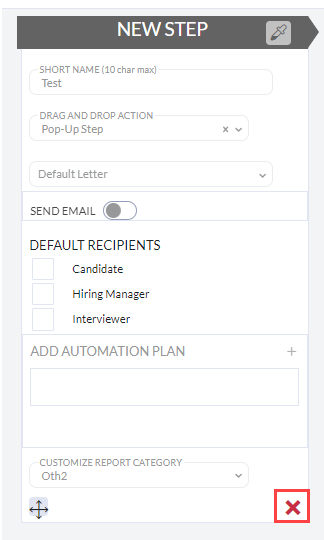
- If you’ve added a new template, you will see an empty “New Step.” Click on the gray “New Step” header to rename it, or click “+” to create a new step.
- Customize the “STEP NAME.” As you type into the header, the same text will automatically populate the Short Name (limited to 10 characters). This text is displayed for Pipeline Activities and can be modified as needed.
- Use the color selector to assign a color for the step for improved visual tracking.
- Use the Drag and Drop Action dropdown to define the behavior when a candidate is dragged onto the Step. Choose to pop up the Add Step window or simply move to step. The “Pop-Up Step” option is recommended for scheduling meetings or prompting to send an email when the step is created.
- (OPTIONAL) Use the Default Letter dropdown to select the Pipeline Email template that will automatically load when the Add Step screen pops up.
- Choose whether the “Send Email” toggle should be on or off by default.
- Select the default recipients of the email, including Candidate, Hiring Manager, and/or Interviewer.
- Do not change “Report Category”
- Click the “+” option on the right to add another step and repeat the above instructions until all steps have been added.
- Save your changes. Once a step is saved, you can create automation plans for your step.
Pipeline Activities Setup #
As you progress a candidate through your pipeline, a PIPELINE activity is automatically generated for that step. Nevertheless, there are occasions when additional actions take place while a candidate is at a step, like calling or leaving a message . In your database, you have the flexibility to create multiple custom activity types. Once you’ve defined these Activity Types in the System’s Database Setup section, you can then customize your pipeline to include activities that align with your workflow.
- Navigate to Activity Types.
- From the main toolbar, select “System” then click on “Database Setup.”
- Under “Activity Types,” verify that the necessary Activity Types have been created.
- Return to ‘Pipeline Setup’
- Select your custom template.
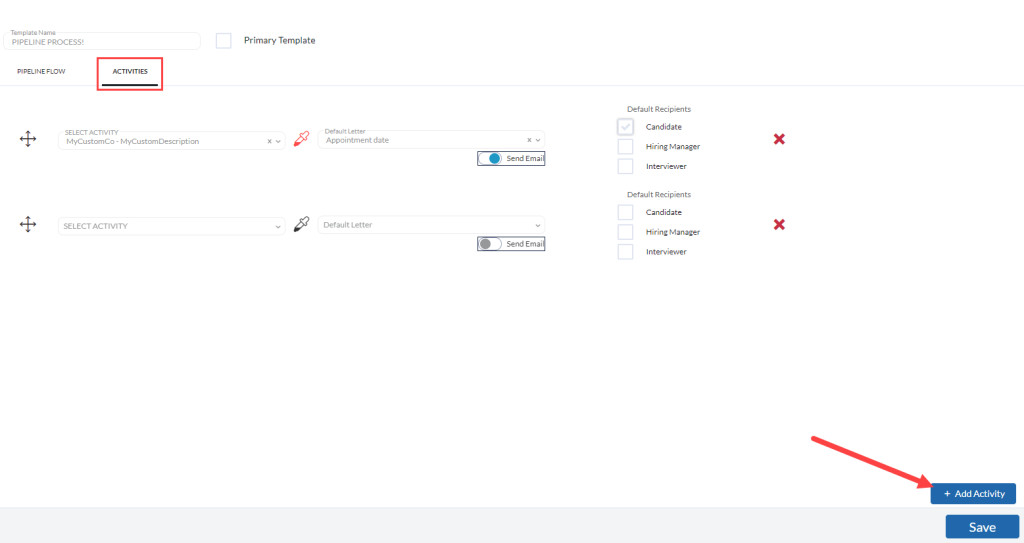
- Click on the ‘ACTIVITIES’ tab.
- Click the ‘+ Add Activity’ option.
- Choose the Activity Type from the ‘SELECT ACTIVITY’ dropdown.
- Assign a color to the Activity Type.
- OPTIONAL: Configure Send Email
- Choose the default letter
- Choose if ‘SEND EMAIL’ should be ‘On’ or ‘Off’ by default.
- Specify the default recipients for emails.
- You can easily customize the order of activities by dragging them using the handle on the left. If you wish to delete an activity, simply click the red ‘X’ on the right.
- Click ‘Save.’
Out of Process Setup #
Define reasons for candidates falling out of consideration. When creating a custom Pipeline template, you can define up to 10 “out” categories.
- Make sure that your custom template is selected in ‘Pipeline Setup.’
- Access ‘OUT OF PROCESS.’
- Click + to create an Out of Process category.
- Customize the “NEW OOP” category. As you type into the header, the header text automatically populates the Short Name (up to 10 characters) used for Pipeline Activities.
- Choose action behavior (‘Move to Out of Process’ or ‘Pop-Up Dialog’). Select ‘Pop-Up Dialog’ if you want to be prompted to send an email.
- If email prompting is needed, choose the Pipeline Email template for this category from the ‘DEFAULT LETTER’ dropdown.
- Set whether ‘SEND EMAIL’ should be ‘On’ or ‘Off’ by default for this category.
- Specify the default recipients for emails.
- Save the category. Once an Out of Process category is saved, you can create automation plans.
- Close the confirmation banner by clicking ‘X’.

Pipeline Automation Plan #
Automation Plans can be enabled for a Pipeline Flow (Active) Step or an Out of Process category. This is a valuable feature for automating various actions without requiring user intervention beyond moving a candidate to a specific step. Common applications of Pipeline Automation Plans include:
- Adding the candidate to a rollup
- Appending notes to the candidate’s Name record
- Changing the Status field on candidate’s Name record
- Changing the Status field on the Position record
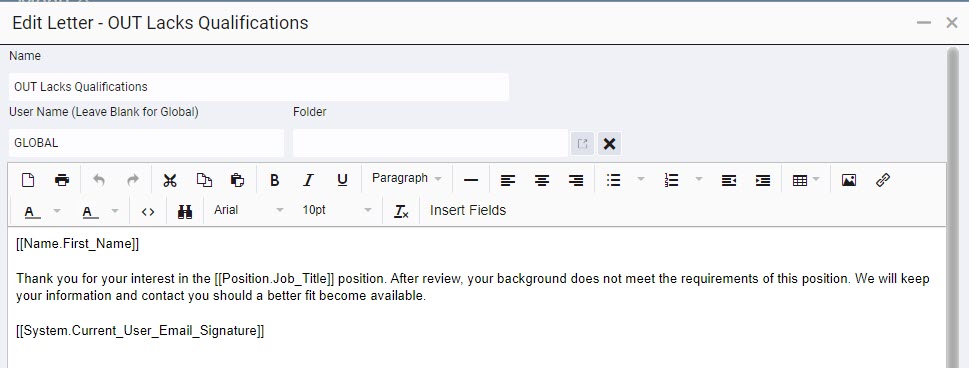
- Sending a Form Letter. It is best to use an Interview Form Letter with a Pipeline Automation Plan. This type of form letter supports merging fields from the candidate’s name record, the position record, the company the position is with, and the interview/step fields.
- Sending a PCR Notification to a User Name
- Sending a PUSH Notification through the PCR Mobile App to a User.
- Sending a link to a Profile through email.
- Removing a candidate from a Rollup
- Adding an Appointment to the PCR Schedule
- Sending an Email. This option does offer a limited set of fields to merge into the content. For more flexibility, it is best to use the Send Form Letter option with an Interview Form Letter.
- Sending SMS messages (requires Ring Central)
- Writing an additional Activity of a specific type
- Writing Detail, which is adding a value to a selected custom name field.
- Appending text to Keywords.
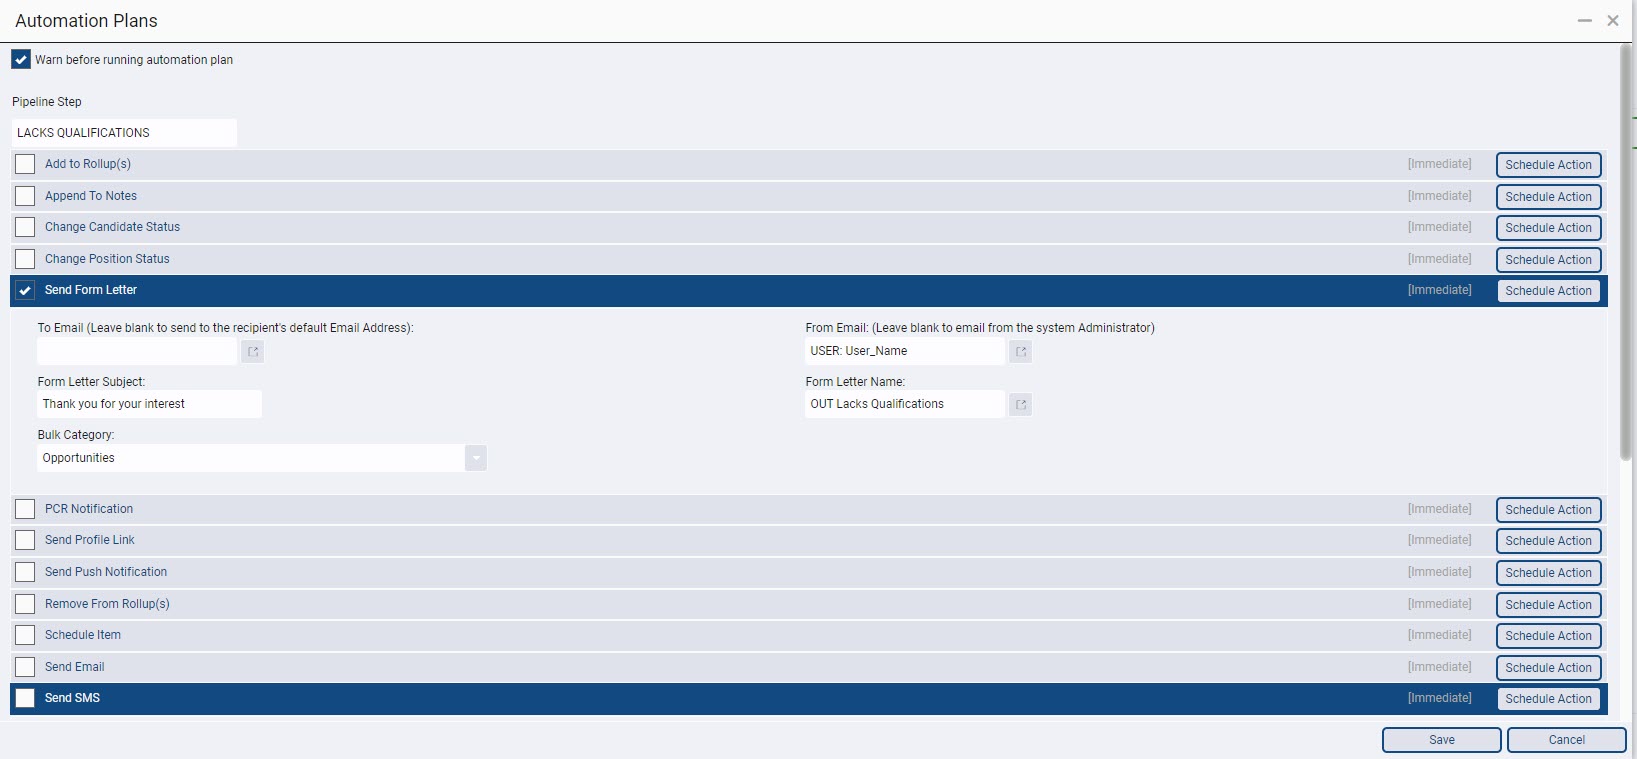
For instructional purposes, we will focus on the most common Automation Plan for Pipelines, which is sending a Form Letter.
- Make sure that your custom template is selected in ‘Pipeline Setup.’
- Choose PIPELINE FLOW or OUT OF PROCESS
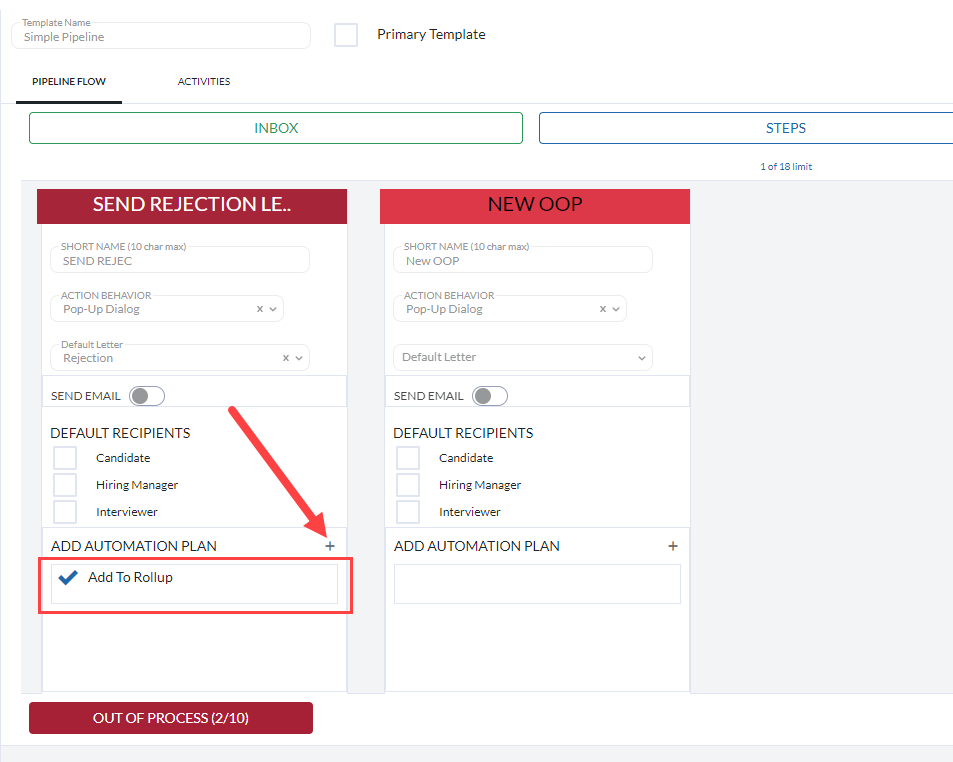
- Locate the Step or the Out of Process category. On that Step or Category panel, click + next to ADD AUTOMATION PLAN.
- Check the warning box, which serves two important functions:
- It acts as a reminder to the user that moving to that step will initiate the automation event.
- It provides the user with the option to cancel the move. Note that if there’s an automation enabled with a step, there is no way to move to the step without triggering the automation.
- Check the box at the left of the automation to enable.
- Make sure the heading is expanded to view, then define the details of the automation.
- Click Save in the Automation Plans screen.
- Click Save in the Pipeline Setup to save changes to the pipeline template.
- For any future edits to the existing automations you can follow the above steps to reopen the automation plan window and change the configuration seen below.
Adjusting Steps #
The steps of your Pipeline Templates can be edited, moved and deleted as your workflow changes.
Editing a Step Name #
- Make sure that your custom template is selected in ‘Pipeline Setup.’
- Click on the Step you want to edit. You can click on either the colored header or the short name of the Step. The text will become editable, allowing you to make changes.
- Once the text is editable, make the necessary changes to the Step’s short name or description.
- Click Save.
- Choose how to handle historical data.
- Global Change Historical Data (Recommended): Updates historical pipeline data to the new step name.
- Do Not Change Historical Data: Retains the original step name on historical pipeline data.
- After an option is selected, the Step will be updated in your Pipelines.
Moving Steps #
This process will help you rearrange the steps in your pipeline as needed.
- Make sure that your custom template is selected in ‘Pipeline Setup.’
- Scroll to the bottom of the step that you want to move.
- Use the Drag icon at the bottom left of the step to drag and drop the step to the desired location within the Pipeline.
- After you’ve positioned the step where you want it, click the “Save” button to save your changes.
Deleting Steps #
- Ensure that your custom template is selected in ‘Pipeline Setup.’
- Scroll to the bottom of the step you want to delete.
- Click the red ‘X’ icon positioned at the bottom right corner.
- The step will now appear in a “Deleted” state, but it won’t be finalized until you save your changes. If you wish to undo the deletion, you can click the “Restore” option before saving.
- Click the “Save” button to confirm your changes.
- After clicking “Save,” a dialog will appear. Choose the Step where the records currently in the deleted step will be moved to upon deletion.
- Choose how to handle historical data.
- “Global Change Historical Data (Recommended)”: This option will update historical activities and pipeline records to reflect the step selected in the dropdown. A new activity labeled ‘STEPDELETE’ will also be recorded for any affected name records, showing the deleted step name and the new step they were moved to. The “Record Count” indicates how many Name Records are currently in the deleted step.
- “Do Not Change Historical Data”: With this option, all names that are currently in the step to be deleted will be moved to the step selected in the dropdown. A ‘STEPDELETE’ activity will be recorded for any affected records, showing the Deleted Step Name and the new step names have been moved to. However, historical activities and pipeline Records with the deleted step name will not be updated. The “Record Count” here shows how many Name Records have historical data associated with this step.
- Select “Delete Step(s)” to finalize the deletion and the handling of associated records.
Managing Templates #
Copy a Template #
To create a new template based on an existing one, simply click the “Copy” option next to the template you want to use as a starting point. This action will generate a duplicate template that you can subsequently modify and customize to your specific needs.
Deleting a Template #
If you no longer need a previously created template, including the PCR Pipeline Template, follow these steps to delete it:
- Ensure that the template is selected in ‘Pipeline Setup.’
- Click the “Delete” option to the right of the template name.
- You will be prompted to confirm your decision. Select “OK” to proceed.
Once you’ve completed this action, the template will no longer be available for selection when creating new Positions. It’s important to note that any Positions that already use this Pipeline Template will remain unaffected.
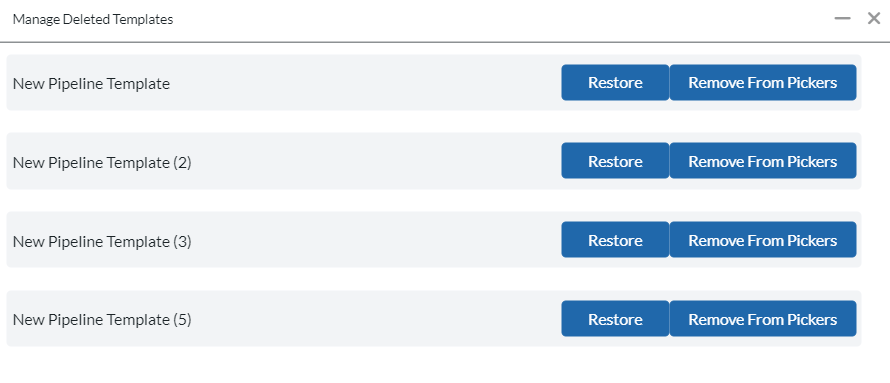
Now, even after deletion, the Pipeline Template may still appear when running reports or activity searches. If you want to remove it from these areas, follow these additional steps:
Above your list of pipeline templates on the Pipeline Setup screen, click on “View Deleted.” Here, you will find two options:
- Restore: This option will return the Pipeline Template to the dropdown selection when creating new Positions. It can be used as if it was never deleted.
- Remove From Pickers: Choosing this option will completely eliminate the Template from all areas of the database. If the Pipeline Template has been used previously, it can be restored at any time. However, if it has not been used, it will be permanently deleted.