Adding a Step #
A Step is an event that takes place once a Name has been linked to a Position Pipeline to move them forward in the process. Steps are the colored headings shown across the top of the Pipeline. Adding a Step will move the Name to the selected Step in the process. Following the steps below will move the Candidate as well as create an activity history of the action.
Add Step #
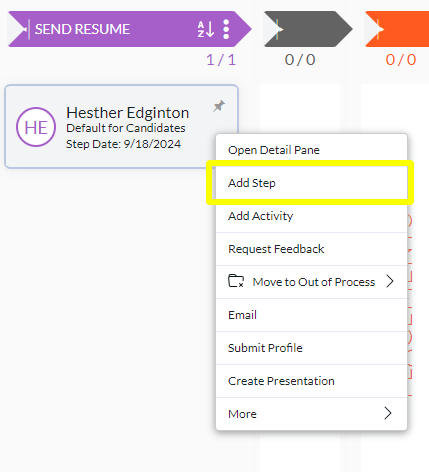
The first option is via right clicking:
- Locate the Name in the Pipeline that you wish to move to a new Step
- Right Click on the Name Card
- Choose Add Step
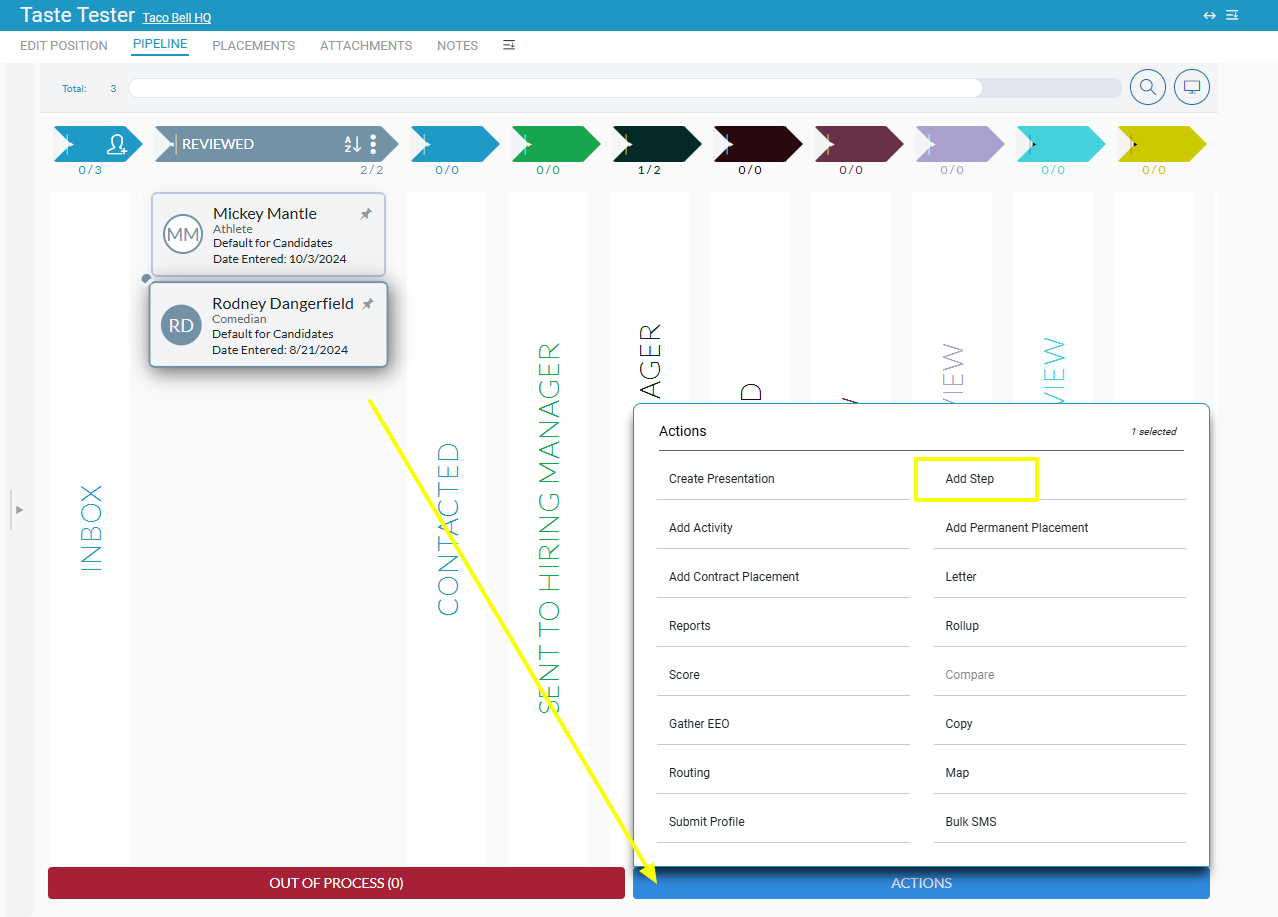
The second option is to utilize the Action Menu
- Left click the Name you would like to create a Step for
- Click Actions
- Click Add Step
Adding Step Details #
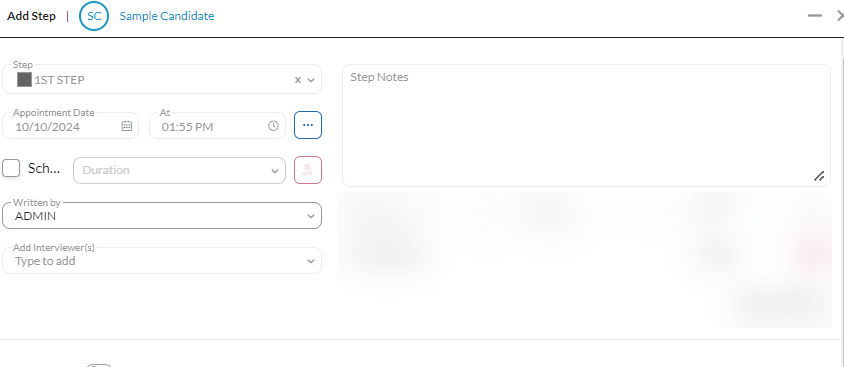
Once you have accessed the Add Step screen you will add the necessary details.
- Select the Step you would like to move the Name to
- Choose your Appointment Date/Time; this will appear on your Schedule upon Saving if the Schedule Checkbox is selected.
- Choose Additional Scheduling Options if desired, this will allow you to schedule a follow up:
- Select Follow Up Date and Time
- Choose Duration of Follow Up
- Choose any Additional Users who should have this follow up on their Schedule.
- Check the Schedule option to add the Appointment Date/Time to your Schedule
- Once the Schedule option has been checked, the Duration dropdown will become available. This dictates the duration of the Step that will be added to your schedule.
- Toggle the Alarm On or Off by simply selecting it. If you choose to use the alarm, it will appear 15 minutes before your Scheduled Step.
- The Written By field will automatically display your Username and typically does not need to be adjusted. If you are entering the Interaction on behalf of someone else, you can use the Written By dropdown to change the Username.
- Interviewer Name is used to assign an Interviewer to this Interaction (you may not always need to use this).
- Step Notes are notes that are associated with the Step
At this point you can save the Step you have created. Upon doing so, the Name will be moved to the Step you have selected.
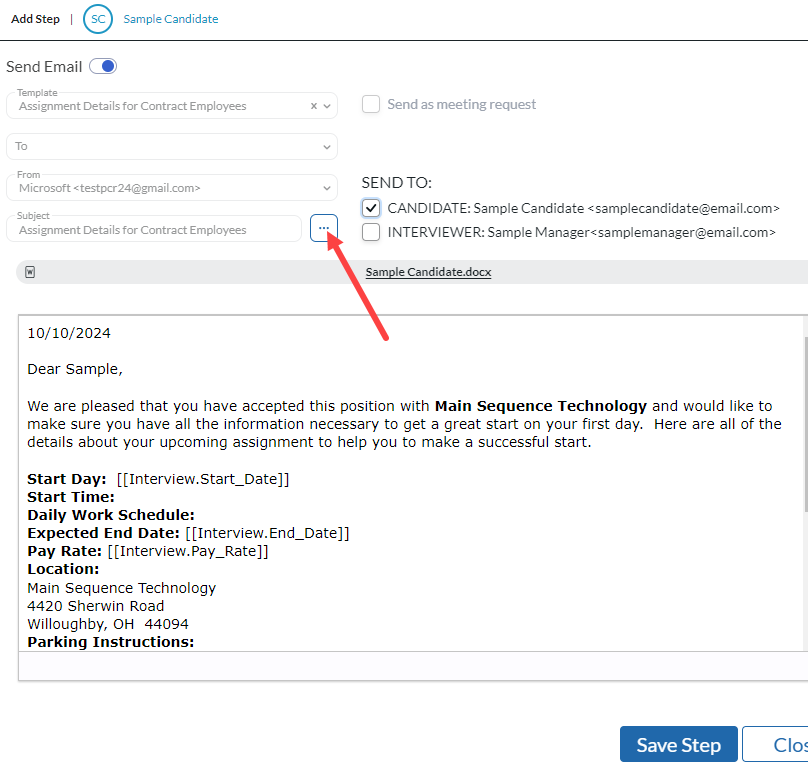
However, you can also choose to send an Email when saving this Step as well. The Name would move to the Step and the Email would send when Save Step is selected.
- Toggle the Send Email option to On
- There are two options for generating content to email;
- Compose on the Fly by typing into the Compose Mail box
- Use the Template dropdown to select a Pipeline Email to send (these can be automatically populated with details from the Interaction)
- There are also two options for choosing who will be the recipient of the Email, both options can be used at once.
- Type an Email Address or multiple into the To field (freeform)
- Check the options for Candidate, Contact, and Interviewer – this option will send Blind copies of the selected email to these Names.
- Enter an Email Subject
- Check the option to Send as Meeting Request if desired
- Use the Attachment option to the right of the Subject field to choose any Attachments (Note, if you have selected a Pipeline email the Candidates Resume may be automatically attached)
- Click Save Step
- Close the Add Interaction dialog box when finished
Drag and Drop #
In the previous directions we went through all the specific details for adding a Step to move the Person through the Pipeline. There is also an option to Drag and Drop as well. This option will allow you to select either one Name or Multiple and then Drag and Drop them to a different Step. If the Step is configured as a Pop-Up Step (by your Admin), the Add Step screen will appear upon dropping the Names. If the Step is set to Move to Step, the Names will just be moved to the Step with no additional details required.
Submitting Candidates #
- Candidate presentations allow users to present a candidate or candidates to a client; also known as a candidate submittal. In your Presentation, you have the option to include Attachments, Resumes, Profiles, and Field Data in a customized format.
- Click here to see more details on Presentations and how to utilize them.
Emailing a resume from the Candidate’s Record Card #
You also have the flexibility to email the resume directly from the position’s pipeline without the need to access the Add Step screen.
- Open the Position record.
- Select “Pipeline” from the navigation toolbar.
- Right-click on the candidate’s Record Card, then choose “Email”.
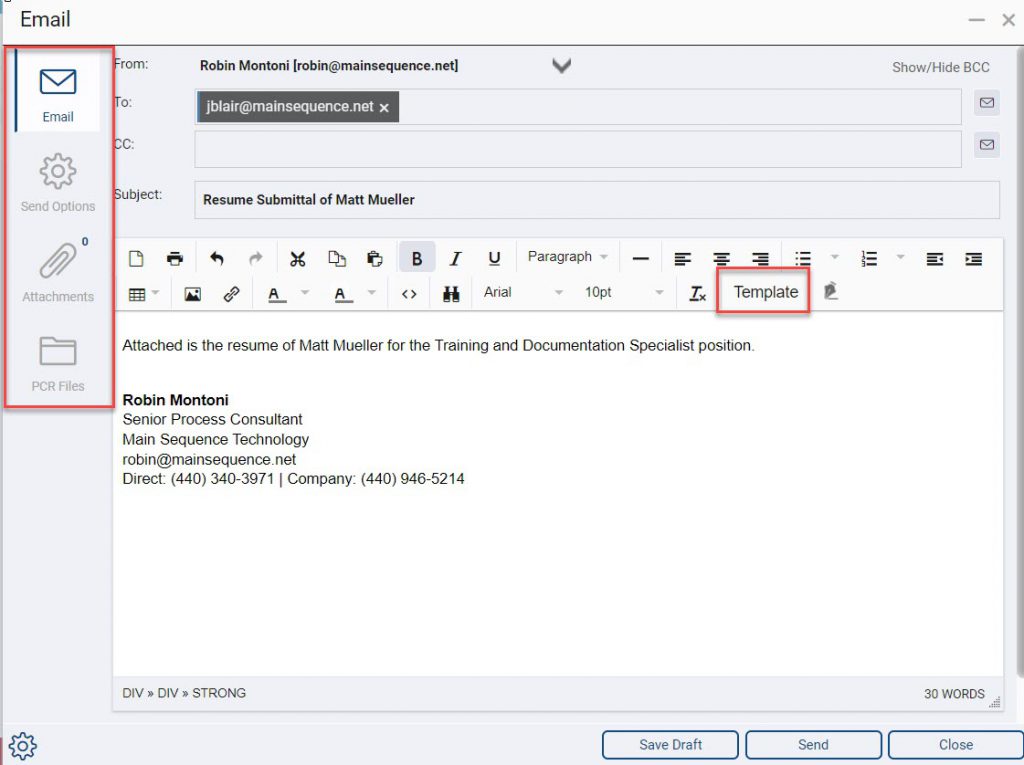
- When it comes to composing the email, you have two options:
- You can compose the email directly.
- You can click “Template” in the editing toolbar to choose a “Pipeline Email” template to serve as a starting point.
- From the email screen you are able to:
- Use Email to compose your message, add a subject, and specify recipients in To/CC/BCC fields.
- Use Send Options to create a meeting request, request a return receipt, set the level of importance, attach a profile, or include a feedback link. You can also choose to mark as private email, or combine all attachments into a single PDF document. You can choose to send to a rollup list (useful for submitting a candidate to a group of people), the candidate, or the position contact. The final option on this screen will send the resumes as a PDF.
- Attachments allows you to add files stored locally on your machine.
- PCR Files is where you find the resume and other files stored in PCRecruiter related to the records and select them as attachments.
- Click “Send”.


Activities #
On the other hand, an Activity is something that happens during the Pipeline Process but doesn’t necessarily warrant moving to another step in the Pipeline, for instance Left Voicemail, Reference Check Conducted, etc. Activities created in the Pipeline are linked to the Step they are created under. This allows for knowing exactly what took place during which Step of the process and the Pipeline as a whole.
Add Activity #
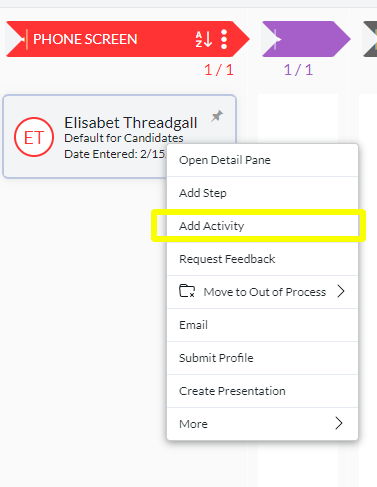
The first option is via right clicking:
- Locate the Name in the Pipeline that you wish to write a new Activity for
- Right Click on the Name Card
- Choose Add Activity
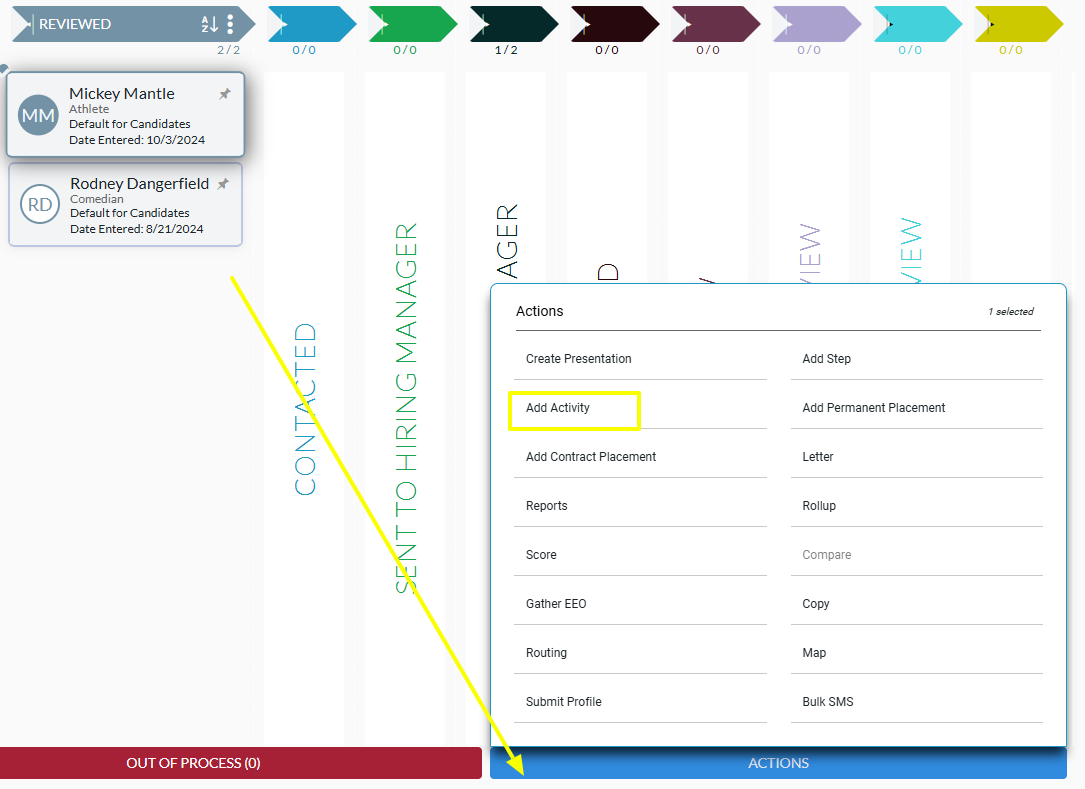
The second option is to utilize the Action Menu
- Left click the Name you would like to create an Activity for
- Click Actions
- Click Add Activity
Adding Activity Details #
- Use the Dropdown to choose the Activity Types (The Activities displayed here will be configured in the Pipeline Setup by an Admin user).
- Typically, an Activity is something that has already happened, meaning you do not need to put it on your schedule. However, if this is an Activity for the future you will need to choose the Date/Time and Schedule option as you did when adding the Step.
- The Username will automatically default to your own Username. You can modify this if needed.
- Add Activity Text will display when viewing the Activity in the future and if this has been added to your Schedule, the Text will also display there.
- Choose to Copy the Activity to the Position Company or Contact if desired
- Search for another Name in the Share Activity field to share this Activity on another Record as well.
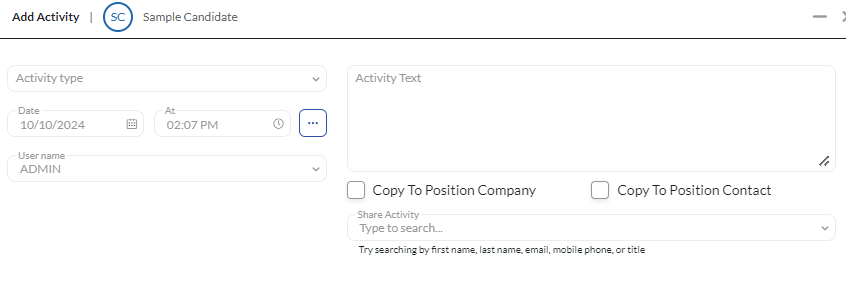
- At this point you can click Save Activity and your Activity will be saved, but just like with the Step, you can also send an email. (Note: Upon saving, the Company Name, Job Title, and Position ID will be stamped to the bottom of the note)
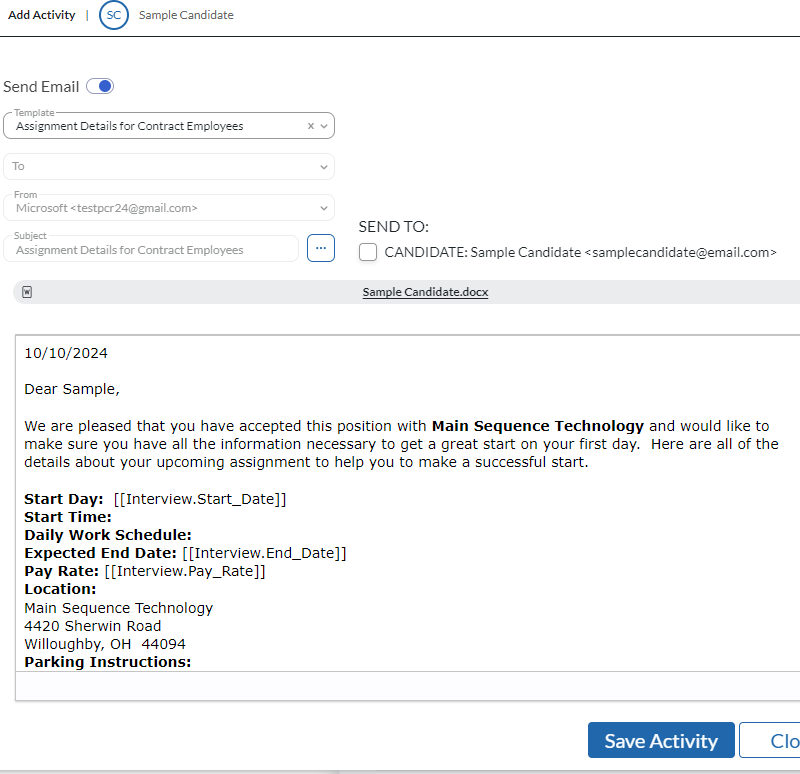
- Toggle the Send Email option to On to enable the Send Email fields
- Enter your email details in the same manner as you did from the Add Step screen. If you have chosen a template that include “Interview” fields, it will populate with details from the Step the Candidate is currently in.
- Click Save Activity to create the Activity and Send the Email simultaneously
Note: When adding an Activity from the Pipeline, the Company Name/Job Title – Job ID will automatically be appended to it.
Out of Process #
When a Name is moved Out of Process in the Pipeline they are no longer located in your active Pipeline Steps. This can be done if they are Not Qualified, Declined an Offer, Turned Down the Position, etc.
To move names Out of Process, you can right click the Name to be moved and choose Out of Process, or Select the Name by clicking and then choose Out of Process from the menu item at the bottom.
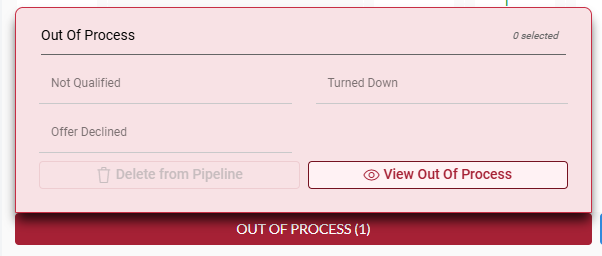
Once records have been moved Out of Process they can be accessed by clicking View Out of Process from the Out of Process menu item at the bottom.
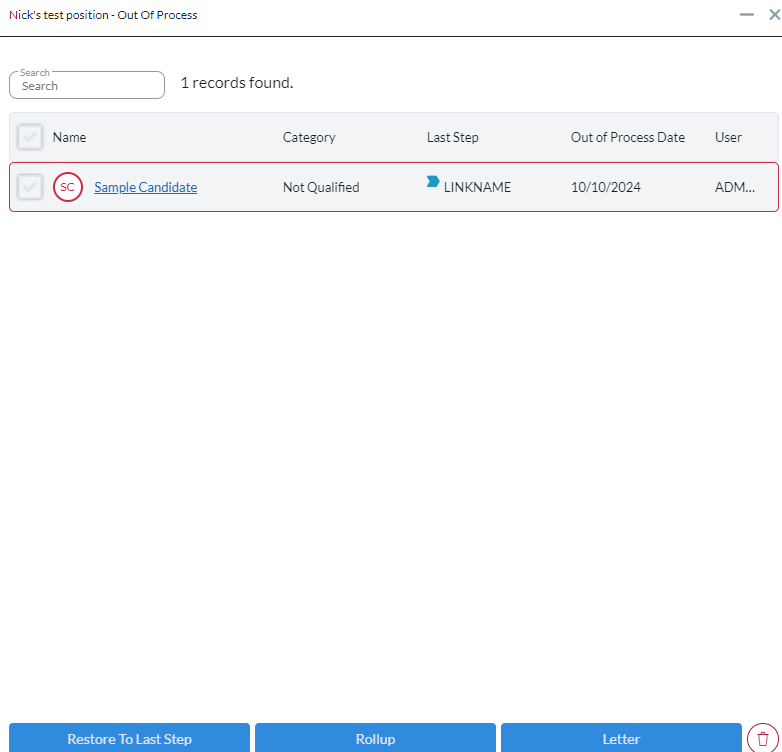
From this screen you can choose any of the following actions:
- Search: Search by Name, Category, Last Step, Out of Process Date, or User. Note: If searching by Category, you will need to search by the shortened version of the Category (NQ = Not Qualified, TD = Turn Down, OFFER = Offer Declined)
- View Details: View the Candidate Name, reason for being moved Out of Process, the Last Step they were in prior to being moved Out of Process, the Date they were moved Out of Process, and the User Name who moved them Out of Process.
- Restore to Last Step: Selecting this will remove the Candidate from the Out of Process area and move them back to the Step they were in prior to moving Out of Process.
- Rollup/Letter: After selecting Records from the Out of Process screen, select Rollup or Letter to complete the corresponding action.
- Delete: This selection will remove the Candidate from the Pipeline completely. When selecting it, you will be prompted with two options:
- Delete Historical Step(s) Associated with this Pipeline: Deletes all Interview records that were created for the selected Candidate but does not delete Activities that were created
- Delete Steps and Activities Associated with this Pipeline: Deletes all Interview records and Activities for the selected Candidate leaving no trace that they were ever in that Pipeline.
Making a Placement #
Making a Placement can be done via the Pipeline or from the Placements tab on a Position Record. To Place someone from the Pipeline, do the following:
- Select the Name or Names you wish to Place
- Click Actions
- Click Add Permanent or Add Contract Placement
- Enter Placement Details (See Add a Permanent Placement and Add a Contract Placement for more information)
- Save
Alternatively, you can also drag and drop into the Placements Step.
Additional Individual Actions #
Individual actions can be triggered by right clicking on the candidate record card and selecting the desired action from the dropdown list.
- Open Detail Pane: Opens the candidate name record flyout from the right-hand side of the screen.
- Request Feedback: Sends an email with a live link to collect feedback on the candidate. These are used to get feedback from a hiring manager or peer.
- Submit profile: Creates an internal profile submission.
- Create presentation: Creates a presentation for that specific candidate.
- Place Candidate: Creates a Permanent or Contract Placement.

Bulk actions #
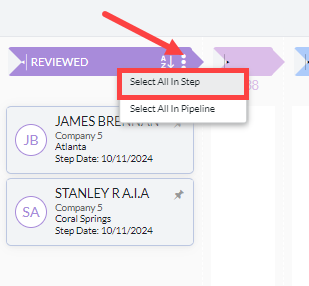
Left clicking on a record card allows you to select multiple candidates and perform bulk actions with those records. Additionally, by clicking the 3 vertical dots on the step title allows you to select all candidates within a specific step or the entire Pipeline. These actions and their use cases are listed below.
- Create Presentation: Live links sent to hiring managers that include resumes, attachments, and candidate summaries. These are typically used as submittals and allow for hiring managers to submit feedback directly from this link.
- Add Activity: Allows you to add activities that are specific to that Pipeline.
- Add Contract Placement or Permanent Placement: Allows for placing multiple candidates at once.
- Add Step: Allows you to move a candidate to a new step in the Pipeline.
- Reports: Runs the New Pipeline Report for the specific Pipeline you are working in.
- Score: Compares the scores of multiple candidates based on profile answers. (Question and answer weights must be set from this location first.)
- Routing: Allows you to send up to 10 candidate resumes to a hiring authority. Emails send resumes as PDF attachments.
- Letter: Sends a bulk Email Campaign to selected candidates.
- Rollup: Places selected candidates into a Rollup list.
- Compare: Displays the resumes of the selected candidates side by side for comparison.
- Copy: Copies selected candidates to another position.
- Map: Shows the location of each candidate compared to the location of the position.

Comparing Candidates in the Pipeline #
There are several ways to quickly compare candidates within the Pipeline to determine who is most qualified for that specific position. Quickly moving between records, viewing resumes side by side, and using Profile answers can assist you in determining which candidates be contacted first.
Page Between Records #
Using the arrows from the logo on a Name Record allows the user to quickly review all the candidates in a particular Pipeline step.
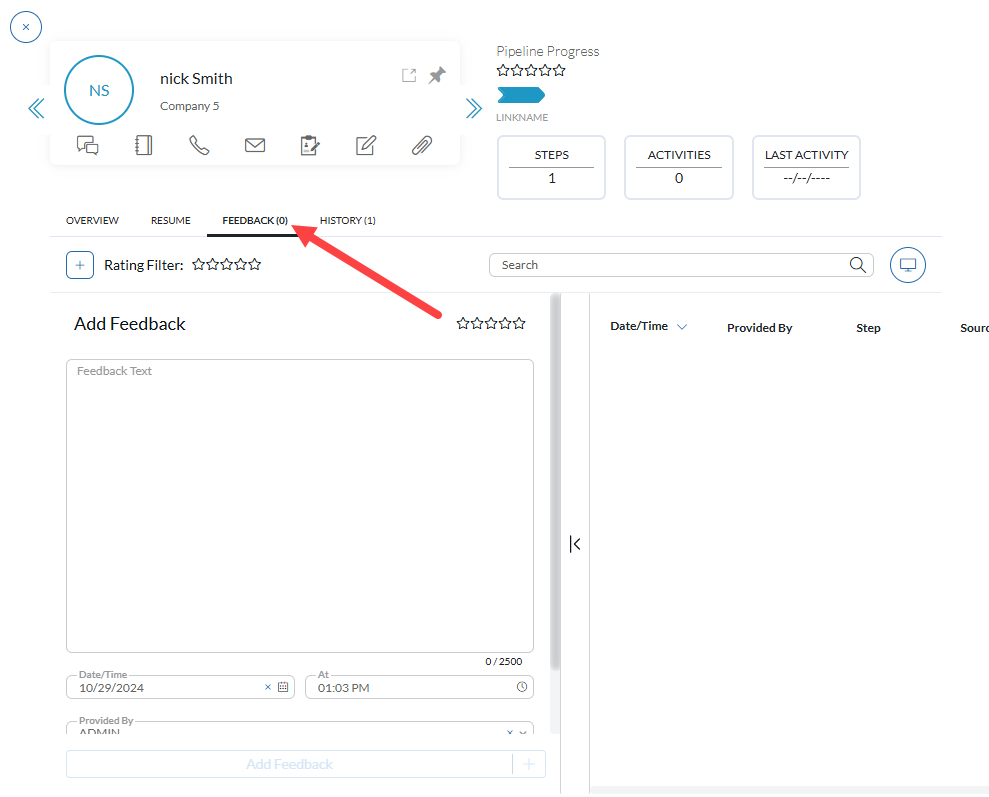
- Click the Candidate logo on the Record Card in the Pipeline to open their record.
- Select the tab on the record you wish to view, such as “Feedback Received”, and this tab will be viewed when switching between records. (We are viewing the “Feedback Received” step, so you can quickly view the Feedback for the candidate and determine if they should be scheduled for interviews.)
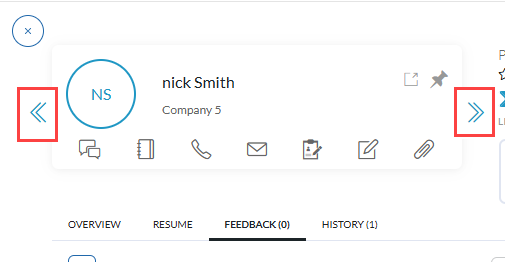
- Using the arrows on the record card you can left or right to page between all the records in that step. This helps speed up the review process and reduces the time needed to determine if the candidate should be moved to the next Pipeline step or Out of Process.
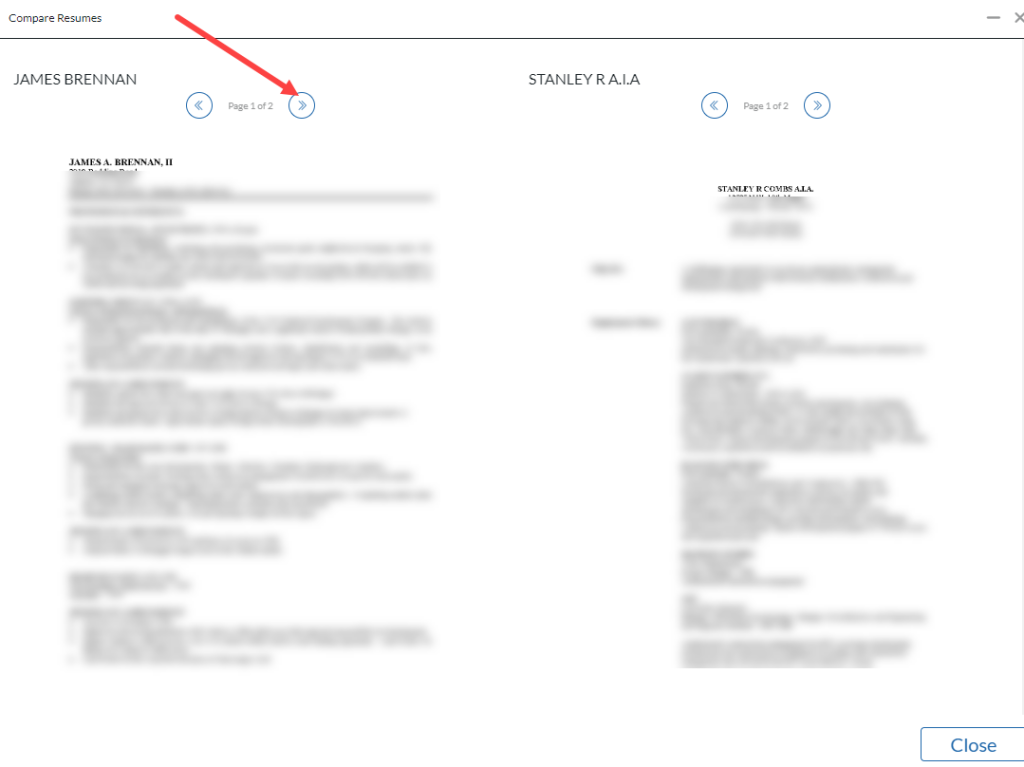
Comparing Resumes #
Resumes from Candidates in the Pipeline can be quickly viewed side by side from the bulk actions menu. This option allows users to quickly look at relevant information such as qualifications or work history.
- Right click on the record cards of the candidates with resumes you wish to review. (Can also use the “select all in step/pipeline” action.)
- Click actions in the bottom right.
- Click compare.
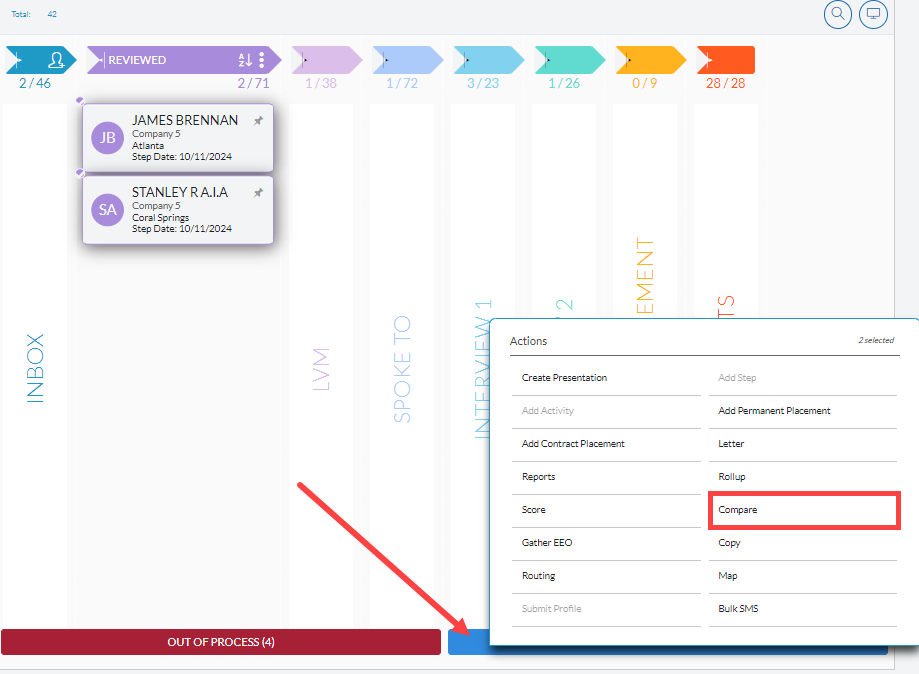
- A window will pop up displaying all the names and resumes.
- Scroll down the list to review these candidates. (You can click the arrows to navigate between multiple pages for a single candidate.)
- You can now use this information to determine which candidate to contact first and move any unqualified candidates to the accurate out of process step.
Scoring Candidates with Profile Answers #
Candidates can be evaluated using answers from Profiles to determine which candidates are most qualified for particular Positions. Once the profile is filled out by the candidate and scores have been assigned to the answers you will be able to quickly view the results for each.
- Select the candidates you wish to score then click Actions and Score.
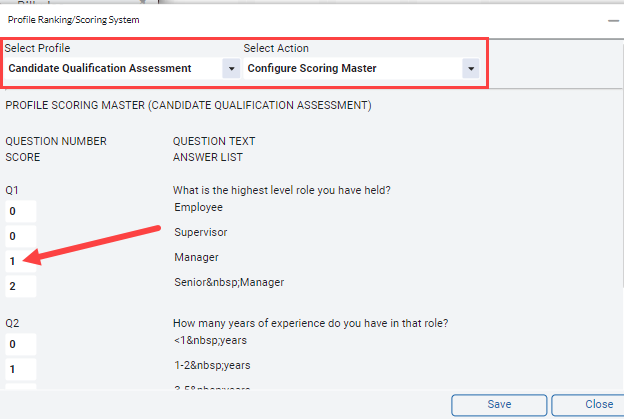
- Select the desired profile from the dropdown on the left. The dropdown on the right should say “Configure Score Master”.
- Assign a numeric scores for each answer. Scores are only available for questions with predefined answers, such as a dropdown. Any free text answers will show as N/A. (Once this is set up it will be available to use for that specific profile in all Pipelines.)
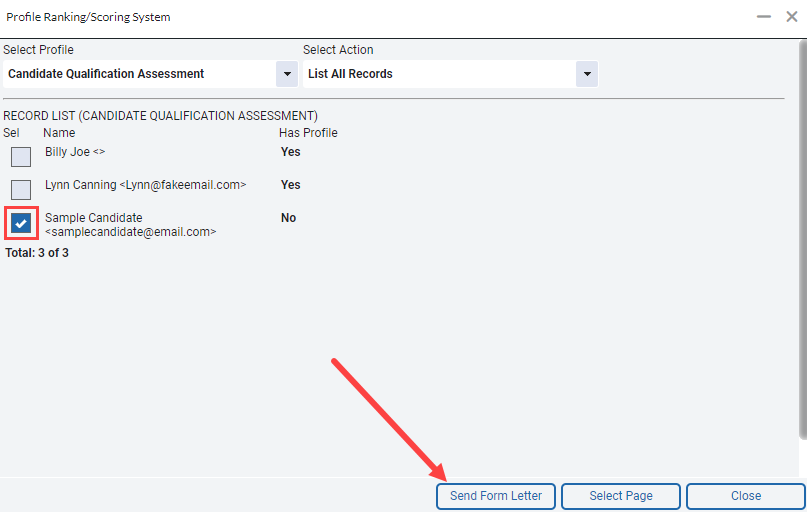
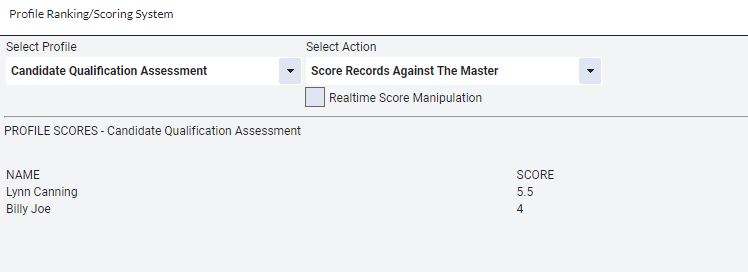
- From the right dropdown select “Score Records Against the Master” to view the scores for each candidate. (Candidates without profiles will not be shown here.)
- Select “List All Records” to view all selected candidates. This will show you who has or has not completed the profile. (If it is not completed you can use the checkbox and send form letter option to send them the profile to fill out.)
“Show Combined Answers” will show you all answers for each candidate side by side. - Use these scores to determine which candidate is most qualified.