PCR Notifications are used to alert users of important events taking place within their database. These Notifications will appear as fly-in boxes in the lower right corner of the screen. They remain in the Notification Pane for 7 days or until they are viewed or cleared.
PCR Notifications can be triggered by any of the following events:
- Canned Automations
- Rollup Automations
- Pipeline Automations
- Background Errors
- Feedback Entered Externally
- Candidate Presentation Viewed/Expiring
- Manually Sent Notifications
Manually Sent Notifications #
Users have the ability to Notify other Users from specific records. This allows a user who is working on a record to send a quick notification to a different user which includes a note and a link to the record the Notification originated from. Any user can send a Notification by doing the following:
- Access the Name, Company, or Position Record you wish to Notify another user to view
- From the Action Menu, click Send PCR Notification
- Use the dropdown to choose which User Names will receive the notification
- Enter the Message you’d like the notification to contain
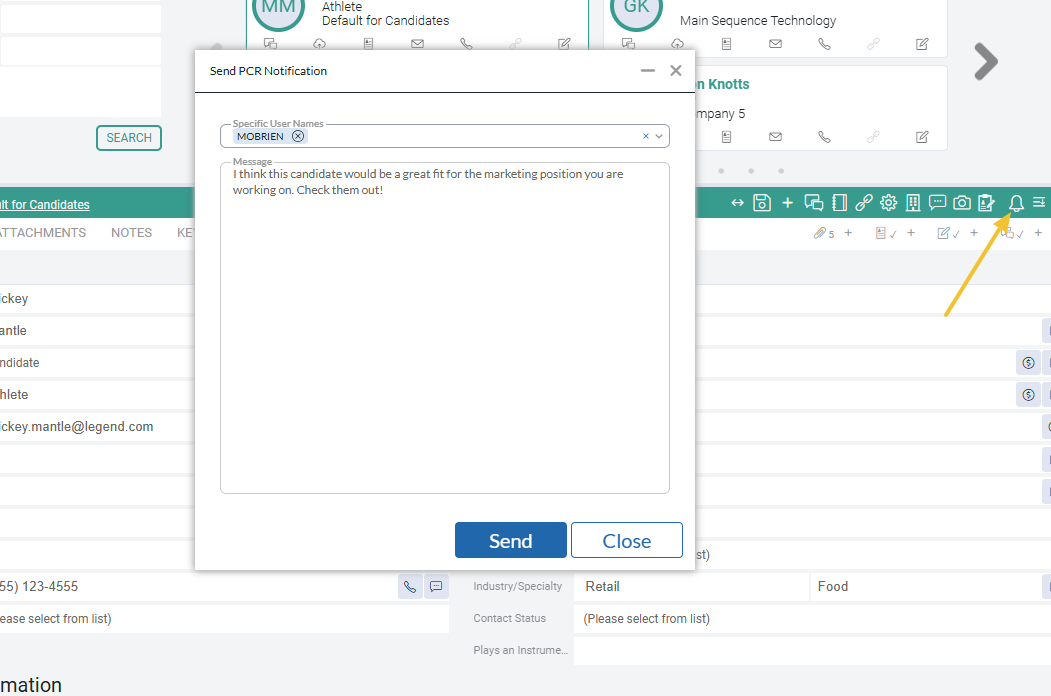
- Click Send
Database Wide Automations #
To set up a PCR Notification that will be applied to the entire database, an Admin user will need to do the following:
- Select System from Main Toolbar
- Select Database Setup
- Select Automations
- Choose an Automation that utilizes the Notification Trigger option (Learn more about Configuring Automations here.)
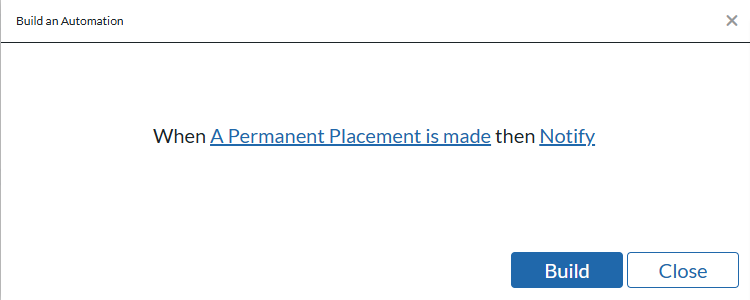
- When configuring the PCR Notification Trigger choose the PCR option from the configuration screen
- Enter the Notification Title
- Enter the desired text of the notification. Note: Using the Insert fields below the text box will pull information from the designated records into the notifications. Where appropriate, these fields will be clickable links to take the user directly to the record being referenced in the notification.

- Choose the User (Someone) to receive the notification
- Click Enable when finished
Rollup Automations #
PCR Notifications can also be triggered when changing a Stage Icon within a Rollup List. To configure this, do the following:
- Select Rollups from the Main Toolbar
- Select any Rollup List
- From the Action Menu, click Configure
- Select the Automation Charm
- Click Add
- Check the option to Warn before running Automation Plan if desired
- Enter a Plan Name
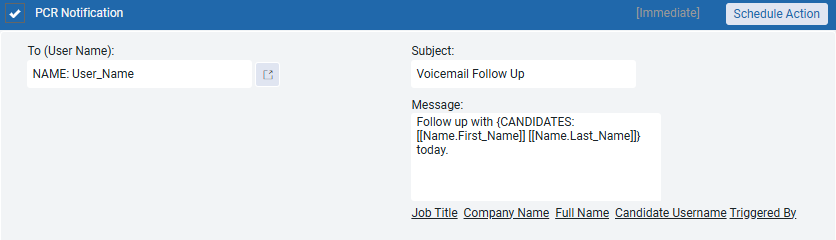
- Expand the PCR Notification section
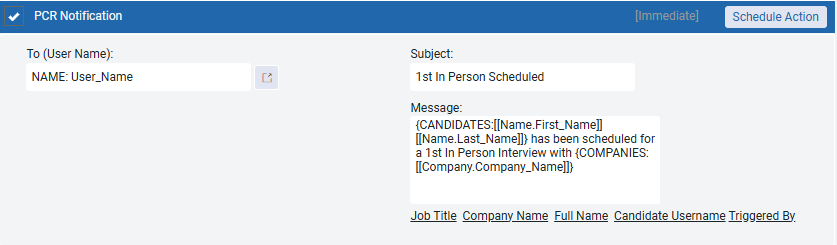
- Select the User to receive the Notification
- Enter the desired Subject of the Notification
- Enter the desired Text of the Notification into the text box. Using the Insert fields below the text box will pull information from the designated records into the notifications. Where appropriate, these fields will be clickable links to take the user directly to the record being referenced in the notification.
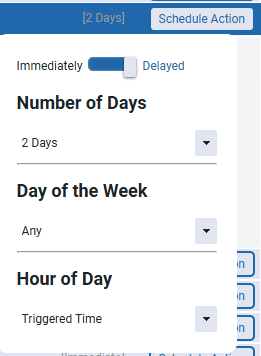
- If Desired, choose Schedule Action to delay this notification for a certain number of Days, until a certain Day of the Week, or a certain Hour of the Day. This means once the stage is selected, the notification will not appear until the delayed condition is met.
- Check the corresponding check box to enable the Automation
- Click Save
Once you have configured your Automation Plan to include a PCR Notification, you need to assign your Automation Plan to a Rollup Stage. Click here to learn about enabling Rollup Stage Automations for your entire database or click here to learn how to enable Rollup Stages per User.
Pipeline Automations #
Setting up a PCR Notification for a Pipeline Automation is very similar to setting up a PCR Notification for a Rollup Automation. Once configured, moving a record into the specified Pipeline Step will trigger the Notification. An Admin user will need to do the following:
- Select System from the Main Toolbar
- Select Database Setup
- Select Pipeline Setup
- From the Action Menu choose Manage Automation Plans (New Pipeline Users – You will just need to choose the “Add Automation Plan” ‘+’ icon for the step you would like to set up a Notification for)
- Click Add
- Check the option to Warn before running Automation Plan if desired
- Use the Selector to choose which Interview Type/Status will trigger this notification (New Pipeline Users – This will already be populated based on your selection in step 4)
- Expand the PCR Notification section
- Select the User to receive the Notification
- Enter the desired Subject of the Notification
- Enter the Message of the Notification into the text box. Note: Using the Insert fields below the text box will pull information from the designated records into the notifications. Where appropriate, these fields will be clickable links to take the user directly to the record being referenced in the notification.
- If Desired, choose Schedule Action to delay this notification for a certain number of Days, until a certain Day of the Week, or a certain Hour of the Day. This means once the stage is selected, the notification will not appear until the delayed condition is met.
- Check the corresponding check box to enable the Automation
- Click Save
Background Errors #
Occasionally you may run into an issue with an error happening in the background of your PCRecruiter database. PCR Notifications will automatically alert you of the issue. This feature is currently available for Email Alias issues and requires no configuration.
Feedback Entered Externally #
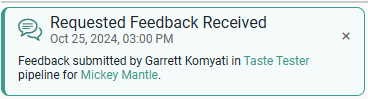
A PCR Notification can be triggered when Feedback is entered via a Candidate Presentation or the Request Feedback screen (New Pipeline Only). To enable these notifications, do the following:
- Select System from the Main Toolbar
- Select Form Letters
- Choose Presentation/Feedback Letters
- From the Action Menu choose Default Settings
- In the “Send Feedback PCR Notification to” section choose to send Notifications to the Sender (The User who sent the Candidate Presentation or the Request Feedback Email), Position User Name, Candidate User Name, or a Specific User Name(s)
- Click Save when finished
Candidate Presentation Viewed/Expiring #
Lastly, PCR Notifications can also be triggered when a Candidate Presentation is Viewed or is soon Expiring. To enable these notifications, do the following:
- Select System from the Main Toolbar
- Select Form Letters
- Choose Presentation/Feedback Letters
- From the Action Menu choose Default Settings
- In the Send Candidate Presentation PCR Notifications section you can enable Notifications for when the Presentation is Viewed or Expiring
- For each section you can choose to notify the Sender User Name, Position User Name, Candidate User Name, or Specific User Name(s)
- Click Save when finished
Viewing PCR Notifications #
Fly-In #
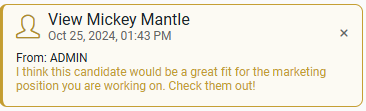
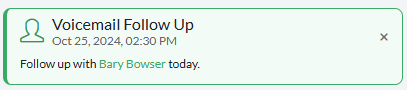
When a PCR Notification is received, it will “fly In” to the bottom right corner of the user’s screen. Clicking a link within the Notification will dismiss the Notification and redirect the user to the linked Record. Once the link has been used, that notification is removed and cannot be retrieved.
If a link is not accessed in the fly in notification after a few seconds, the Notification fly in will be dismissed and the notification can now be accessed in the PCR Notifications Pane.
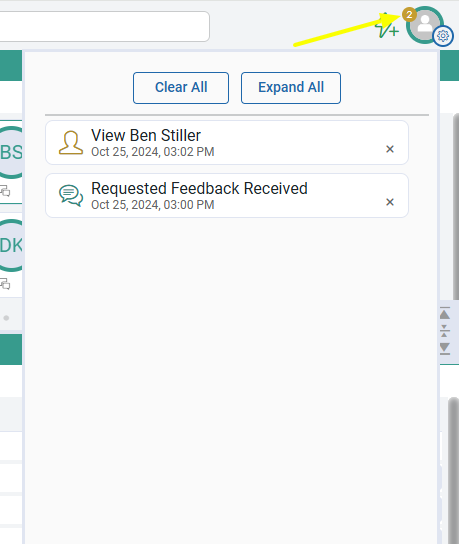
Notifications Pane #
The Notifications Pane can be accessed by clicking the Notification count in the top right corner of the browser. Un-read notifications will remain here for 7 days. Use ‘Clear All’ to empty the list or ‘Expand All’ to open the details for all listed items at once.