PCRecruiter’s Email Opt-In/Opt-Out list stores addresses or domains that have been Opted In or Out of certain mail categories/emails.
When an email address has been opted out, PCRecruiter will skip over that email address when sending corresponding emails.*
- The list stores email addresses only and is not tied to any individual’s name record. This allows addresses to remain opted in/out even if the name is removed and re-added later on; or if there are multiple names with the same email attached.
- If your PCRecruiter account has multiple databases, the same list applies to all databases
- When creating a form letter the “Insert fields” option allows you to include an Opt-Out Link.
- Any email address that has been used as an Email Alias cannot be opted out.
* If the ‘Use Most Restrictive Blocking’ option under SYSTEM has been enabled, PCRecruiter will skip over all emails not explicitly labeled as Opted-In.
Select Mail Categories #
An Admin User will need to choose which Mail Categories are available to recipients when selecting an Opt-Out link from an email.
- Click System from the main toolbar
- Select Email Setup
- Select Bulk Mail Categories
- Uncheck as many options as possible, leaving only those that you are likely to use in your business. When sending a campaign, you will categorize the email based on its content. When someone unsubscribes, they can choose which types of content they still want to receive.
Managing the Opt-In/Opt-Out List #
Access the Opt-In/Opt-Out list (Can only be accessed by Admin users):
- Click System from the main toolbar
- Select Email Setup
- Select Email Opt-In/Opt-Out List
Set the Storage Location #
Before using the Opt-Out/Opt-In feature, you need to choose a “Piggyback” database. This database contains your list data and is connected to any other databases on your account. All databases will share the same master list, so typically, the “Piggyback” database should be your main database or the one you use most frequently.
If your account does not have a selected database, or if you need to change the database, please contact support@mainsequence.net for assistance.
View List #
The list will display any Email Addresses that have opted In/Out of your Emails. The features of this table include:
- Filter: Limit the table view to Opt-in or Opt-out only.
- Search: Search the list for a specific email address.
- Action:
- Delete: Remove Email Addresses from the Opt-In/Opt-Out List entirely.
- Edit: Change the subscription details for a the selected email address, including their ability to receive individual emails and their on/off status for inclusion in Bulk Categories.
- Email Address: Displays the Email Address or Domain listed.
- Status: This column indicates whether users can send non-automated, individual emails (i.e. clicking the email icon on a Name record) to this address.
- Categories Opted-In: Lists the Mail Categories the Email Address has been opted into for non-individual emails. If this column is empty, that email address will be excluded from all categories of Campaigns / Bulk Emails.
- Expire Date: The Date an email address will automatically be removed from the list.
- Method: Indicates how or why the email was listed. Typical values include:
- Self: The owner of the Email Address selected an Opt-In/Opt-Out Link and chose which emails they would like to receive
- User: Added to the list by a PCR User manually.
- Bounce: Email was automatically opted out due to a bounce message coming back to an IMAP-connected inbox.
The action buttons along the bottom of the panel include:
- Export: Produces a .csv file that contains the User Name, Date Entered, Status, Email Address, Expiration Date and Method
- Import: Allows you to add an entire Rollup List or a .csv file to the List. Select your list or file and then choose your Opt-In/Out Options.
- Add to Rollup: Searches the database for any names which contain email addresses on the list and then adds the names to a rollup list of your choice for further action (Ex. Modification or Deletion)
- Add Email: Manually add an Email Address to the Opt-In/Out list. Enter the Email Address, Expiration Date (They will automatically be removed from the list at this time), Choose the Status Note: Manually Adding an Email to the List does not allow the user to choose Categories to be opted in and out of.
View/Edit Subscription from Name Record #
If the “Allow Users to Edit Candidate Email Subscriptions” option has been enabled under System, users will also be able to access the opt-in/out settings for an individual Name record.
The icon will appear at the right side of the Email Address field.
- Triangle/Arrow: Email address does not appear in the Opt-in/Out table. No status has been recorded.
- Circle with Checkmark: Email is opted in.
- Circle with X: Email is opted out of all email.
- Stack with Line: Email can be sent individual emails, but cannot be included in any bulk/automated email send.
Click on the icon to access the Email Opt-In popup:
- Opt-In / Out / Out Bulk: Set the status for this email.
- Expires: Set a time limit for this opt-in.
- Method: Indicates the Method to store for this opt in / out.
- Details: Add any notes regarding this status change.
- “Last Edited”: At the bottom of the panel, the date and user for the most recent subscription change are shown.
Define the Text for Links and Confirmations #
When creating a Form Letter, you will use the “Insert Fields” option to merge the Opt-In/Out links in to your letters. The text of the link and the messages that appear after it has been opened can be configured as follows:
- Click System from the main toolbar
- Select Form Letters
- Choose Name Letters
- From the action toolbar, choose Default Settings to define options that apply to all emails sent from this database:
- Link Text: Use this field to define the text of the link as it should appear in your letters (Ex. Click here to unsubscribe)
- Confirmation Text: Use this field to define the text which the recipient sees once they have clicked the link.
- The Resend Options use the Activity log on a Name as a check before sending the email to prevent a recipient from receiving the same email multiple times.
- Click Save
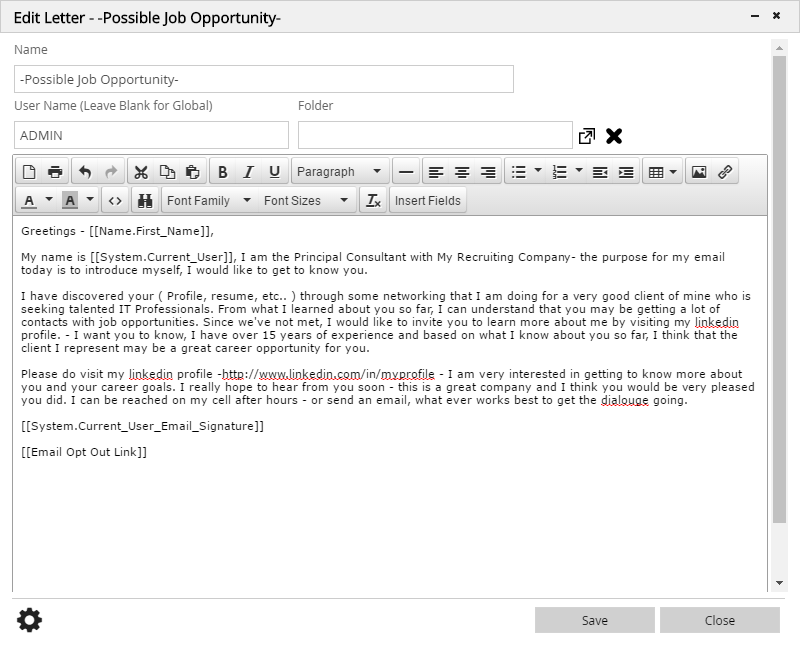
Insert the Link in a Form Letter #
The “Insert Fields” button when creating/editing Form Letters includes an option to insert “Email Opt Out Link” to any letters. When inserted, the email will provide the recipient with a link they can click to opt out of emails or manage their subscription (Category) settings for their email address.
To learn more about creating Form Letters, click here.
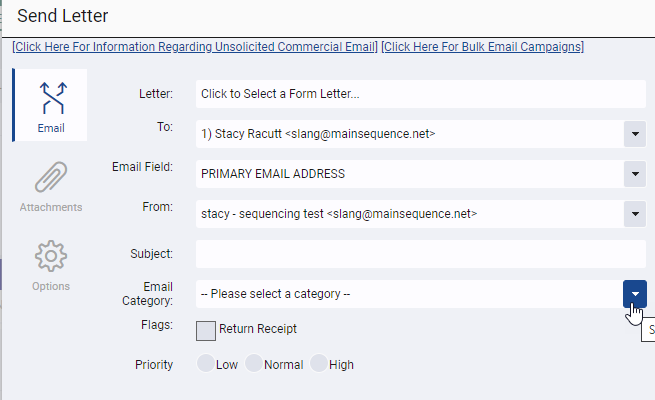
Sending an Email #
When sending an email from the Legacy Bulk Email, Mail Campaigns or PCRecruiter Sequencing Feature you will see an option to select an Email Category from a dropdown. You must select an option from this dropdown to send the email.

Opting In/Out as the Email Recipient #
Once the recipient receives the email, they can click the link to modify how they are opted in/out of letters from your database. If the recipient enters their email address and clicks “Confirm” they will only be opted out of the Category that was selected for the letter that was sent (Listed at the top of the confirmation screen). They can select Subscription Preferences to further manage their settings. Check marking a Category will opt them in, while unchecking a Category will opt them out of the Category.
Other Details #
- If you use PCRecruiter Portal for MS Outlook, note that Outlook follows its own mail sending rules. The Opt-In/Out settings are only adhered to when sending mail through PCR rather than Outlook itself.
- If you use PCR with IMAP, only emails sent from the PCRecruiter interface will be filtered through the Opt-In/Out list
- The Opt-In/Out list will affect Legacy Bulk Email, Email Campaigns and Sequences.
- Form more information on restrictions and regulations regarding bulk emails, please consult with your email provider and local regulations.