Candidate Presentations streamline the process of sharing candidate information by offering a customizable link-based approach. Instead of traditional email attachments, you send a secure link that recipients can use to access comprehensive candidate details, including field data, resumes, attachments, and a tailored write-up.
This feature provides control over link expiration and document download permissions, allowing you to manage information accessibility efficiently.
On the client side, recipients can conveniently leave feedback on candidates within the platform, triggering notifications for improved communication.
Click here for a step by step interactive course on presentations. Don’t have a login? Contact your administrator or reach out to PCRecruiter support for assistance.
Enabling Candidate Presentations #
The Candidate Presentations Security options can be accessed by a system administrator by following these steps:
- Select System from the main toolbar
- Select Users
- Select Manage Users
- Choose the user you would like to modify presentation security for
- Choose the Security charm on the left
- Open the Other tab
- Locate the two Presentations Securities
- Presentations
- Read Only: Allows users to see what presentations have been sent and view any feedback that has been submitted when viewing the corresponding records.
- Send, Edit: Users with this permission are able to view presentations and feedback as listed above. This setting also allows a user to send a presentation and edit the presentation settings such as expiration date.
- Templates, Send, Edit: Also considered ‘Full Permission’ for Presentations. Users with this setting will have the above permissions but can also create/modify presentation templates.
- Presentation Overall List
- Full Permission: Allows users to access the list of all presentations and feedback; this is accessed via the system menu.
- No Permission: Blocks users from accessing the list of all presentations and feedback. Note: This only disables accessing the information from the system menu. The user will still be able to view the filtered details on the corresponding records.
- Presentations
- Click Save.
Presentation Letters #
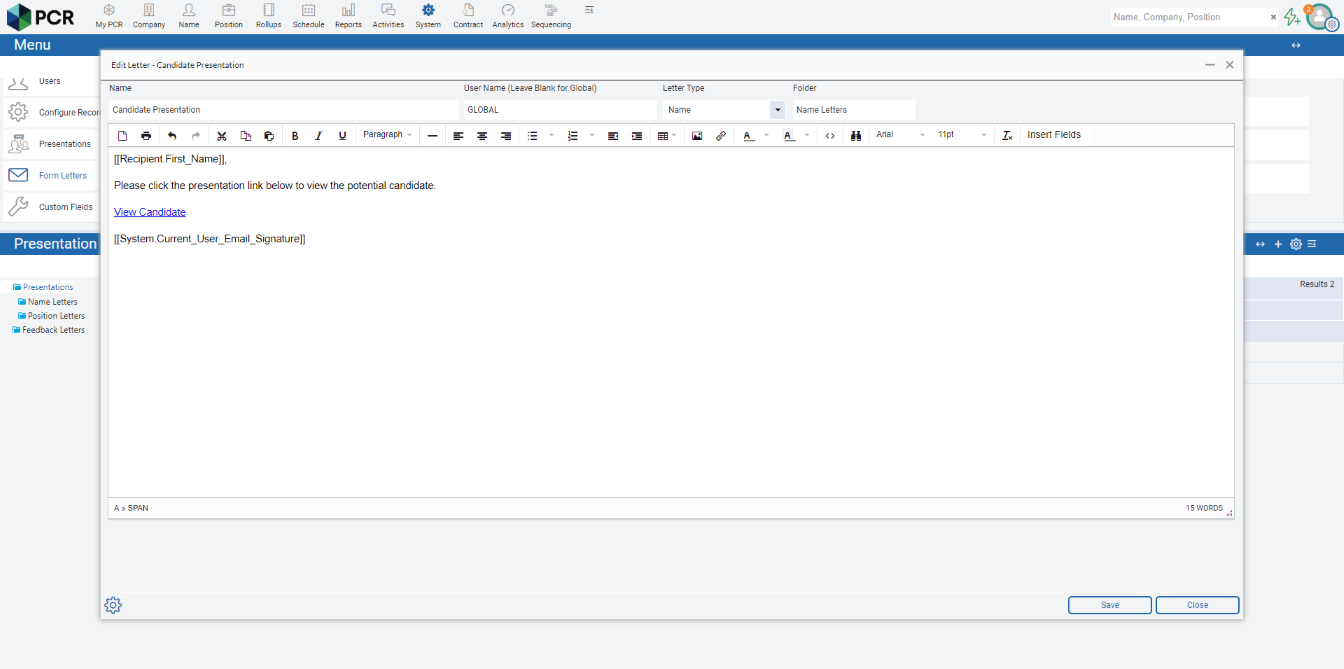
Presentation Letters, though not mandatory, provide a convenient template for presenting candidates. Alternatively, if you prefer not to create a presentation letter, you have the flexibility to compose your presentation email on demand.
- Select System from the main toolbar
- Choose Form Letters
- Choose Presentation/Feedback Letters
- Select Add Letter
- Enter a Name for your letter (This will auto populate as the subject of your email when sending)
- Leave as your username or change to a global letter if desired
- Choose the Letter Type:
- Name: Can be sent from a name record, name rollup list, or name search results
- Position: Can be sent from a pipeline and allows you to insert fields in relation to the Position record and Company Record
- Enter the email body into the text box (this can be edited prior to sending)
- Use Insert Fields option to enter the following: Recipient First or Last Name, System fields (Username, Date, Signature, etc), and any profile link.
- As stated above, if you are creating a position letter you can include position details in your form letter.
- Use the Presentation Link insert field to include the link to the presentation – this is mandatory as it is how the recipient will access the candidates being presented.
- Save when finished

Presentation Templates #
To begin using Candidate Presentations, an admin user must configure at least one presentation template (We have added a few to get you started allowing you to skip this step and revisit it if needed). This template will then become available to all users who can then utilize the template to present candidates (Note that most selections can be modified upon sending the Candidate Presentation). To access your Presentation setup do the following:
- Select System from the main toolbar
- Select Presentations
- Choose Candidate Presentation Templates
Presentation Settings #
The Presentation Settings control the basics of your presentation; including design, automations, and expiration.
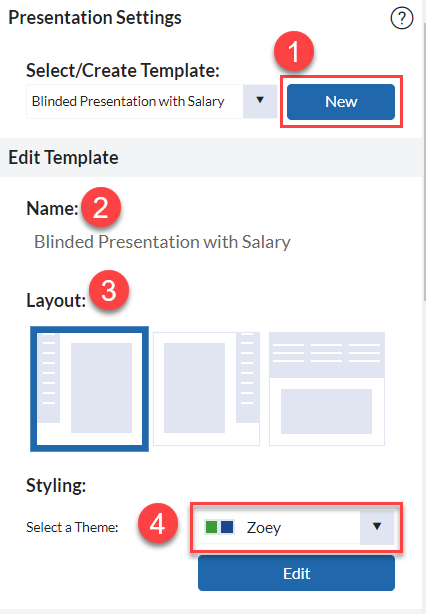
- Select a Template to modify or choose New to create a new template
- If you have chosen to create a new template, enter a Template Name
- Choose one of the 3 available layout options:
- Side by side with field data on the left
- Side by side with field data on the right
- Up and down
- Use the theme selector to select the theme you would like to use for your template; this will automatically apply a color scheme to your presentation. (Themes can be customized using CSS. Contact support if you would like pricing on customizing the available theme colors.)
- Aero
- Kona
- Tito
- Tucker
- Zoey

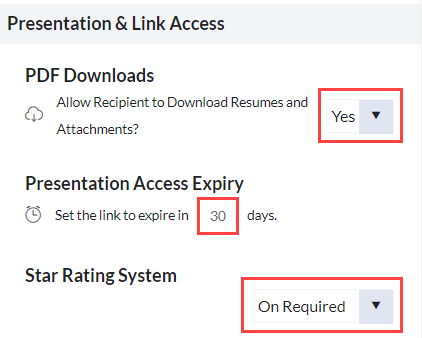
- Presentation and Link Access: Sets the number of days until the link expires. When a presentation is sent, the number of days will commence. Once the length of time expires, the presentation will no longer be accessible. If desired, an email will be triggered on ‘X’ days prior to expiration. Just be sure to enter or select the email address you would like the notification sent to in the Notifications and Pipeline Automations area.

- Notifications and Pipeline Automations: This area is used to trigger email notifications and automatically conduct pipeline movement upon a recipient opening and providing feedback for a presented candidate.
- Input Email: There are two input email fields; these fields are used to trigger an email notification when a presentation is viewed or feedback is provided on a particular candidate. Upon these actions happening, the email is triggered according to the email address that has been entered.
- Select Email: Choose the Sender Username, Position Username, and/or Candidate Username to be notified when the action takes place. Note: Position Username is only available when sending from a Pipeline. And if a candidate applied via your job board there is no active username assigned unless a user manually modifies the field.
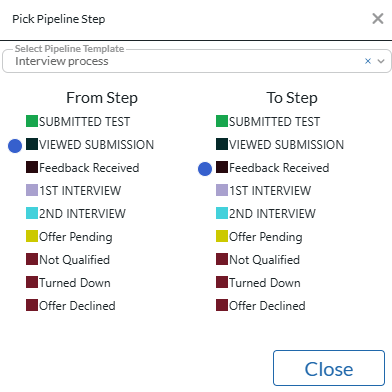
- Pipeline Automation: These are also triggered by a presentation being opened or feedback being submitted. If you decide to utilize this feature you will need to make one of two selections: Select a ‘To’ interview status: When a presentation is opened or feedback is submitted for a candidate the candidates is then moved ‘to’ the selected interview status. (Note: If the candidate has already been moved to the selected interview status they will not be moved to the status a second time).
- Select the ‘From’ and ‘To’ pipeline steps: When both a ‘From’ and ‘To’ are selected the candidate will be moved to the ‘To’ pipeline step only if they currently reside in the ‘From’ pipeline step (Ex. When sending a candidate presentation, you move all of the presented candidates to “Candidate Submitted.” Once a hiring authority provides feedback, the candidate is automatically moved to “Feedback”. If they have been moved to “Phone Screen” in the meantime, they would remain there”.


Design Window #
The design window (Viewing pane to the right) is used to control the candidate data displayed when being presented. This includes field data, resumes, profiles, and attachments.
- Select your header: You may either drag and drop an image into your header, or click to select an image.
- Click the Show Toggle on or off to display/hide the candidate names from the presentation, this will only show when multiple candidates are selected.
- Selected Fields: In the fields column, drag and drop Available Fields to Selected Fields. The Selected Fields will be displayed when the candidate presentation is sent.
- Documents: There are numerous document types that can be included in your presentation. To add them, select ‘Add Section’, name the section, and then choose your document type:
- Resume: Choose the Current Resume or Blinded Resume (Learn how to create a Blinded Resume here)
- Global Attachments: Choose Attachment, then select the attachments you wish to include
- Profiles: Choose Attachment, then select the profile you would like to include. Once you select the profile a dropdown will appear to the right. This dropdown has two options: Only if Completed and Attempt to Generate. If you choose Only if Completed, the profile will only be included for candidates who have the specified profile completed for their record. If you select Attempt to Generate, the profile will be generated using the linked fields on the profile (Learn more about Linked fields here).
- Candidate Specific Attachments: Unique attachments can be added to an attachment section during the sending process.
- Once the presentation template is completed, you can click the ‘Preview Presentation’ button to review the template format.
- Don’t forget to Save the Template when finished.

