The most recent updates to the PCRecruiter 9 software will be posted here. These will be organized based on the month of the update. The list below will focus only on new features and UI changes and does not include regular maintenance or software patches which we roll out regularly.
***Please note that Self-Hosted databases will not reflect these updates right away. If you wish to inquire about receiving these updates please reach out to your account representative or the Support team***
The Week of April 28th 2025 #
The update pushed in April of 2025 came with several changes as well as general bug fixes. The biggest difference is the switch to the new “Rounded Look” for fields and icons throughout the sooftware. This theme redesign gives the database a cleaner look and feel. In addition to this users can now utilize the automatic search resize feature, freeing up more spece on your screen when looking through lists and searching for records. Both of these are optional and can be turned on or off in your theme settings.

New Rounded Fields #
In your theme settings there has been an option added to utilize the rounded look for all PCR fields. These fields replicate the fields used inside of the New Pipeline. The new fields save you space and are easier to view when navigating within the database. Please note that this is an optional feature and must be changed manually, you will continue to have the classic look be default.
Automatic Search Resize #
Searching in PCR now has a more intuitive option to help save space on your screen when viewing search results. After being turned on from your theme settings, anytime a user navigates to a list view the lower pane of the PCR screen will automatically minimize to allow for a full screen view of the list. Once a record has been selected the lower pane will open again displaying the record selected from the list. Please note that this is an optional feature and must be changed manually, you will continue to have the legacy search behavior be default.
The Week of March 17th 2025 #
The update pushed in March of 2025 came with several changes as well as general bug fixes. For Company records we have split the Email/WWW Address field into 2 separate fields for each field type. The new fields are labeled Email and Website but need to be manually added to existing user layouts. All information in the old field are stored in the database and will migrate to the new fields. Please note that older records may display a URL value in the new Email field. More details can be found below.
- Configure Company Record Layout
- Configure Company Search Results Layout
- Configure Company Rollup List Layout
- Indivdual users may not have the permissions to configure their layouts. To give them permissions click HERE or follow the instructions below to apply the change to their account.
- Copying Company Configurations to all Users (Admin Only)
- Moving existing URL values to the new field
New Email/Website fields for Company records #
We have added two new default fields for Email and Websites for Company records inside of your database. The previous field ‘Email/WWW Address’ will still display on your existing layout but needs to be replaced with the new fields. The legacy field will also not be available when making layout adjustments in the future. Any previously stored values will display by default in the new Predefined Email field. There are instructions below for this process. Please note that some users may not have access to this, please reach out to an Admin user if the customize option is not available to you. For additional information on customizing layouts click HERE.
Individual User Company Record Layout Change #
- Navigate to a Company record on your layout.
- In the task bar on the record, click the customize icon, which is displayed as a gear symbol. (If this is not pinned click the more options icon.)
- From this screen click on the ‘Email/WWW Address’ field and click Delete Field button to remove it from your layout. This must be done before adding the new predefined fields.
- At the bottom of the field list click ‘click to set field’ and select Predefined: Email Address from the Dropdown.
- Finally, repeat to add the Predfined: Website field to the layout.
- Click Save.
Individual User Company Search Results Layout Change #
- Select Company from the main task bar.
- In the search task bar on the upper pane, click the customize icon (Gear symbol). (If this is not pinned click the more options icon.)
- Click on results page on the lefthand side of the window.
- If the ‘Email/WWW Address’ field exists in the search result lists click on the field and select Delete to remove it from your layout. This must be done before adding the new predefined fields.
- At the bottom of the field list click ‘click to set field’ and select Predefined: Email Address from the Dropdown.
- Finally, repeat to add the Predfined: Website field to the layout.
- Click Save.
Individual User Company Rollup List Layout Change #
- Select Rollups from the main task bar.
- Open any Company Rollup by clicking the number below the Company column.
- In the Rollup list task bar click the customize icon (Gear symbol). (If this is not pinned click the more options icon.)
- If the ‘Email/WWW Address’ field exists in the Rollup List Fields layout, click on the field and select Delete to remove it from your layout. This must be done before adding the new predefined fields.
- At the bottom of the field list click ‘click to set field’ and select Predefined: Email Address from the Dropdown.
- Next repeat to add the Predfined: Website field to the layout.
- Click Save.
Copying Layout to all Users #
If you are an Admin user and wish to apply this change for all your users please follow the instructions below. More detailed ifnormation on copying user settings can be found HERE.
- Follow the above instructions to adjust your layout.
- Click on System>Users>Copy User Settings.
- Select your Username from the ‘Source User Name’ dropdown. (You need to be set as a Model user to be present here. Instructions for this can be found below.)
- In the System menu click Users>Manage Users.
- Select your Username.
- Make sure the Model User dropdown is set to Yes under the ‘Security information’ section.
- Click save and repeat the above steps.
- Under the ‘Name, Company, Position Records header check the Company box under the Record/Search Layout Column.
- If copying Rollup List settings, check the Rollup List Layout box under the Rollup Lists header.
- Ensure no other boxes are checked.
- Select the appropriate users from the righthand side of the window and click Save to apply these changes.
- Please note that this will adjust the Layouts for both Company records and Company search results to reflect your current layout for all users selected. If you do not wish to replace this layout please have the user manually follow the above steps.
Moving URL values to the correct field #
Please note that for Company records added before the update both URL and Email values previously stored in the Email/WWW Address field may be displayed in the new Email field by default. Any existing URL values in the new Email field will need to be manually copied over to the newly added predefined Website field. Any values added to the legacy field after the update will be correctly routed to the appropriate field. The Email/WWW Address field can no longer be added to your layout but will need to be removed from existing User layouts.
- Adjust your layout following the above instructions.
- From the Company record you should now see both the Email and Website fields on your layout.
- If a URL exists in the new Predefined Email field, move this value over to the newly added Website field.
- Click save.
If you are experiencing any issues or have additional questions please reach out to Support for assistance.
The Week of December 16th 2024 #
The update pushed in December of 2024 came with several changes and a new integration announcement. The new Integration is with Quil, an AI notetaking software. A new theme option has been added that contains a redesign of the fields inside of the database, which reflect the fields inside of the New Pipeline, Sequencing, and Automations features. We have also added an Expanded search feature which will automatically minimize and mazimize the lower PCR pane when viewing various lists inside of the DB.
New AI Notetaking Integration via Quil #
We are also announcing our newest integration via Quil, which is an AI tool that automatically generals a script of video meetings, phone calls, or in-person interviews and records this information inside of the notes section of the Candidate record. For more information check out our Blog Post.
New Rounded Field Option #
In your theme settings there has been an option added to utilize the rounded look for all PCR fields. These fields replicate the fields used inside of the New Pipeline. The new fields save you space and are easier to view when navigating within the database. Please note that this is an optional feature and must be changed manually, you will continue to have the classic look be default.
Automatic Search Resize #
Searching in PCR now has a more intuitive option to help save space on your screen when viewing search results. After being turned on from your theme settings, anytime a user navigates to a list view the lower pane of the PCR screen will automatically minimize to allow for a full screen view of the list. Once a record has been selected the lower pane will open again displaying the record selected from the list. Please note that this is an optional feature and must be changed manually, you will continue to have the legacy search behavior be default.
The week of October 28th, 2024 #
The update pushed in October of 2024 came with adjustments to the PCR notifications for popup notifications with certain features, such as our RingCentral phone integration. We are also announcing our newest phone integration via Zoom, users with paid Zoom accounts will now have access to a direct integration for dialing out of PCR (SMS is not currently supported by Zoom). Additionally, this update contains a redesign of some of the fields within the software, such as those found in the New Pipeline or Advanced Sequencing Features. Finally, we have extended the delay time that can be set for Automations. Below are the details and instructions regarding these changes.
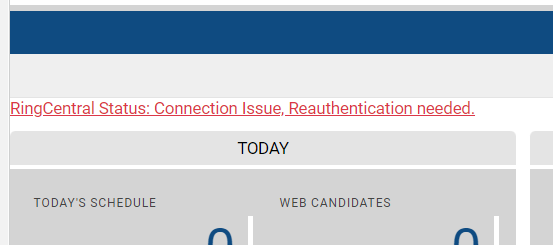
RingCentral Reauthentication #
Due to a recent change from RingCentral, all RingCentral accounts setup in PCRecruiter need to be authenticated to continue using click to dial and activity writing functions. Users will need to login to PCR and do the following:
1. Select MyPCR from the Main Toolbar
2. Click “You are not authenticated with RingCentral, click here to login”
3. Sign in to RingCentral Account
4. Authorize
If you need additional help click here for a step by step tutorial.
If you want to send out instructions to your users feel free to copy this message below.
To connect your RingCentral settings the user can authenticate their account via the MyPCR screen
- Select MyPCR from the Main toolbar
- Select “You are not authenticated with RingCentral, click here to login.”
- Enter your Email or Phone number that is associated with your RingCentral account (or utilize one of their SSO options)
- Click Next
- Enter your RingCentral Password
- Click Sign In
- Click Authorize
Launcher No Longer Needed for PCR popup Notifications #
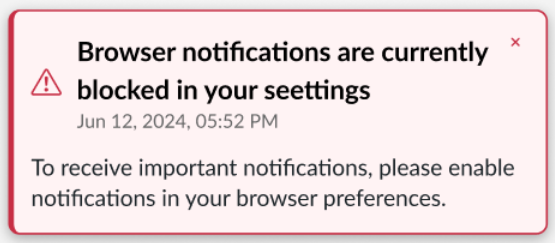
We are excited to announce that you will not need the PCR launcher for CallerID notifications, such as the notification for incoming calls with the RingCentral or Zoom integrations. These notifications will now come directly through your Chrome browser. In order for these notifications to be enabled you will need to follow the steps below.
Please note that this needs to be done regardless of your use of these integrations as other push notifications will be sent out in the future.
Browser notifications in Chrome must be set to allow notifications in your settings. Click HERE for instructions on turning on browser notifications. If your settings are already turned on or you do not get the red notification below you can skip this step.
- When logging in to a database for the first time after the update that will receive a PCR notification that prompts them to enable those notifications within Chrome.
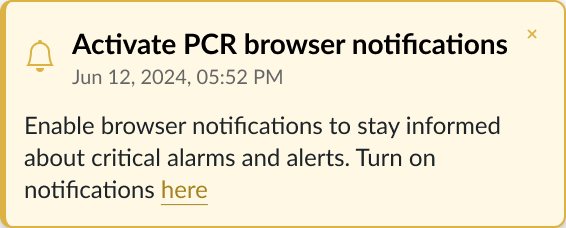
- Click on the link in the notification to prompt the Chrome Browser to enable notifications from PCRecruiter.

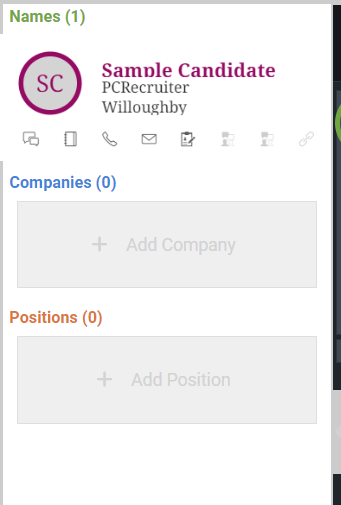
- Click allow to enable Chrome Notifications on the PCR webpage. This will allow you to receive notifications in the browser from PCR, such as the CallerID popup notification from RingCentral when an incoming call occurs.
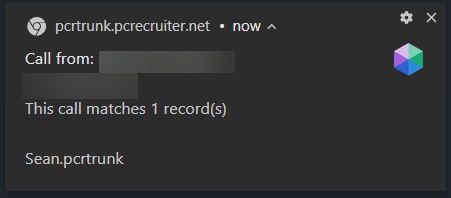
- For the RingCentral integration, if you click on these notifications a PCR screen will open which displays any records with a matching phone number in your database, allowing you to quickly navigate to their record or to add a new record with that phone number to your database.
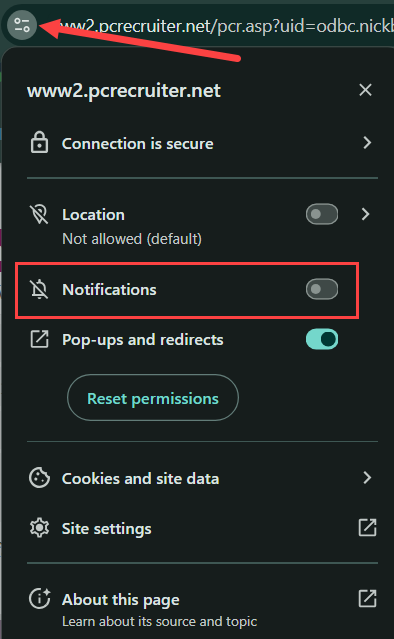
Notification Troubleshooting #
- Browser notifications in Chrome must be set to allow notifications in your settings. If your settings are set to block notifications then you will see the PCR notification below. Click HERE for instructions from Google.
- If you accidentally dismiss this notification or do not see it pop up in your browser you can also click the “View Site Information” icon to the left of the URL at the top of the browser window from any PCR page and select the toggle to turn on these notifications.
- If notifications have been enabled and you are still not receiving the RingCentral CallerID notifications, you may need to adjust your previous settings from your RingCentral app using the following directions.
- Open your RingCentral app.
- Click Settings.
- Choose Phone.
- Scroll down to the General section.
- Disable the toggle for the ‘Launch an external app or website for incoming calls’ function.

Zoom Phone Integration #
The Zoom Phone integration allows for users to set up Zoom as their auto dialer for use inside of your database. This will act as a direct integration for all calls prompted within the system.
The integration will write incoming and outgoing call activities for calls triggered directly from your Zoom app or when using the click-to-dial option inside of the PCR application.
Please note that the phone number being called must be on a record in PCR in order for the activities to be written automatically.
At this time, Zoom only supports voice dialing out of PCR and not SMS integrations.
The Zoom integration also requires the above notification setup instructions for incoming call notifications. For specific details regarding the full setup instructions and functions of this integration, Click HERE.
New Field Design #
The new fields have been adjusted to save space in various screens to maximize the ability to quickly view information. Below is an example of these redesigned fields.
- While these new fields are not in every area of PCR they can be found in the following areas of your database.
- Quick Search
- Notes
- Feedback
- New Pipeline
- Presentations
- Advanced Sequencing
- Automations
- PCR Notifications
Automation Timeframe Extension #
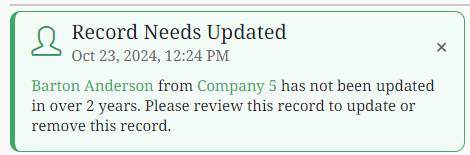
Automations containing a [Number of Days] setting were previously restricted to a maximum value of 365 days (1 year) before or after an action was taken or date field was reached. We have now extended this limit, allowing users to set a value of up to 730 days (2 years). These automations can be leveraged to take the burden of manually checking records or reaching out to previous contacts in your database, which can save you time and more importantly money.
This delay can assist with database upkeep by notifying users of records that have not been updated for over 2 years, such as the example below. Once the user has been notified they can review the information on the record. From here they can determine if that information is up to date and either attempt to find current contact information or to remove the record if it is no longer relevant.
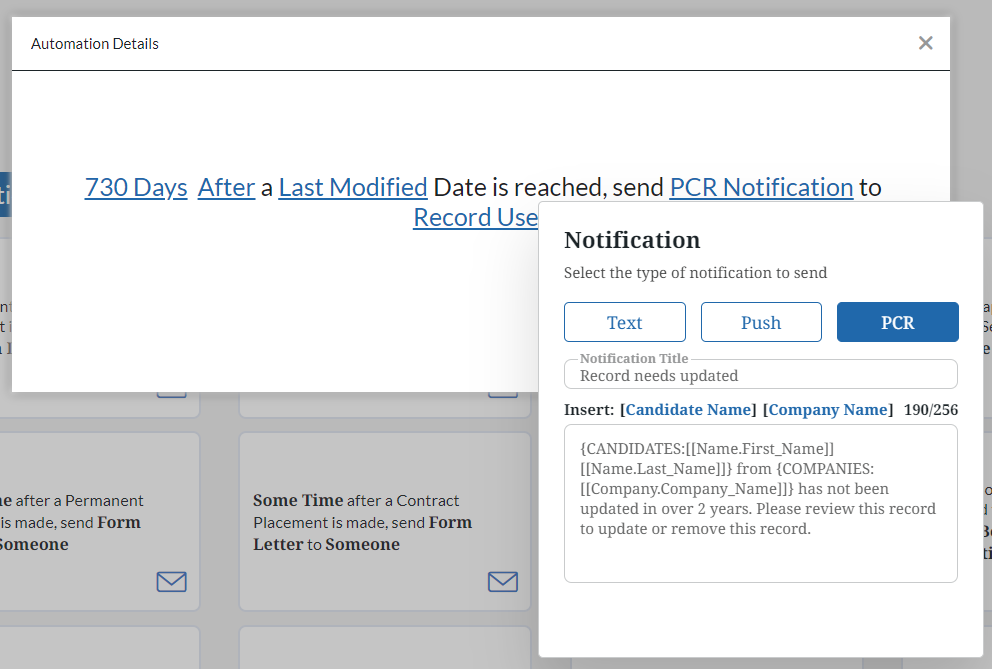
The notification that is populated has clickable links for the record insert fields added to the automation which allow the user to quickly jump to that record.
Some other examples below are helpful automations which can be leveraged for database maintenance or organization. Automations have a wide range of capabilities so these are just a few examples.
- 730 days after a last modified date is reached then add to rollup. (Rollup for outdated records)
- 730 days after a Last Activity date is reached then send Form Letter to Record Email. (Form letter could be a check in with the name record to see if they are looking for new opportunities).