Table of Contents
One of the key advantages of the Custom Name Report, as compared to the standard Summary or Detail Name Reports, is that you have full control over the selection and order of the fields to be displayed in the export. With this report, you can include:
- Predefined and Custom Name Fields
- Text from the Resume, Summary, and Keywords.
- Fields from the company record associated with the name.
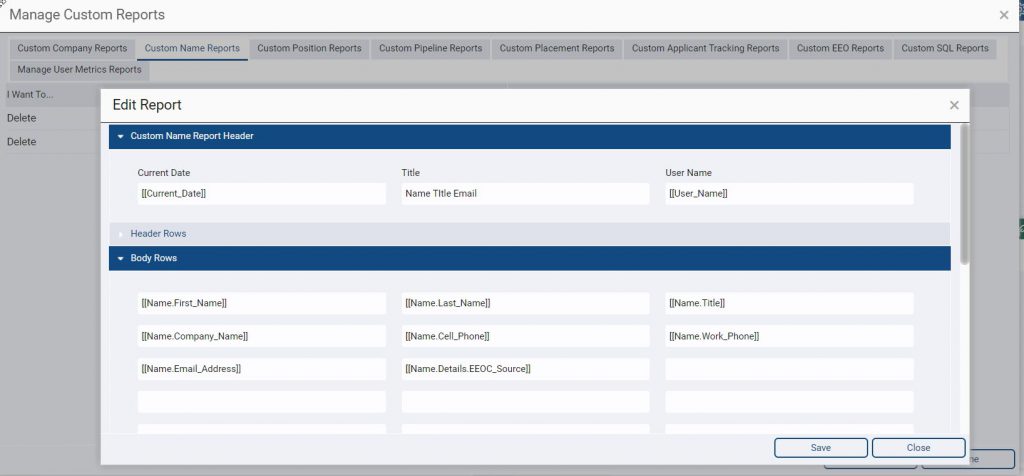
Creating a Custom Name Report #
- Click “Reports” on the main toolbar.
- Click on the “Manage Custom Reports” action icon.
- Click on the “Custom Name Reports” tab.
- Click the “Add” button to create a new report.
- In the “Custom Name Report Header” section, replace the placeholder [[Report Title]] with your desired report name.
- Choose fields for inclusion in the Body Rows section:
- Click on the first cell and select the field you want to include in your report.
- Continue selecting fields from left to right and row by row. You can choose up to 24 fields, giving you control over the data to be displayed.
- Customize Header Rows:
- As you select a field, the field name will populate the Header Row cells. For example, you can change the header from “Company_Name” to “Client.”
- Use Field Groups (Optional)
- In the “Field Groups” section, you can display a list of unique values for the selected field and a count of records with each unique value. For example, you can choose the “EEOC_Source” field to provide a breakdown of the number of records associated with each unique source.
- Include Totals (Optional)
- In the “Totals” area, you can include a count of how many records contain data in the selected field. For instance, you might use this to count the number of names included in the report if all name records have a value.
- Save your Custom Name Report:
- Once you’ve made all your selections and configured your report to your satisfaction, click “Save.” Your custom report will be accessible in the “Name Reports” section under the Reports menu.
Generating a Custom Name Report #
- Click “Reports” on the main toolbar.
- Navigate to “Name Reports.”
- Choose the specific report by clicking on its name.
- Limit your report by either Name Rollup or Date Entered.
- Use the Order By dropdown to select the field for sorting, and specify whether it should be in ascending or descending order.
- Access the action menu and opt for your desired export format (Note: Export options beyond PDF View Mode depend on your Export Reports security setting).